DBLab tutorial for any PostgreSQL database
DBLab Engine is used to boost software development and testing processes by enabling ultra-fast provisioning of databases of any size.
Use the PostgresAI Console for an easy and quick installation of DBLab. Following the steps below, in a few minutes, you will get:
- A single DBLab Standard Edition (DBLab SE) installed in your infrastructure (PostgresAI does not have access to it)
- Additional components such as monitoring
- Ready-to-use, well-tested, vendor-supported Postgres images for DBLab that are compatible with your source databases located in popular managed Postgres services like RDS, CloudSQL, Supabase, and Heroku
- A DBLab SE subscription with guaranteed vendor support
Using this tutorial, you can set up DBLab on your AWS account:
- Make sure you have an AWS account. If you don’t, sign up for one.
- We'll be using a small instance for this tutorial: 2 vCPUs and 8 GiB RAM. It'll cost you about $0.20 every hour (total, sum for both AWS resources and DBLab SE subscription; see Pricing).
- If you're using a different cloud service or you already have hardware, that's okay. You can still use this guide. Just tweak the steps a bit to fit your setup.
Any database is compatible
DBLab supports instant cloning and database branching for source Postgres databases located anywhere:
- Managed Postgres services such as AWS RDS, Google CloudSQL, Heroku Postgres, DigitalOcean Postgres, Supabase, Timescale Cloud, and others
- Any self-managed Postgres, either cloud-based or on-premises
- Postgres-compatible database services such as Amazon Aurora PostgreSQL
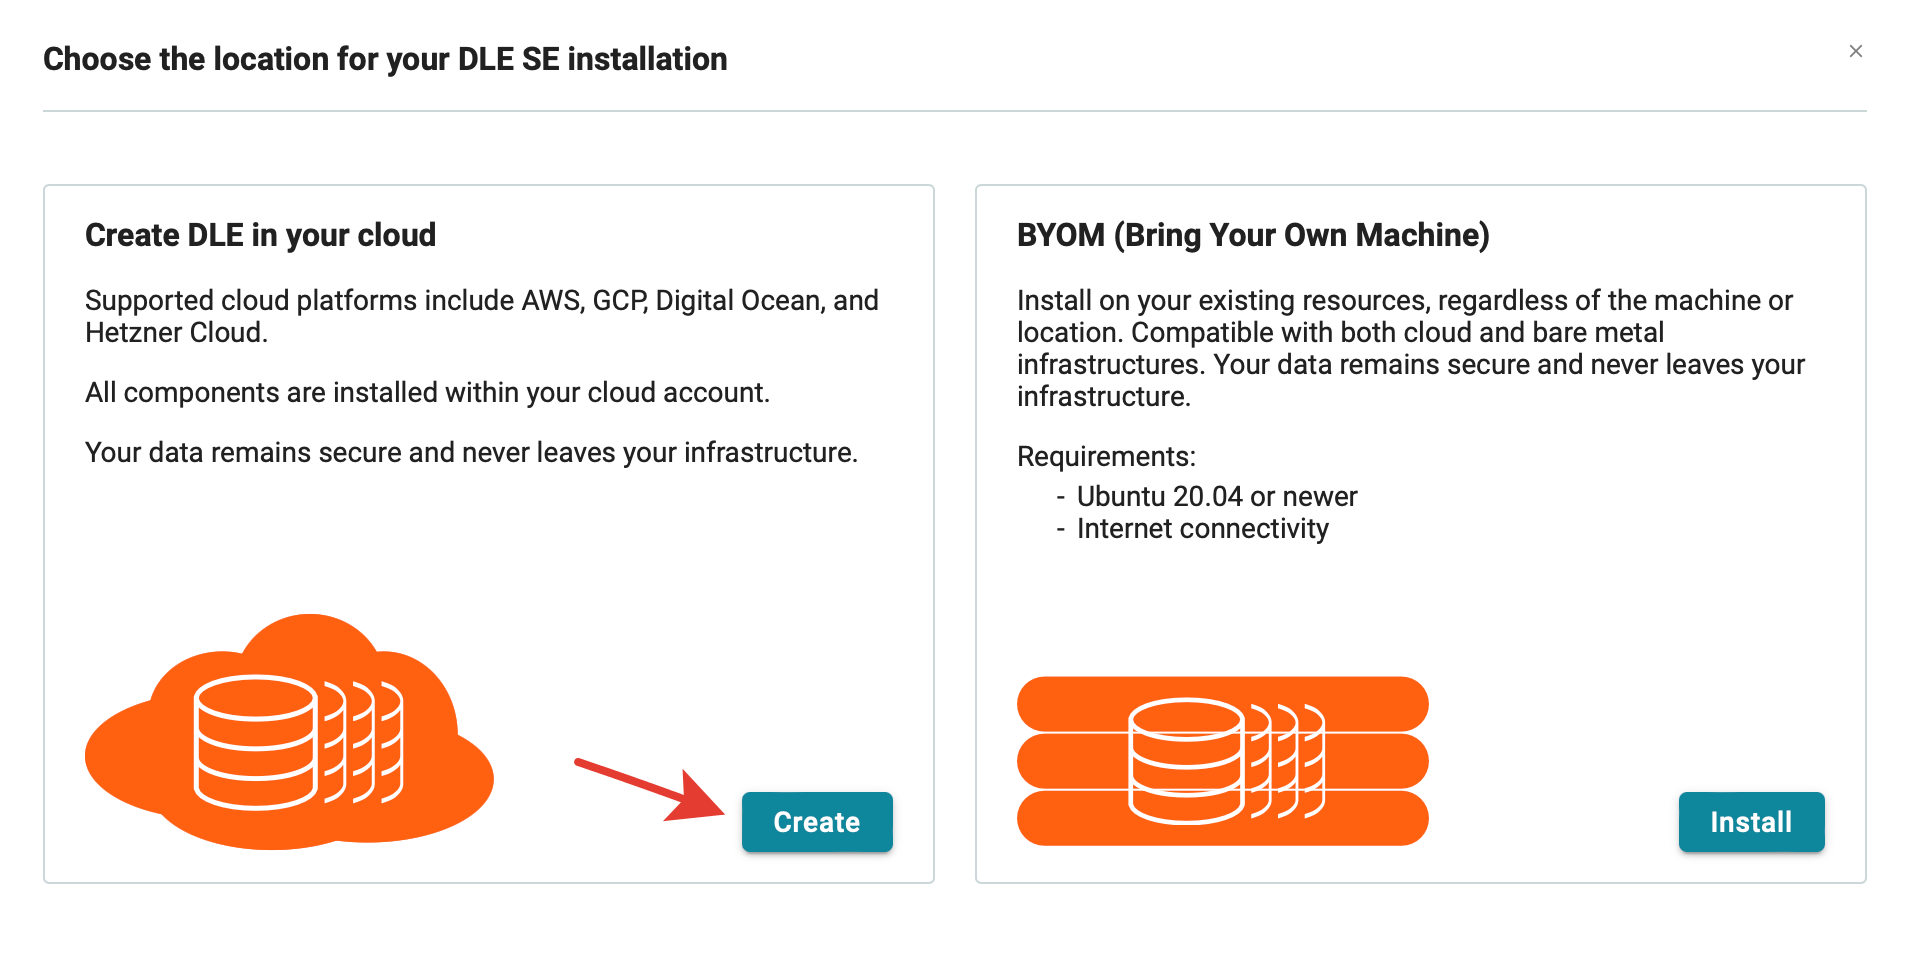
Choose any location for installation
The location of your DBLab can be chosen according to your preference. The installation can be either cloud-based or on-premises. Two primary installation options are available:
- Create DBLab in your cloud: this option, applicable for AWS, GCP, DigitalOcean, and Hetzner Cloud, includes resource provisioning such as VM and disk.
- BYOM (Bring Your Own Machine): for other clouds or on-premises installations, ensure that a VM with Ubuntu 22.04 is installed and a suitable disk is attached. The installation tool will take care of the rest.
This option applies to AWS, GCP, Digital Ocean, and Hetzner Cloud. It covers the provisioning of all necessary resources (VM and disk) and the installation of all software components, including DBLab.
If your cloud vendor is not supported by Option 1 or if you are using an on-premises solution, this option is suitable. You will need a VM or physical machine with a sufficiently large disk and Ubuntu 22.04 installed. The setup tool will then install all necessary components, including DBLab.
In both scenarios, your data remains securely within your infrastructure.
Step 1. Deploying DBLab in cloud
Prerequisites
- Sign up for an account at https://console.postgres.ai/, using one of four supported methods: Google, LinkedIn, GitHub, GitLab
- Create a new organization
- Inside your organization, go to the "Billing" section and add a new payment method:
- press the "Edit payment methods" button,
- you will see the Stripe portal – note it has the address
https://billing.stripe.com/...(PostgresAI partners with Stripe for simplified billing), - add your payment methods there and close the page.
DBLab installation
The first steps are trivial:
- Go to "Database Lab / Instances" and press "New DBLab"
And then press the "Create" button to deploy DBLab in your cloud:
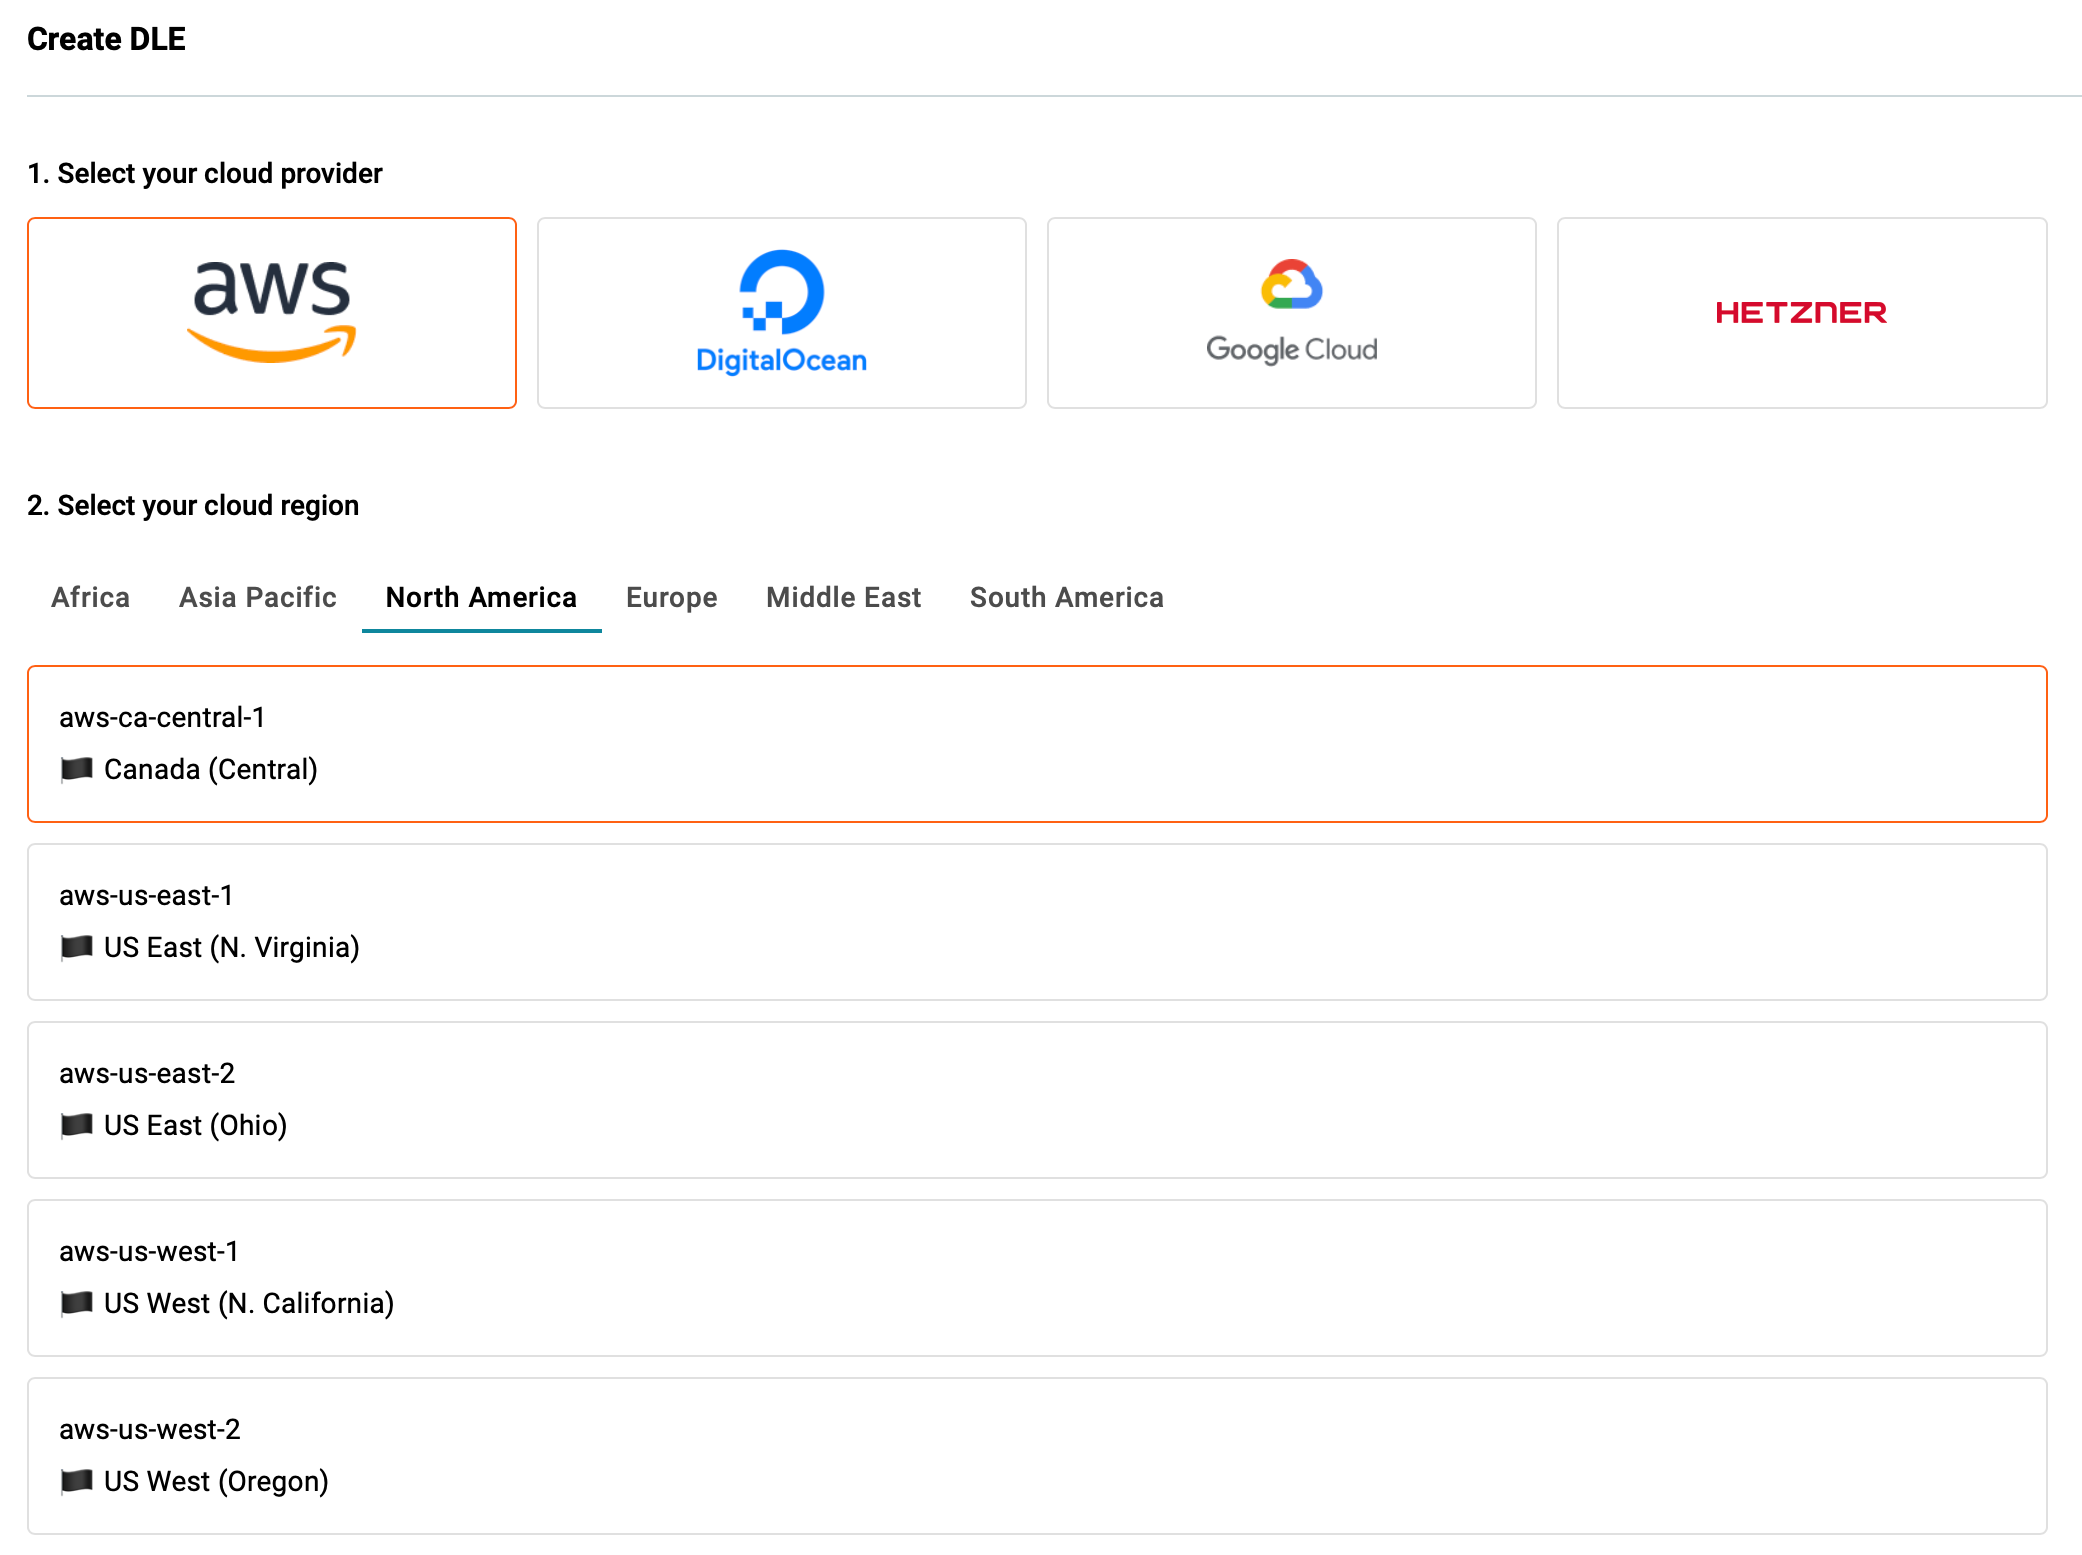
Select your cloud provider and region:
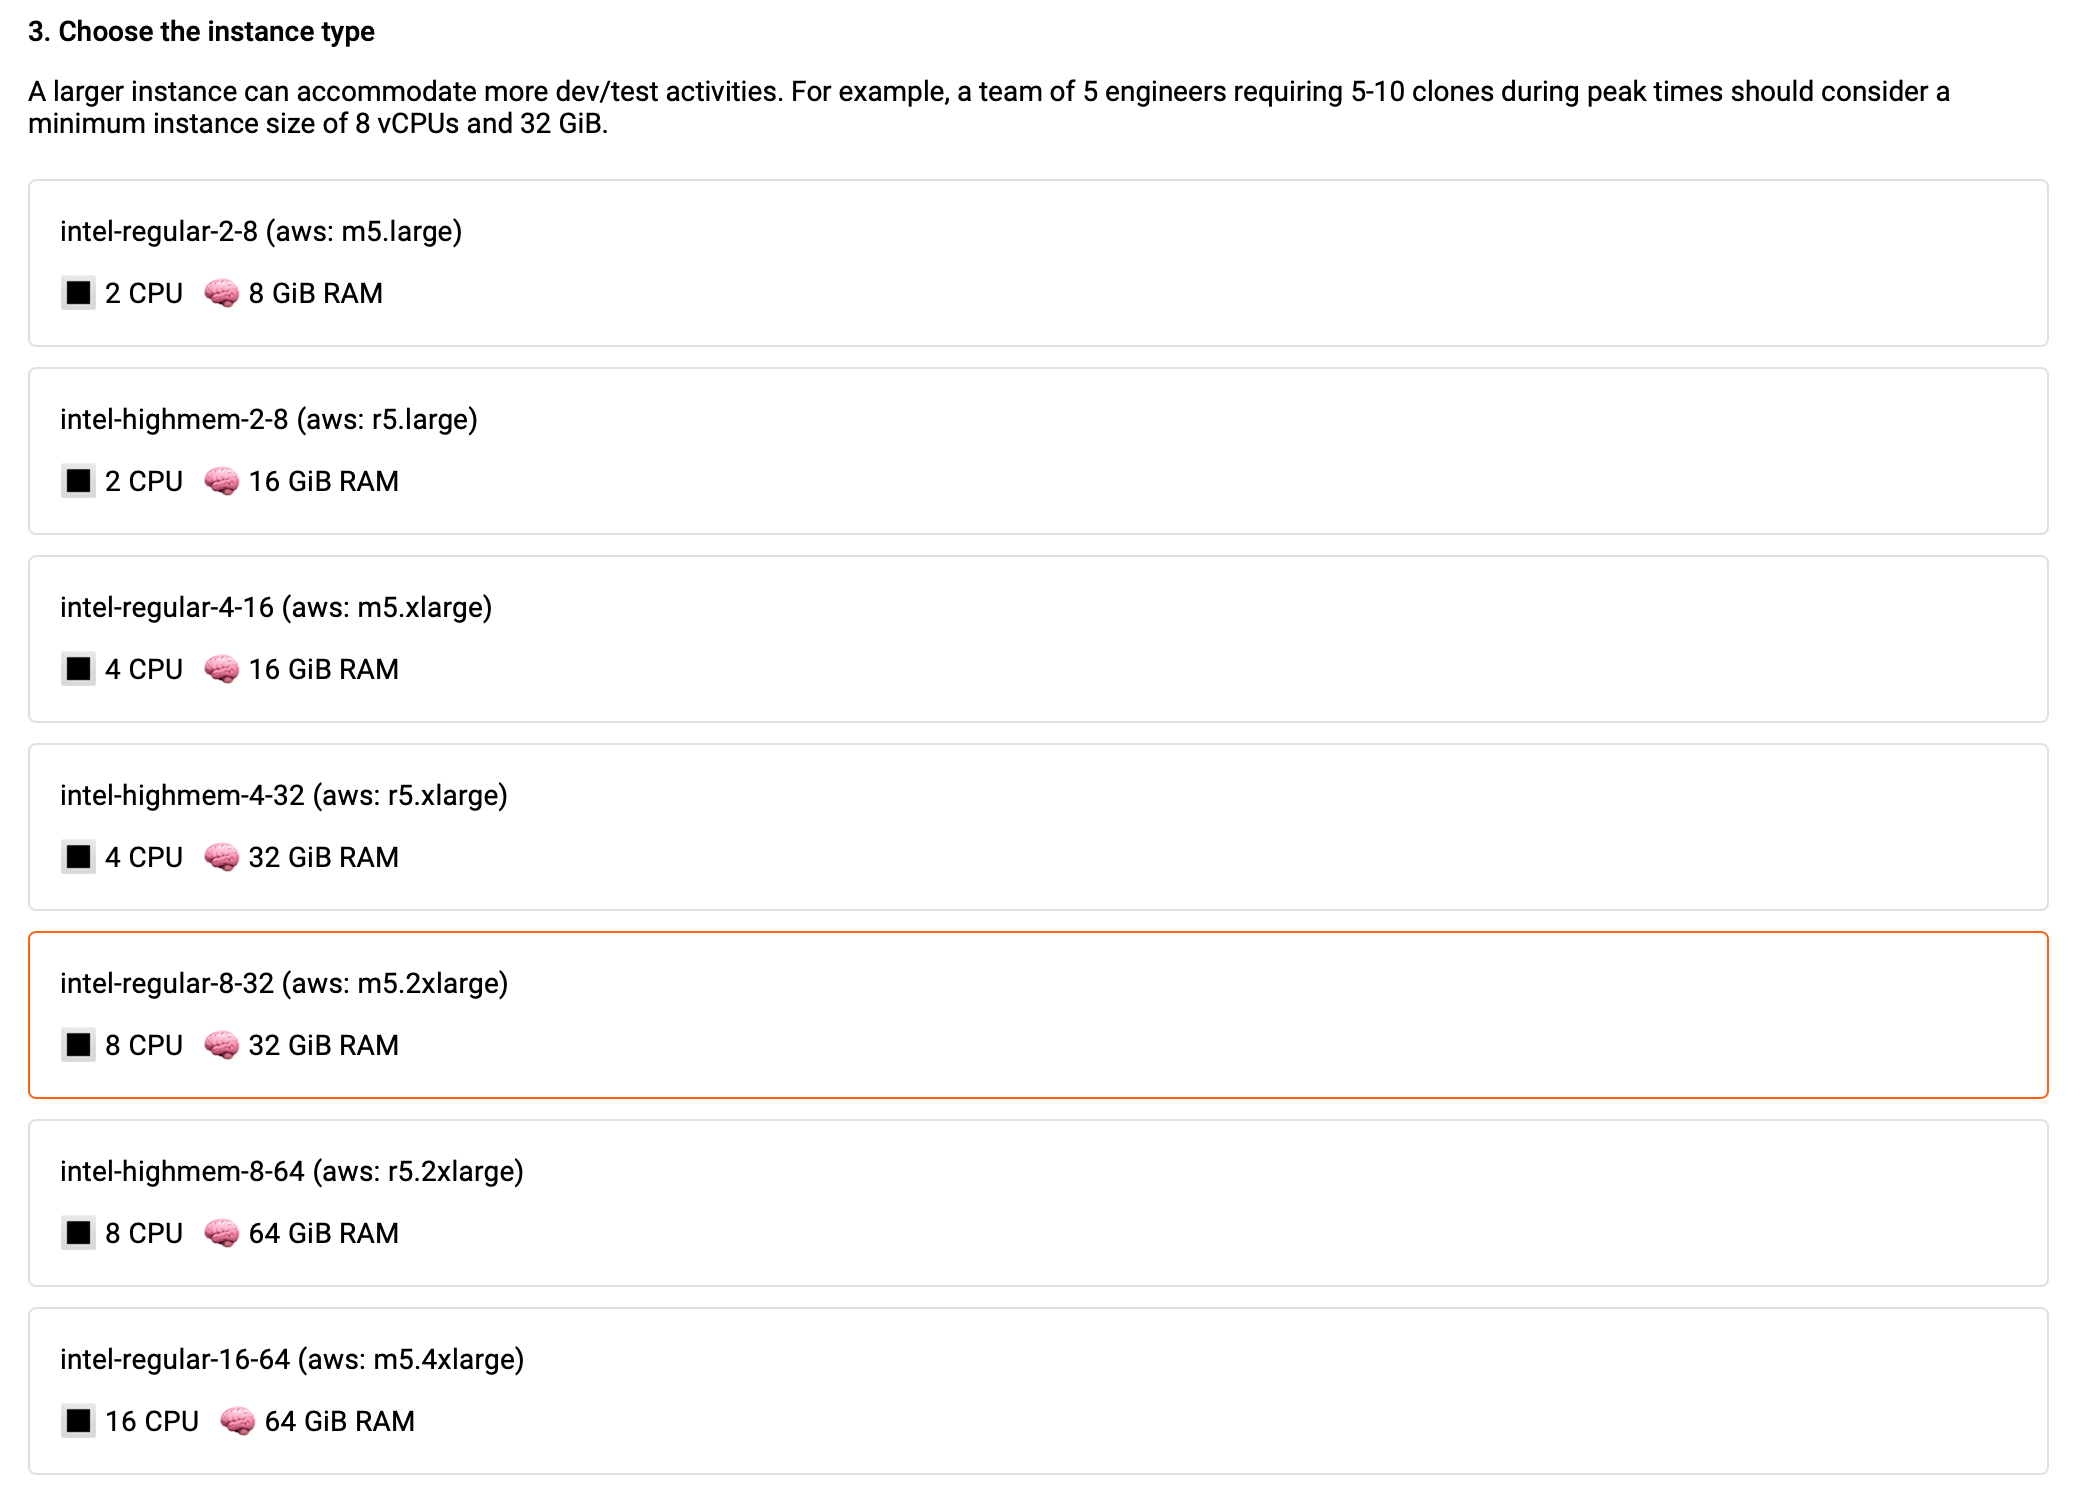
Choose the instance type:
Choose the volume type and size:
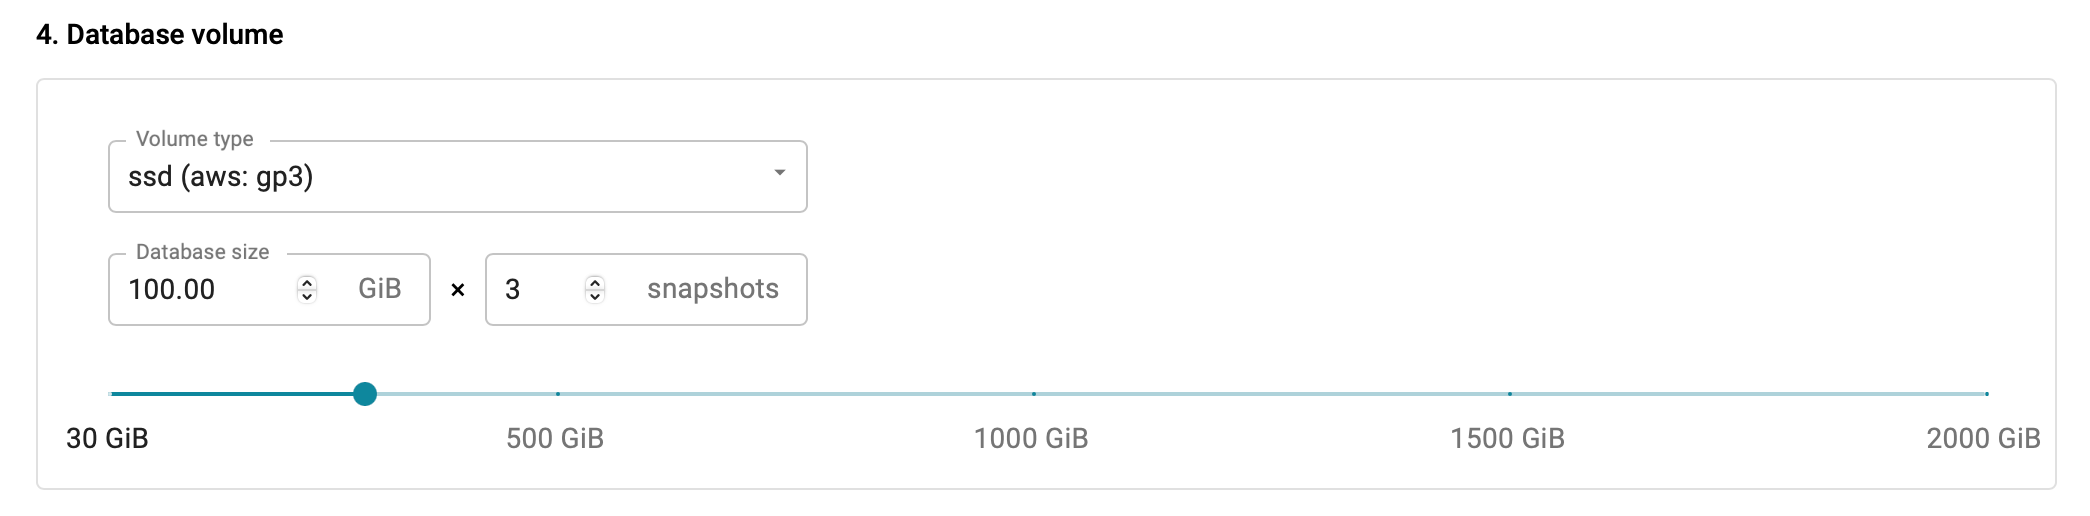
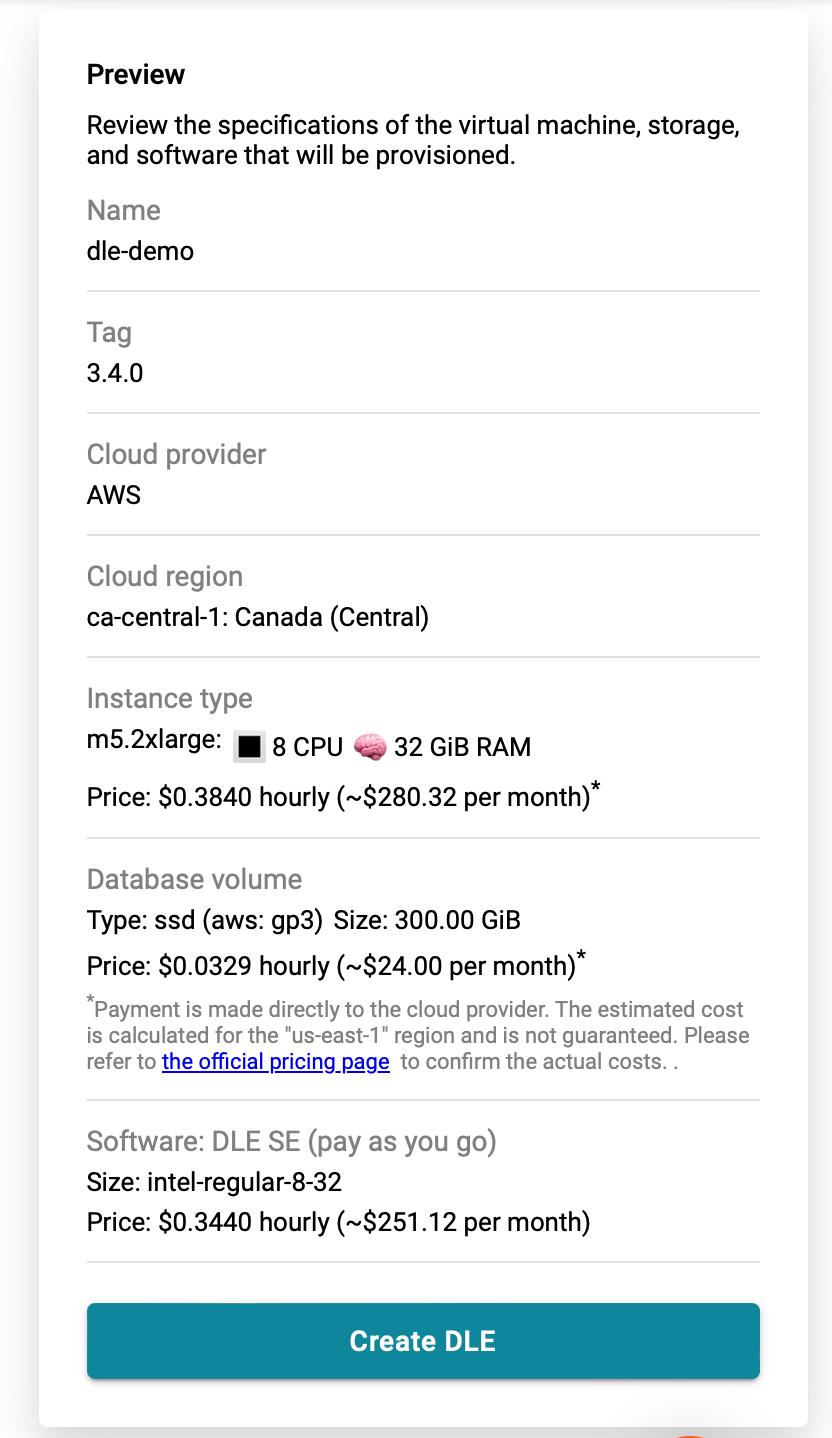
In this example the database size is 100 GiB, we want to create 3 datasets to be able to create 3 snapshots, so the volume with size 300 GiB will be created.
Provide a name for your DBLab instance:

Define DBLab verification token (a non-trivial, password-like value is recommended):

You can use the "Generate random" button to generate a new unique token.
Choose DBLab version:

Provide SSH public keys:
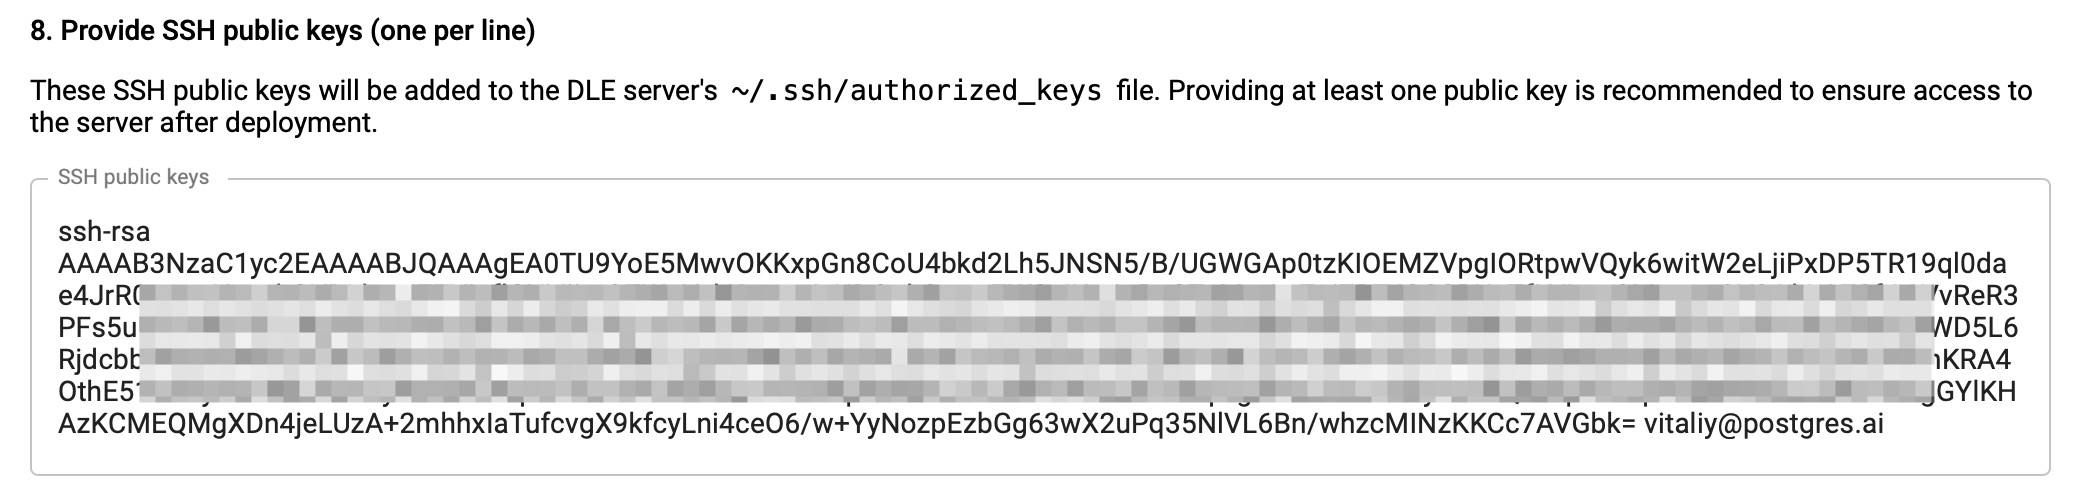
These SSH public keys will be added to the DBLab server's ~/.ssh/authorized_keys file. Providing at least one public key is recommended to ensure access to the server after deployment.
Review the specifications of the virtual machine, and click "Create DBLab":
Select the installation method and follow the instructions to create a server and install DBLab SE:

To perform the initial deployment, a new temporary SSH key will be generated and added to the Cloud. After the deployment is completed, this key will be deleted and the SSH key that was specified in the "ssh_public_keys" variable will be added to the server.
After running the deployment command, you need to wait a few minutes, while all resources are provisioned and DBLab setup is complete. Check out the "usage instructions" – once DBLab API and UI are ready, you'll see the ordered list of instructions on how to connect to UI and API.
Example:
TASK [deploy-finish : Print usage instructions] *****************************************************************************************************************************************************************
ok: [[email protected]] => {
    "msg": [
        "1) Use SSH port forwarding for UI / API / CLI:",
        "    ssh -o StrictHostKeyChecking=no -N -L 2346:127.0.0.1:2346 [email protected]",
        "",
        "2) DBLab UI: http://127.0.0.1:2346",
        "",
        "3) Verification token (ensure to securely store it):",
        "    edlhYHOgBPkr4ix1qP3YvQMytfK2JSxH",
        "",
        "4) DBLab API:",
        "  - API URL: http://127.0.0.1:2346/api",
        "  - API docs: https://api.dblab.dev/",
        "",
        "5) DBLab CLI:",
        "  - CLI ('dblab') setup:",
        "      export DBLAB_CLI_VERSION=4.1.1",
        "      curl -sSL dblab.sh | bash",
        "      dblab init --environment-id=dblab-demo --token=edlhYHOgBPkr4ix1qP3YvQMytfK2JSxH --url=http://127.0.0.1:2346/api",
        "  - CLI docs: https://cli-docs.dblab.dev/",
        "",
        "6) Monitoring:",
        "  - SSH port forwarding:",
        "      ssh -o StrictHostKeyChecking=no -N -L 19999:127.0.0.1:19999 [email protected]",
        "  - Monitoring URL: http://127.0.0.1:19999",
        "",
        "7) To connect to clones, also use SSH port forwarding. E.g., for clone 6000:",
        "    ssh -o StrictHostKeyChecking=no -N -L 6000:127.0.0.1:6000 [email protected]",
        "  - and then use: 'host=127.0.0.1 port=6000 user=YOUR_USER dbname=postgres'",
        "",
        "(Optional) To destroy the DBLab server (for CLOUD, except BYOM):",
        "  - add the 'state=absent' variable to the snippet you used for deploy the DBLab server.",
        "  - run the command again to delete the server."
    ]
}
Save the data from the "Print usage instructions" task, because the PostgresAI Platform does not save this data on its side.
Open UI
First, set up SSH port forwarding for UI port 2346:
# Replace with your server IP
ssh -N -L 2346:127.0.0.1:2346 [email protected]
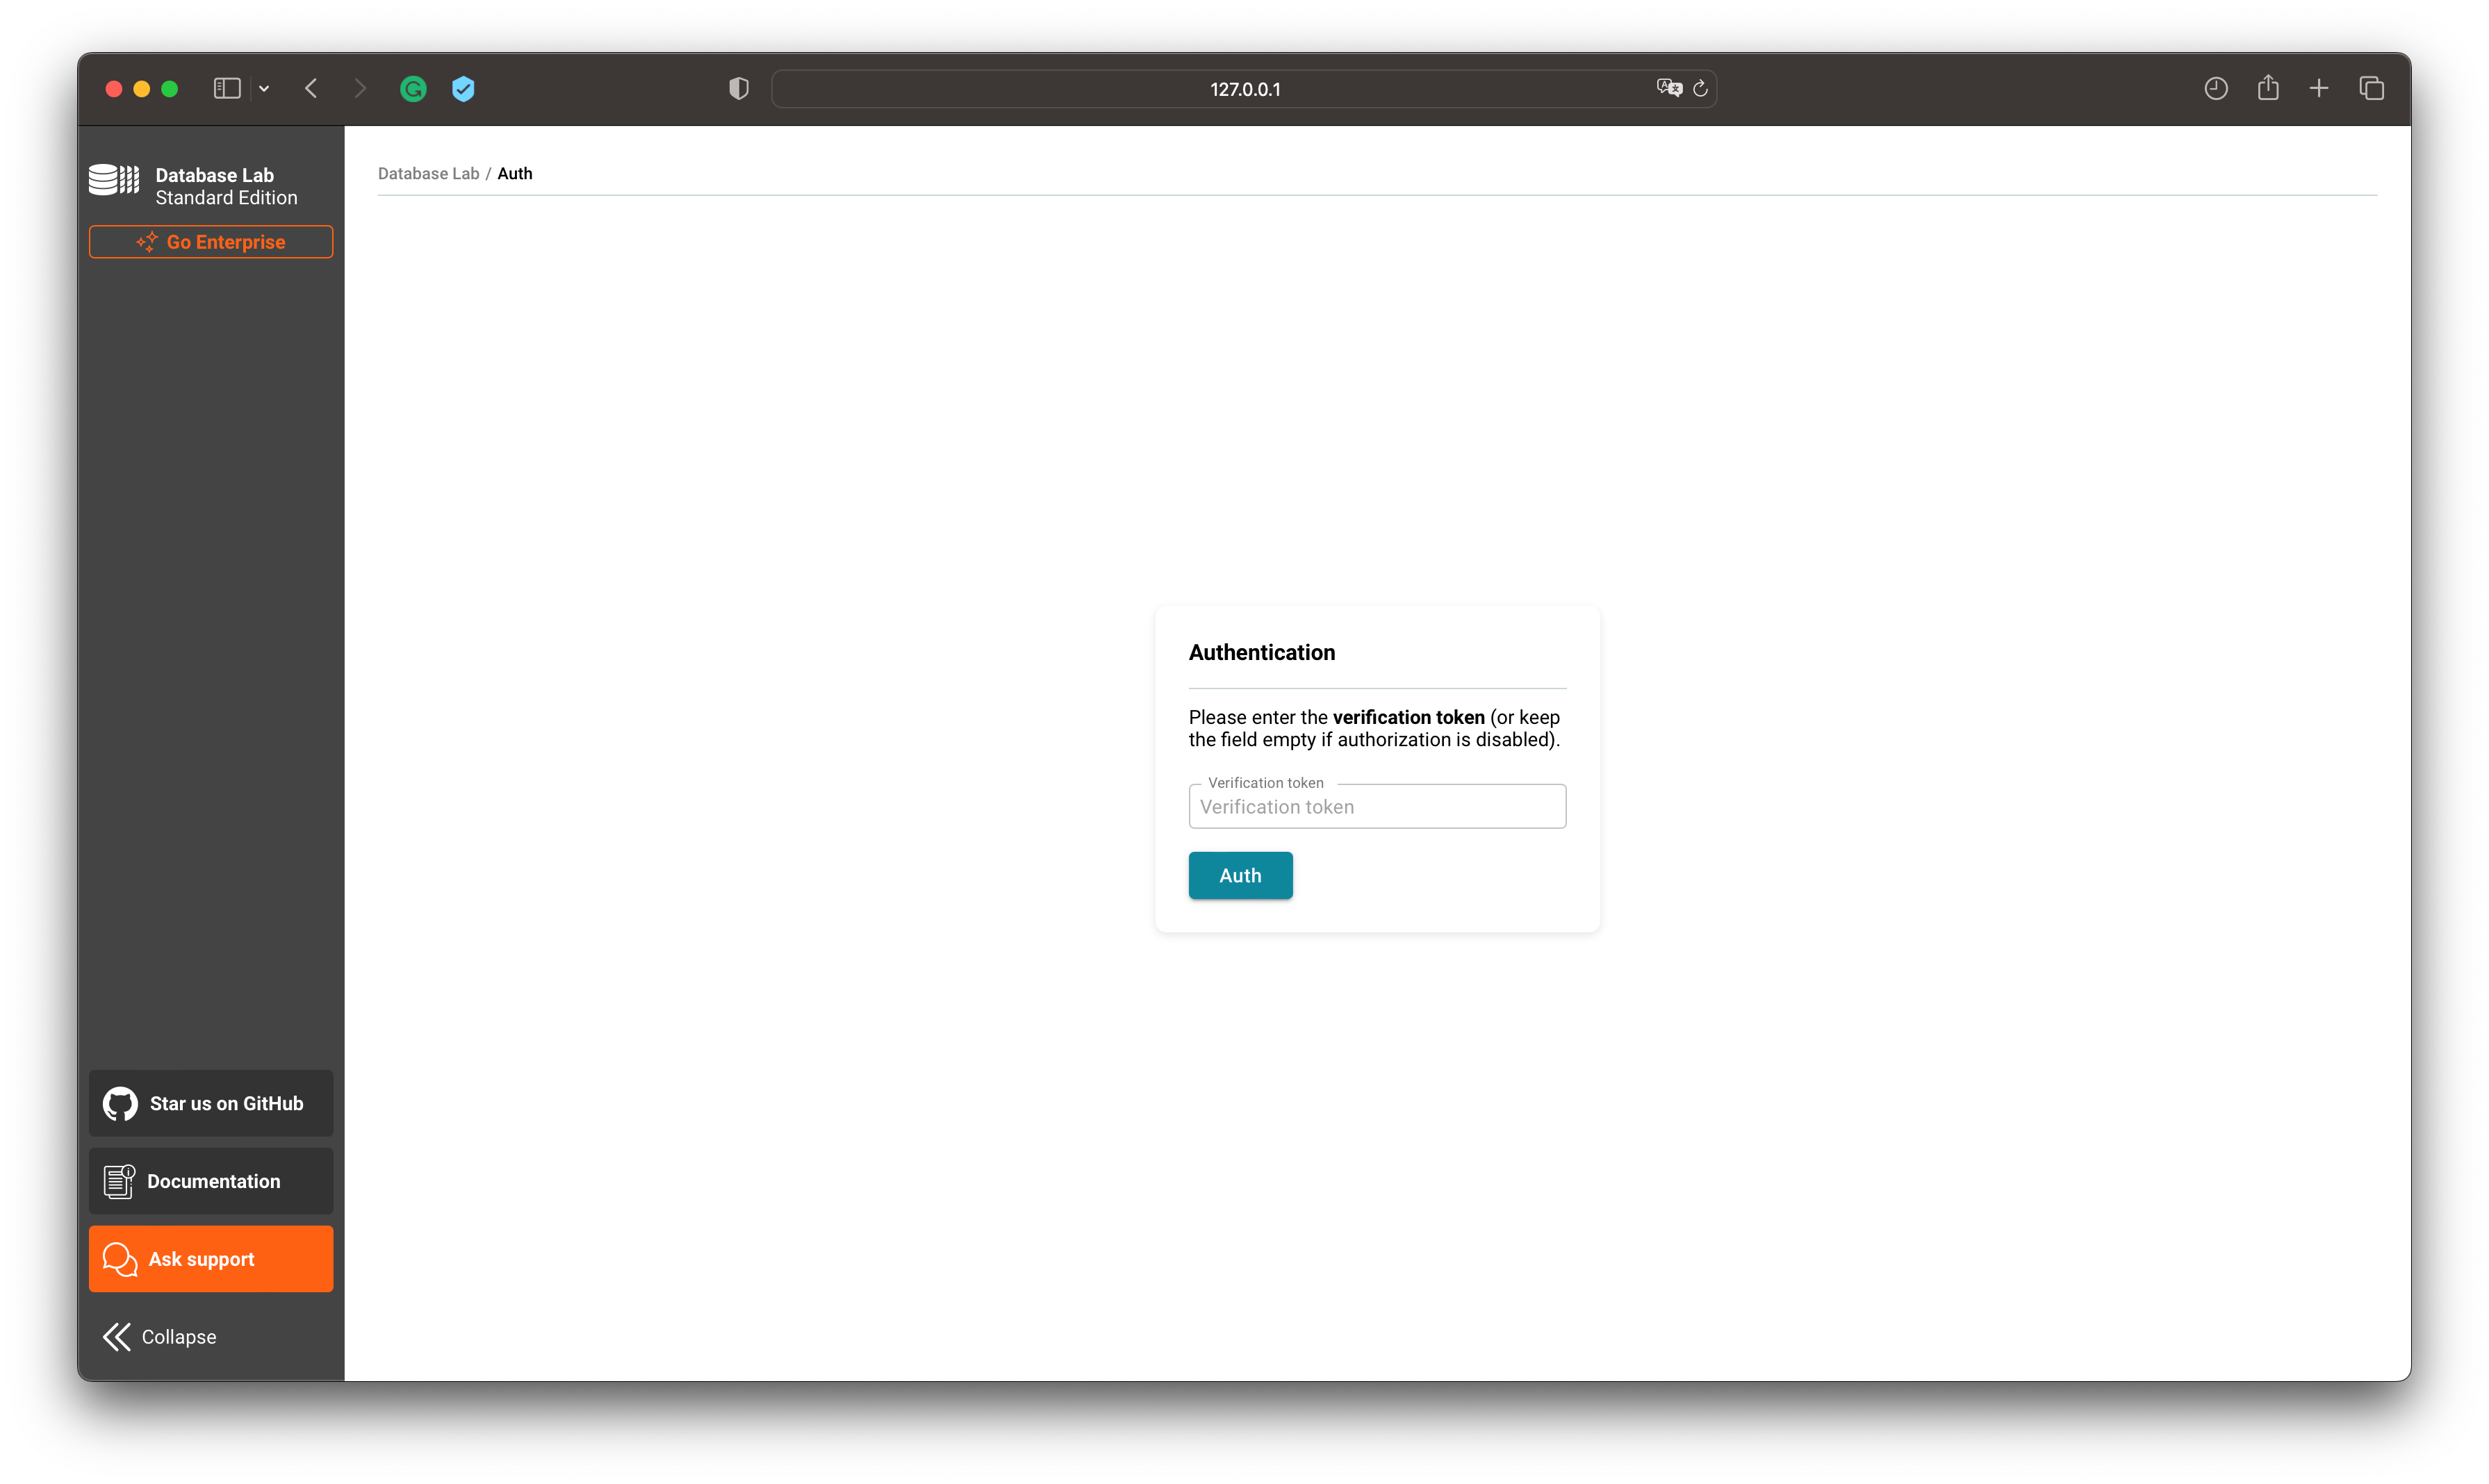
Now UI should be available at http://127.0.0.1:2346
Step 2. Configure DBLab and run the data retrieval
Currently, configuring DBLab in UI allows config changes only for the "logical" mode of data retrieval (dump/restore) – the only available method for managed PostgreSQL cloud services such as RDS Postgres, RDS Aurora Postgres, Azure Postgres, or Heroku. "Physical" mode is not yet supported in UI but is still possible (through SSH connection and editing DBLab config file directly). More about various data retrieval options for DBLab.
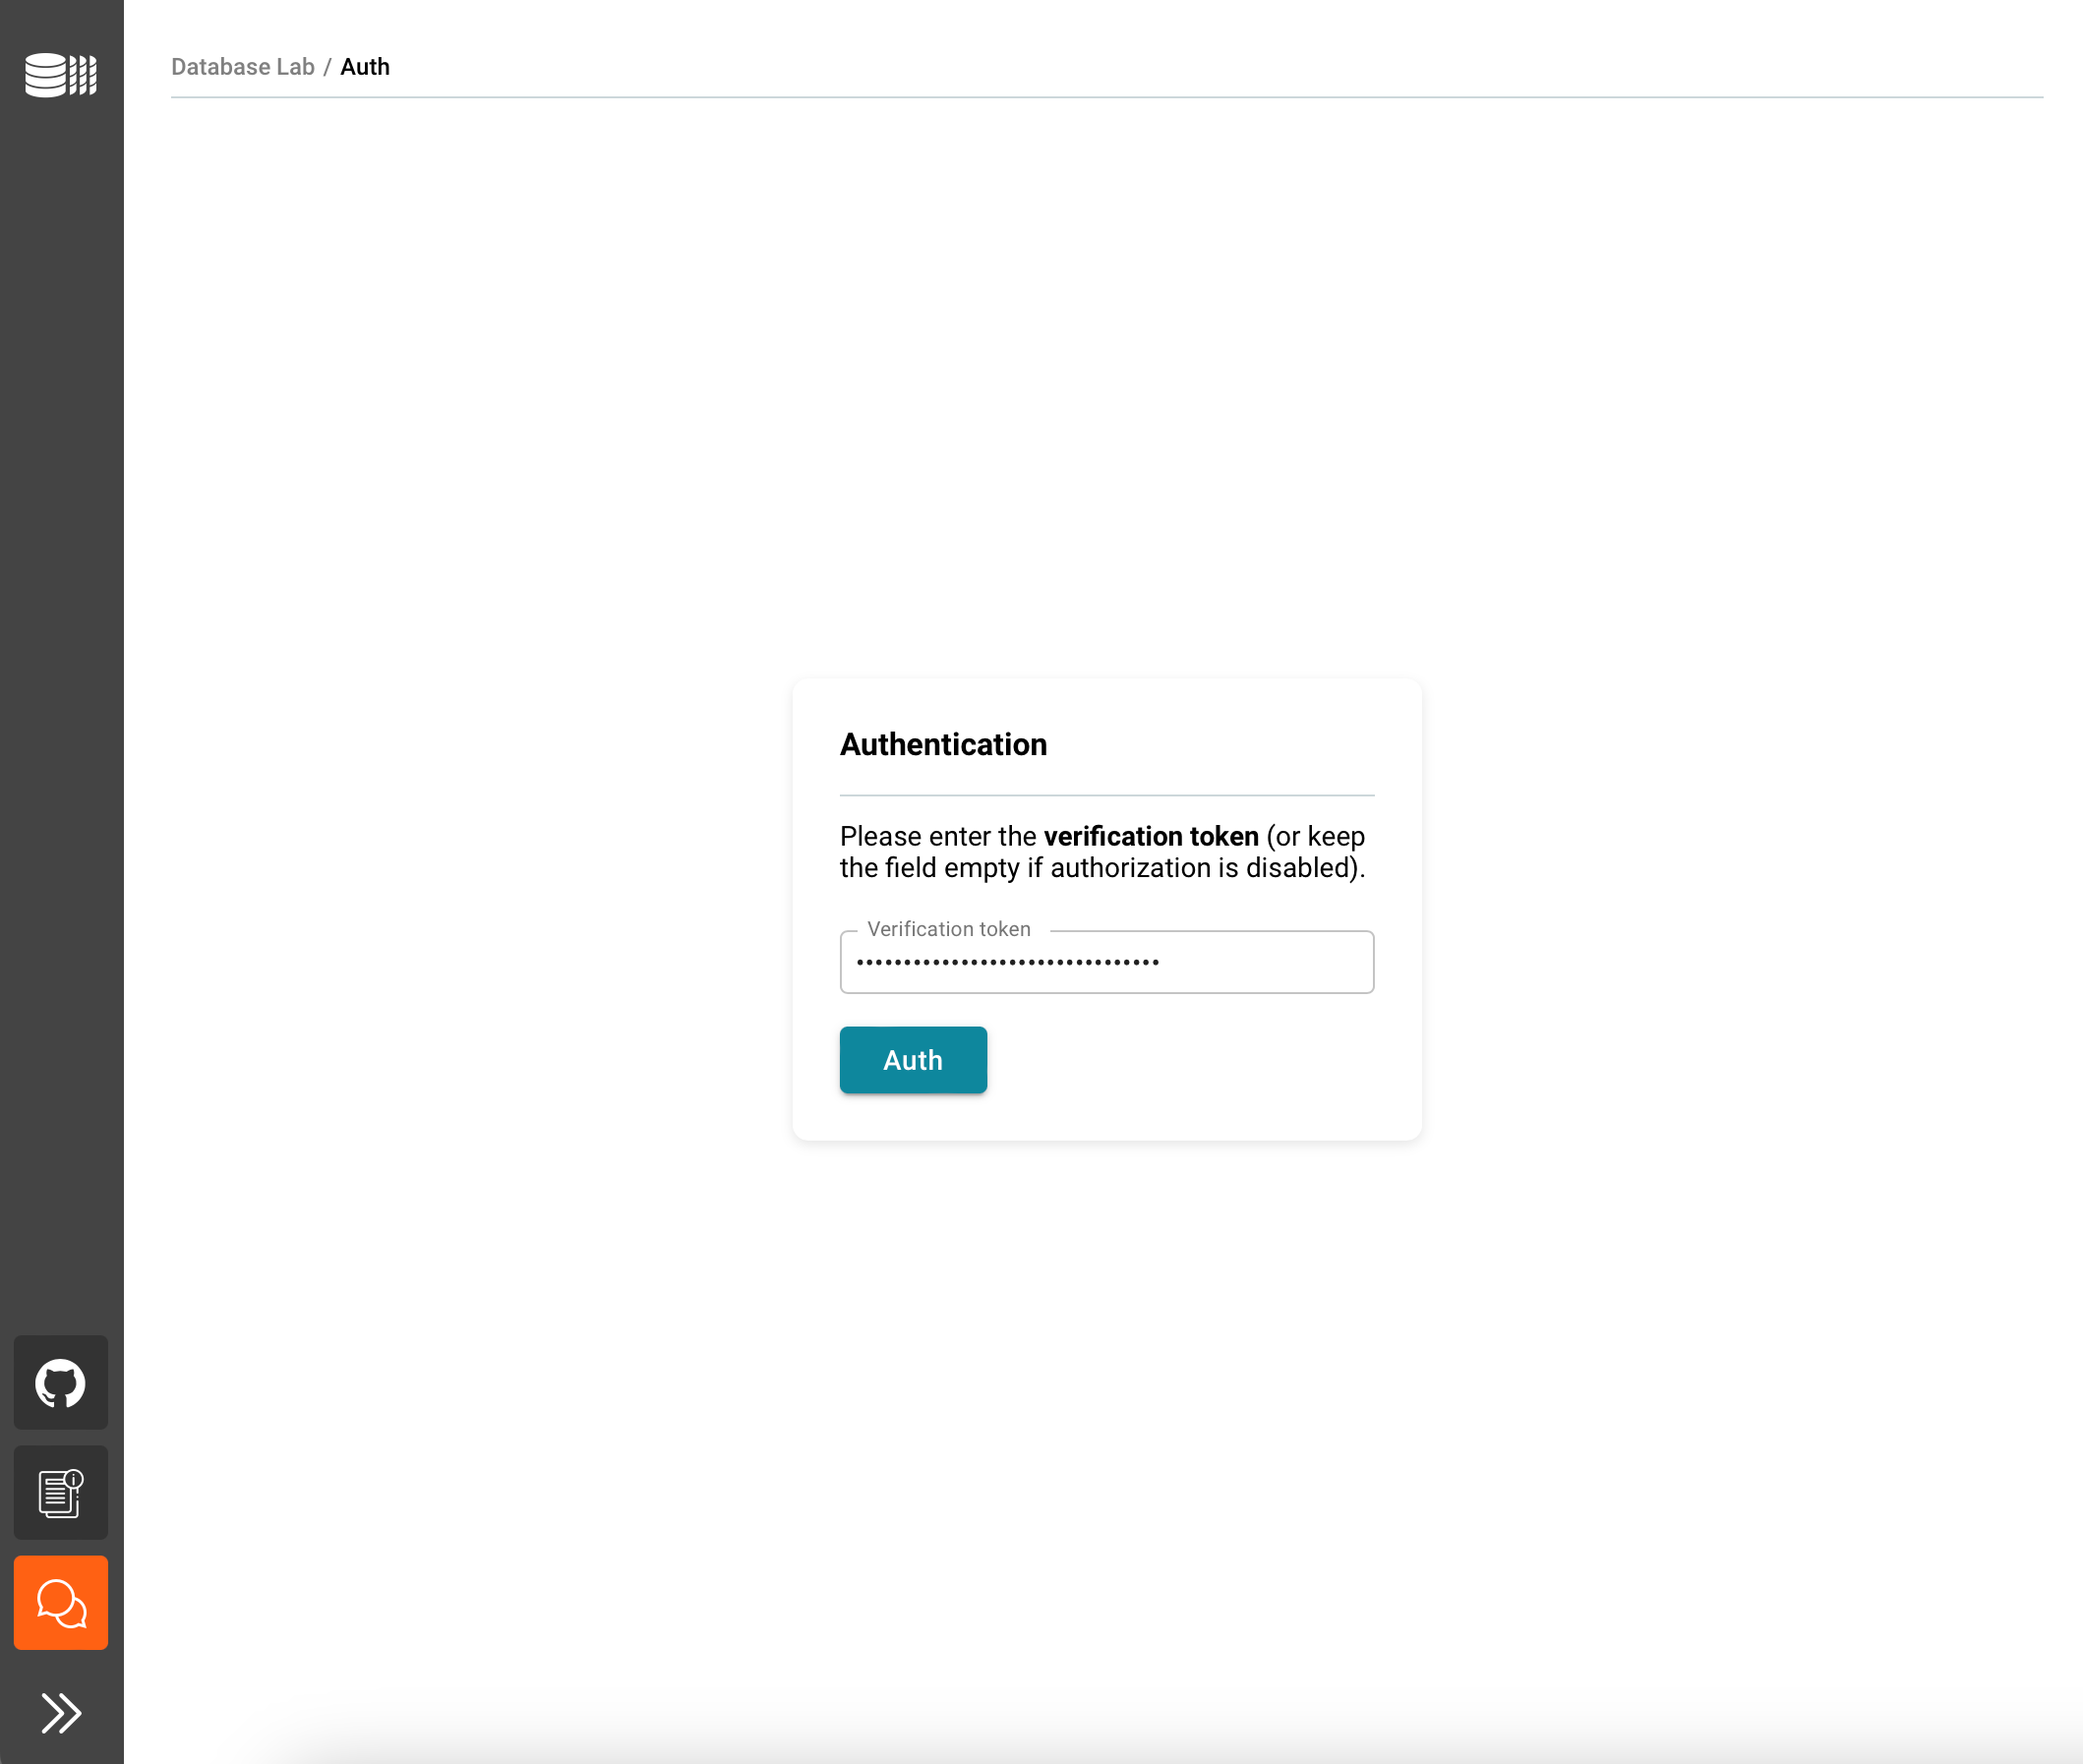
Enter the verification token you have created earlier.
Now it's time to define DB credentials of the source to initiate database provisioning – this is how DBLab will be initialized, performing the very first data retrieval, and then the same parameters will be used for scheduled full refreshes according to the schedule defined. Fill the forms, and use the information in the tooltips if needed.
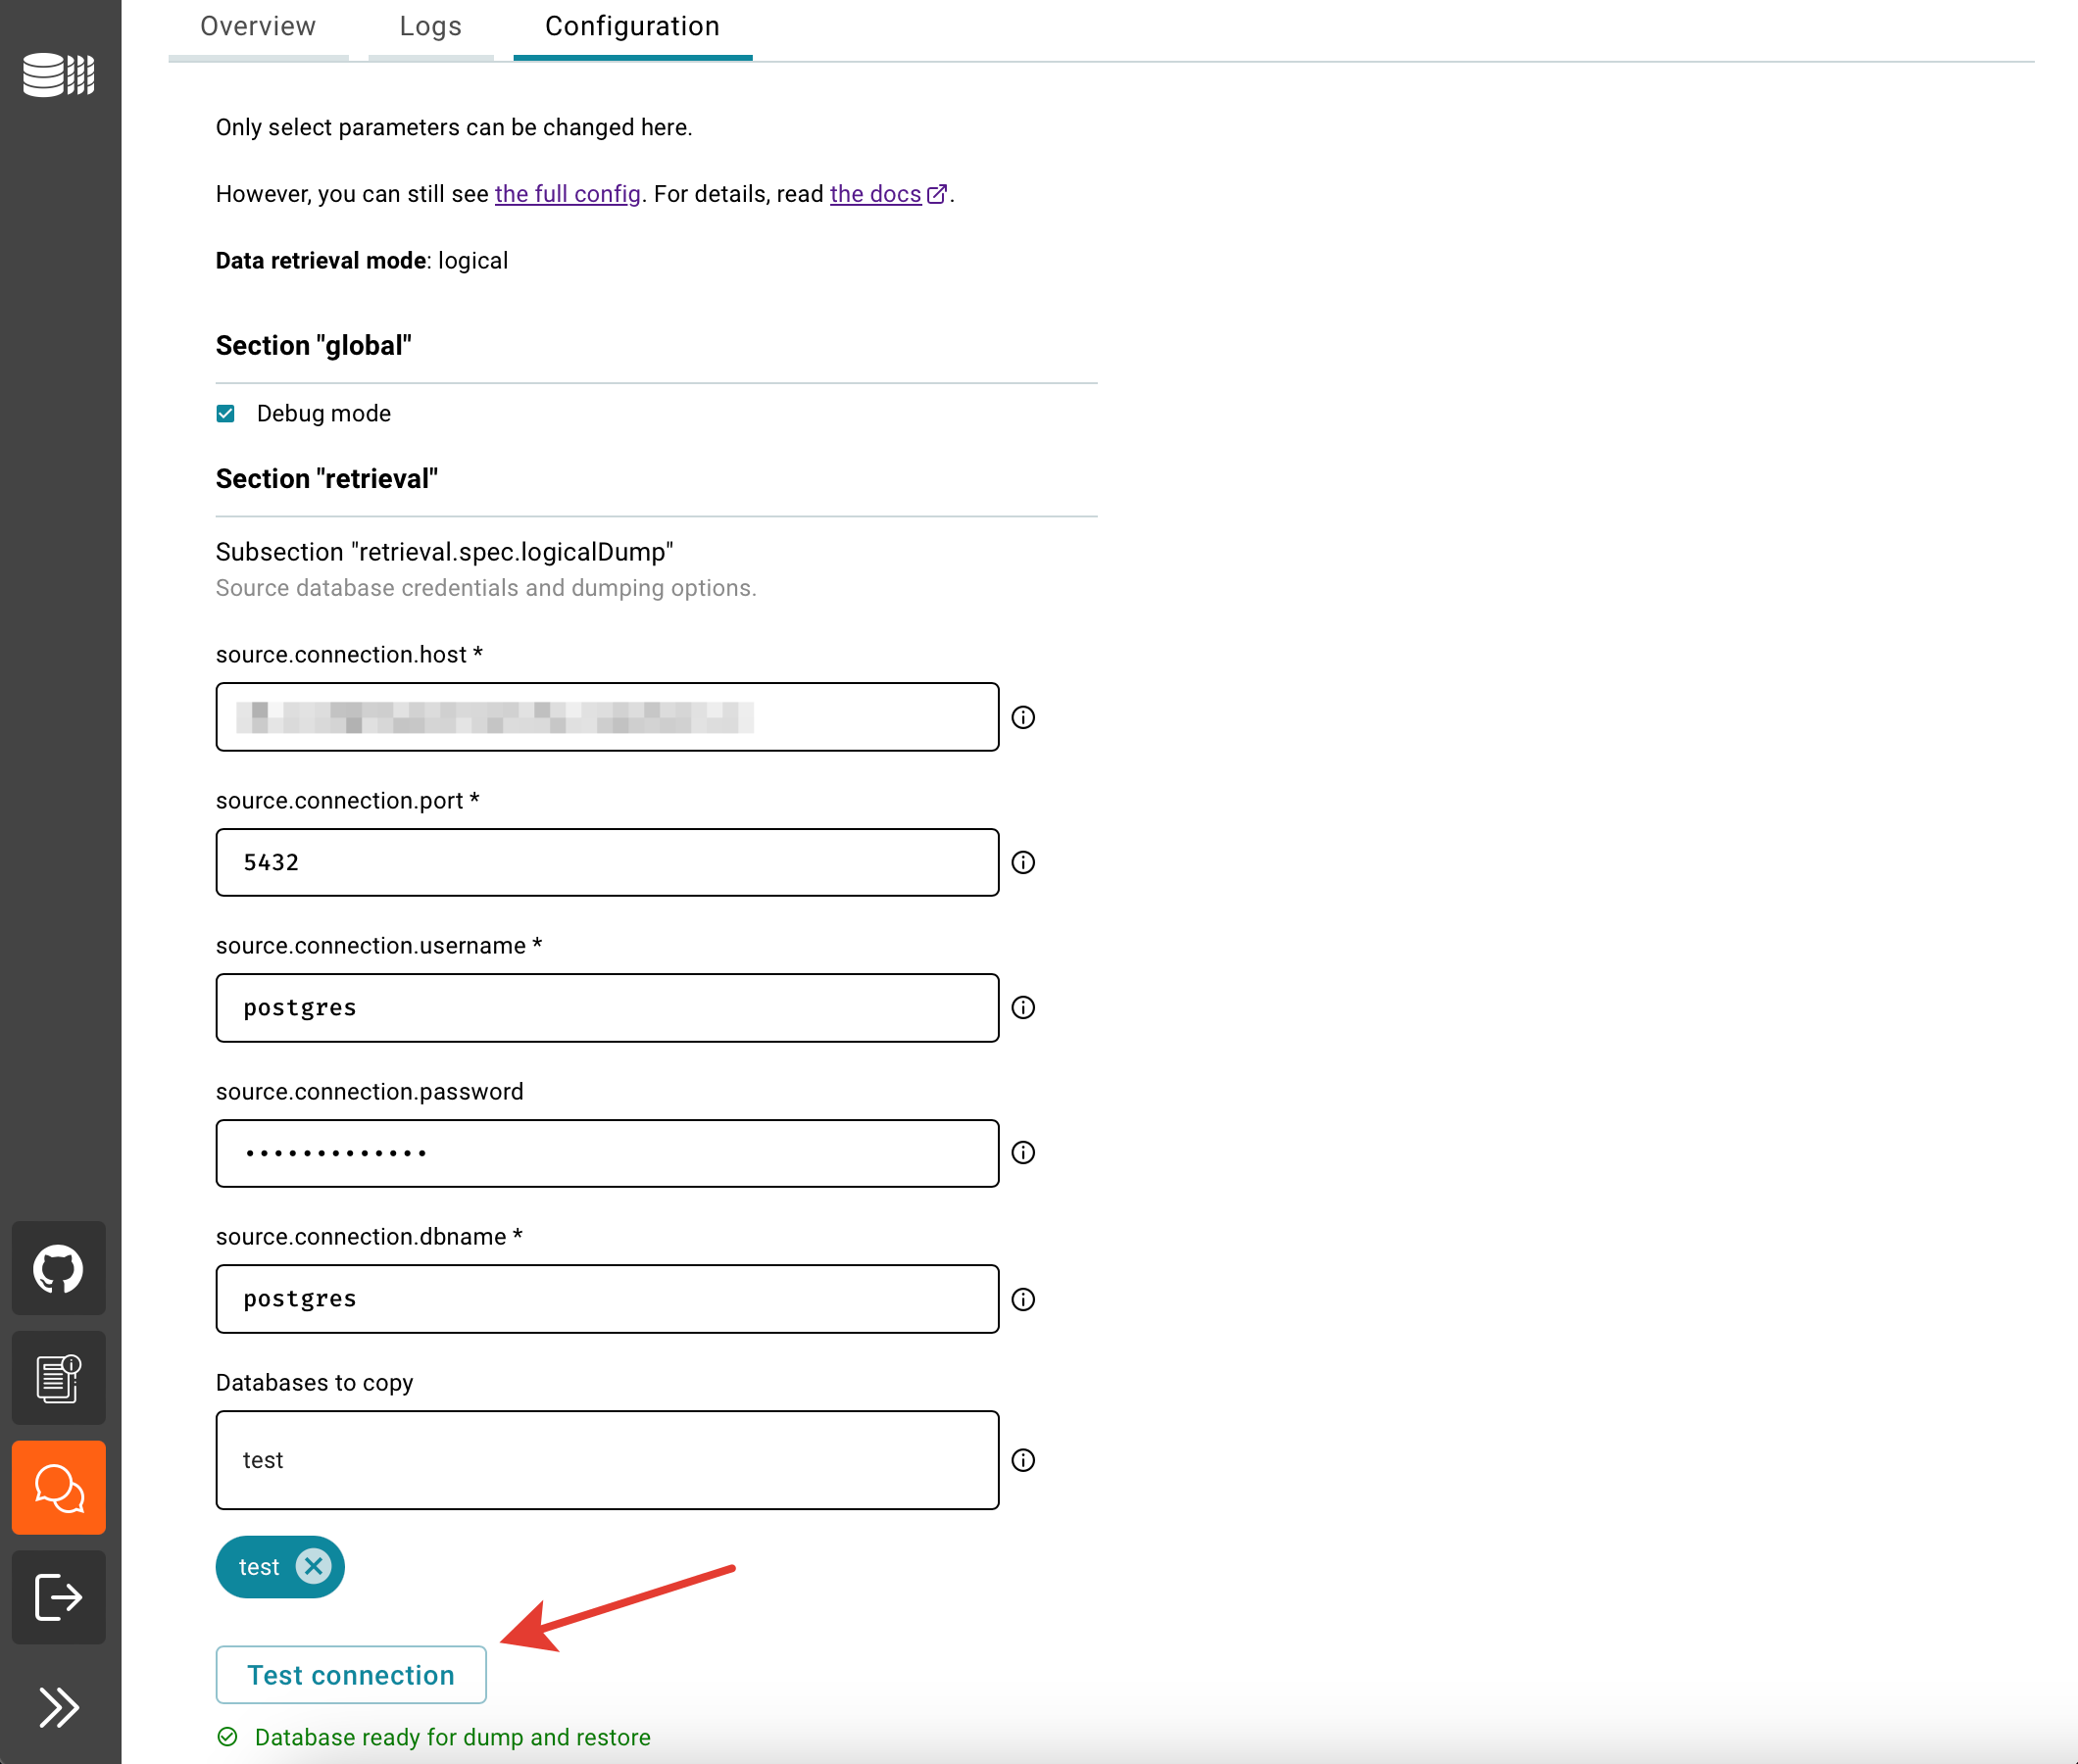
Then press "Test connection" to check access to the source database from which the dump will be created.
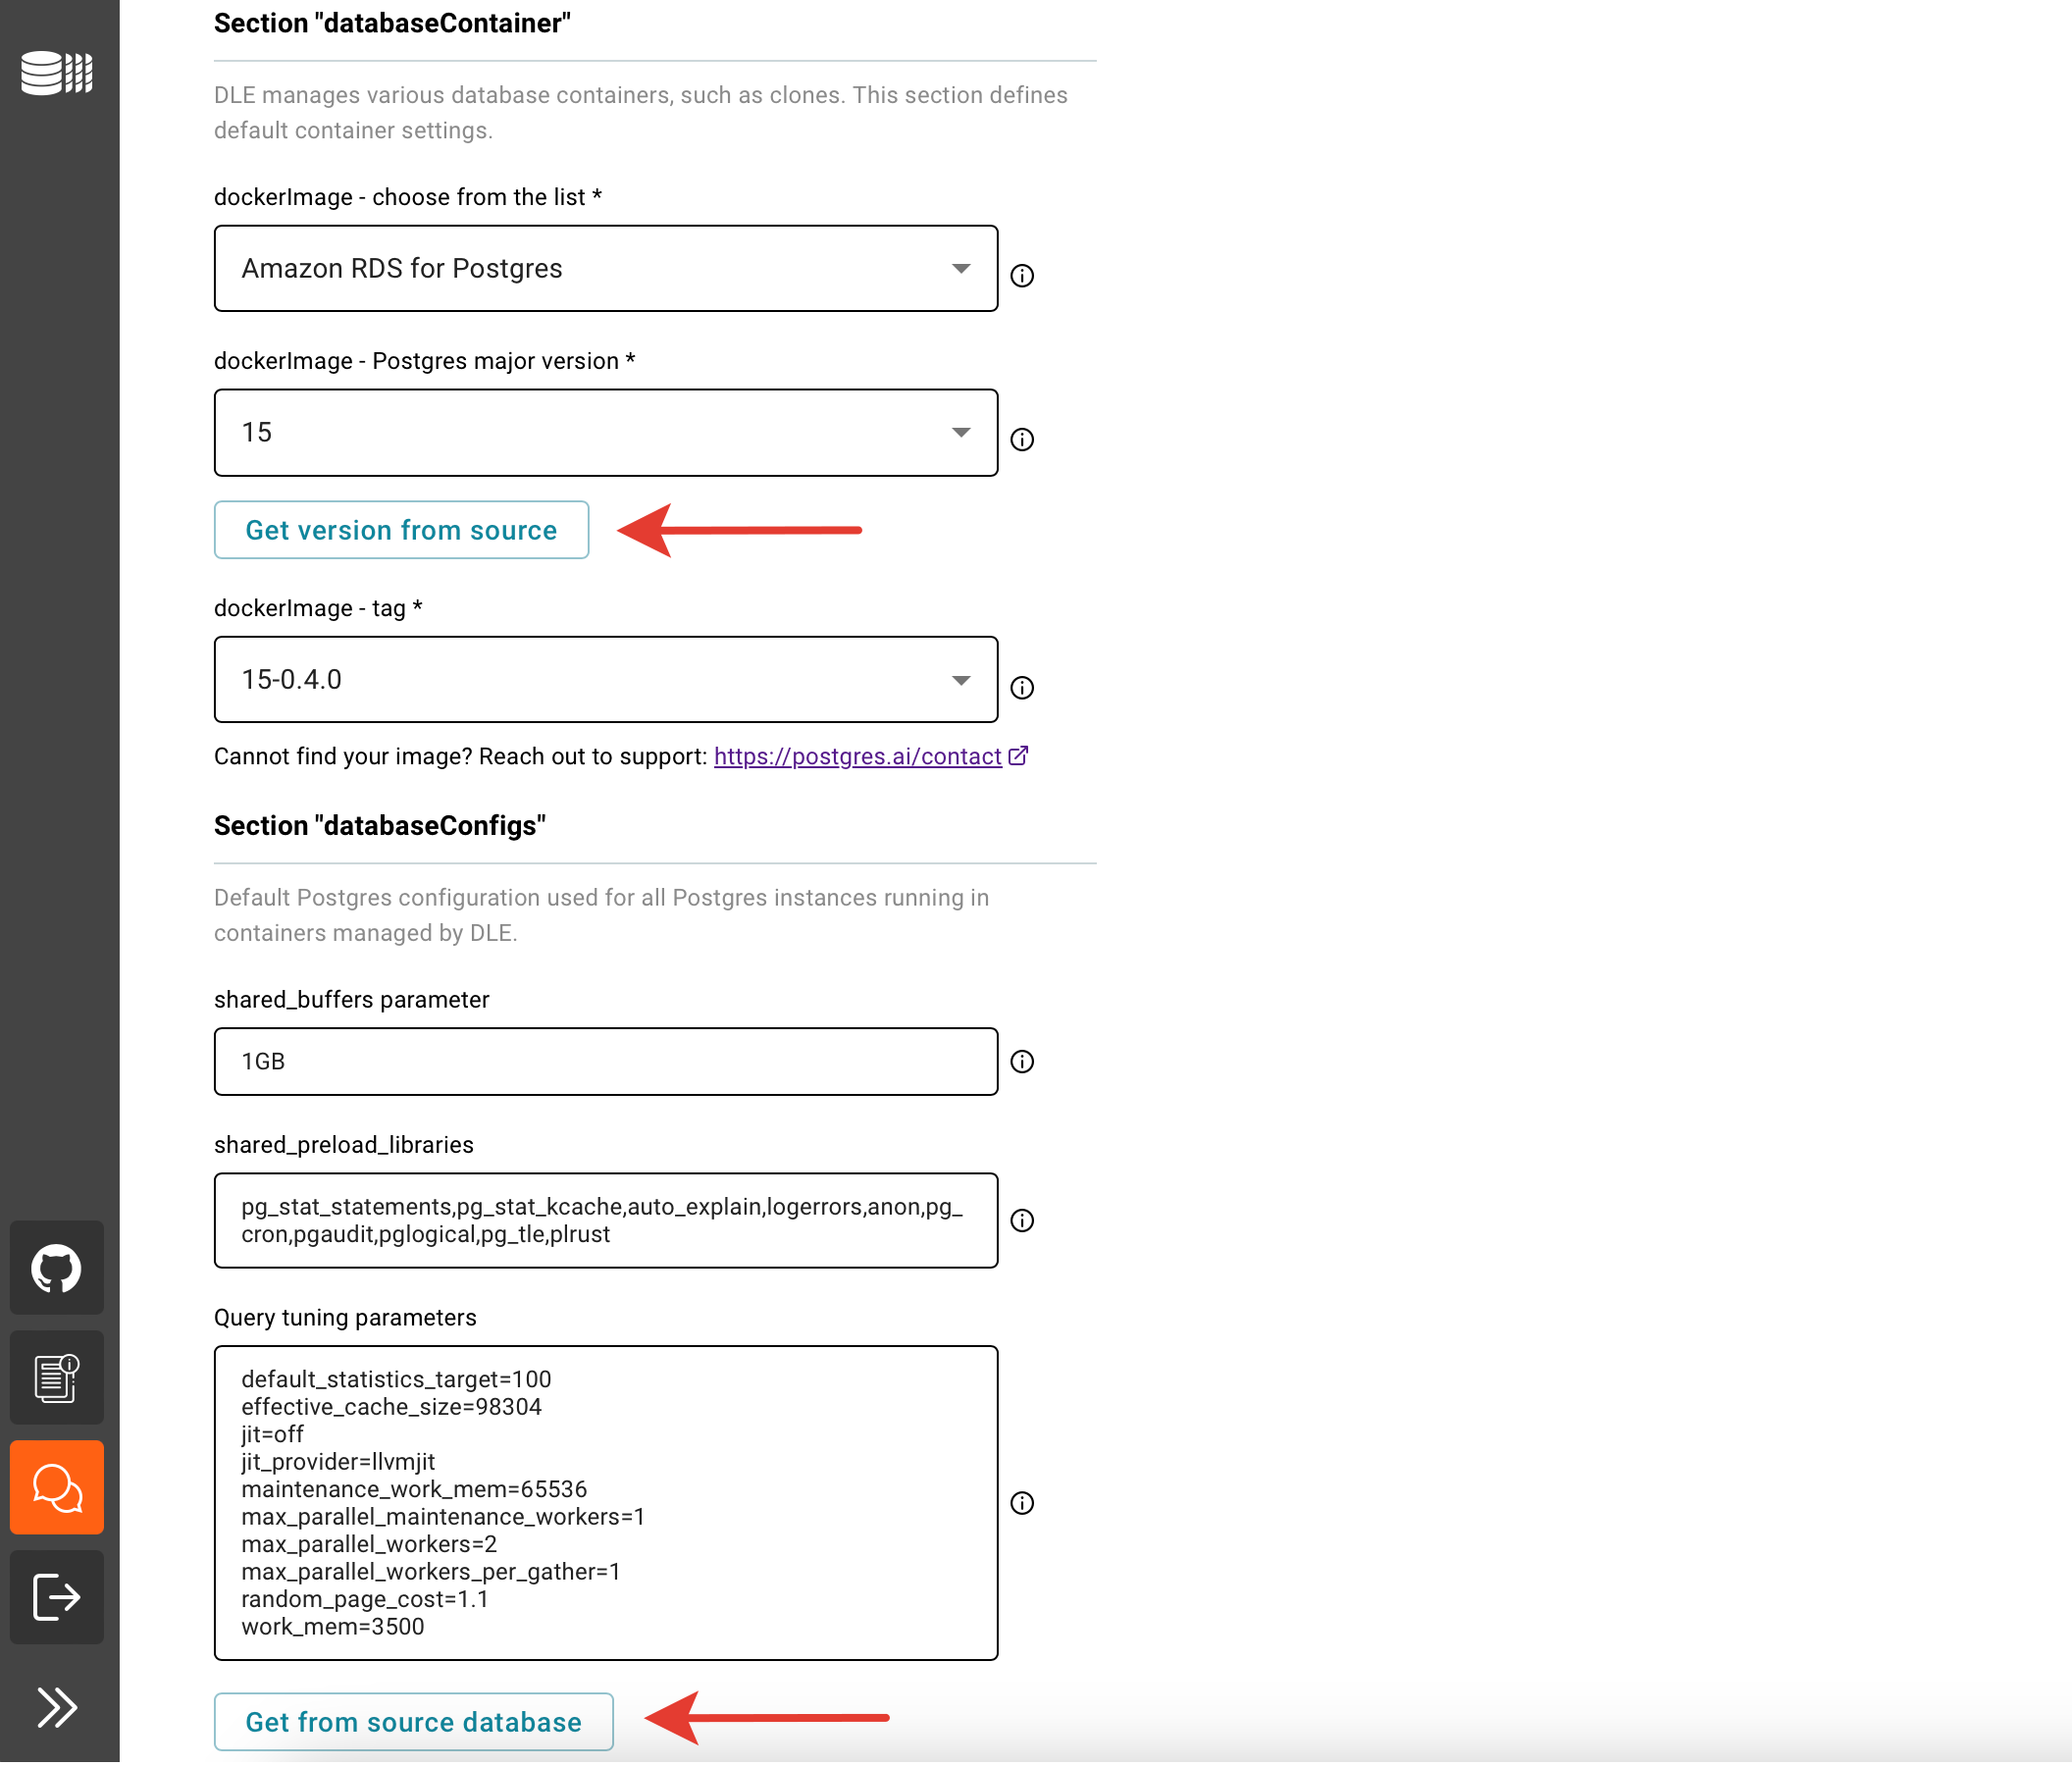
You can use the "Get version from source" and "Get from source database" buttons to get the PostgreSQL version and the necessary Query tuning parameters from the source database server.
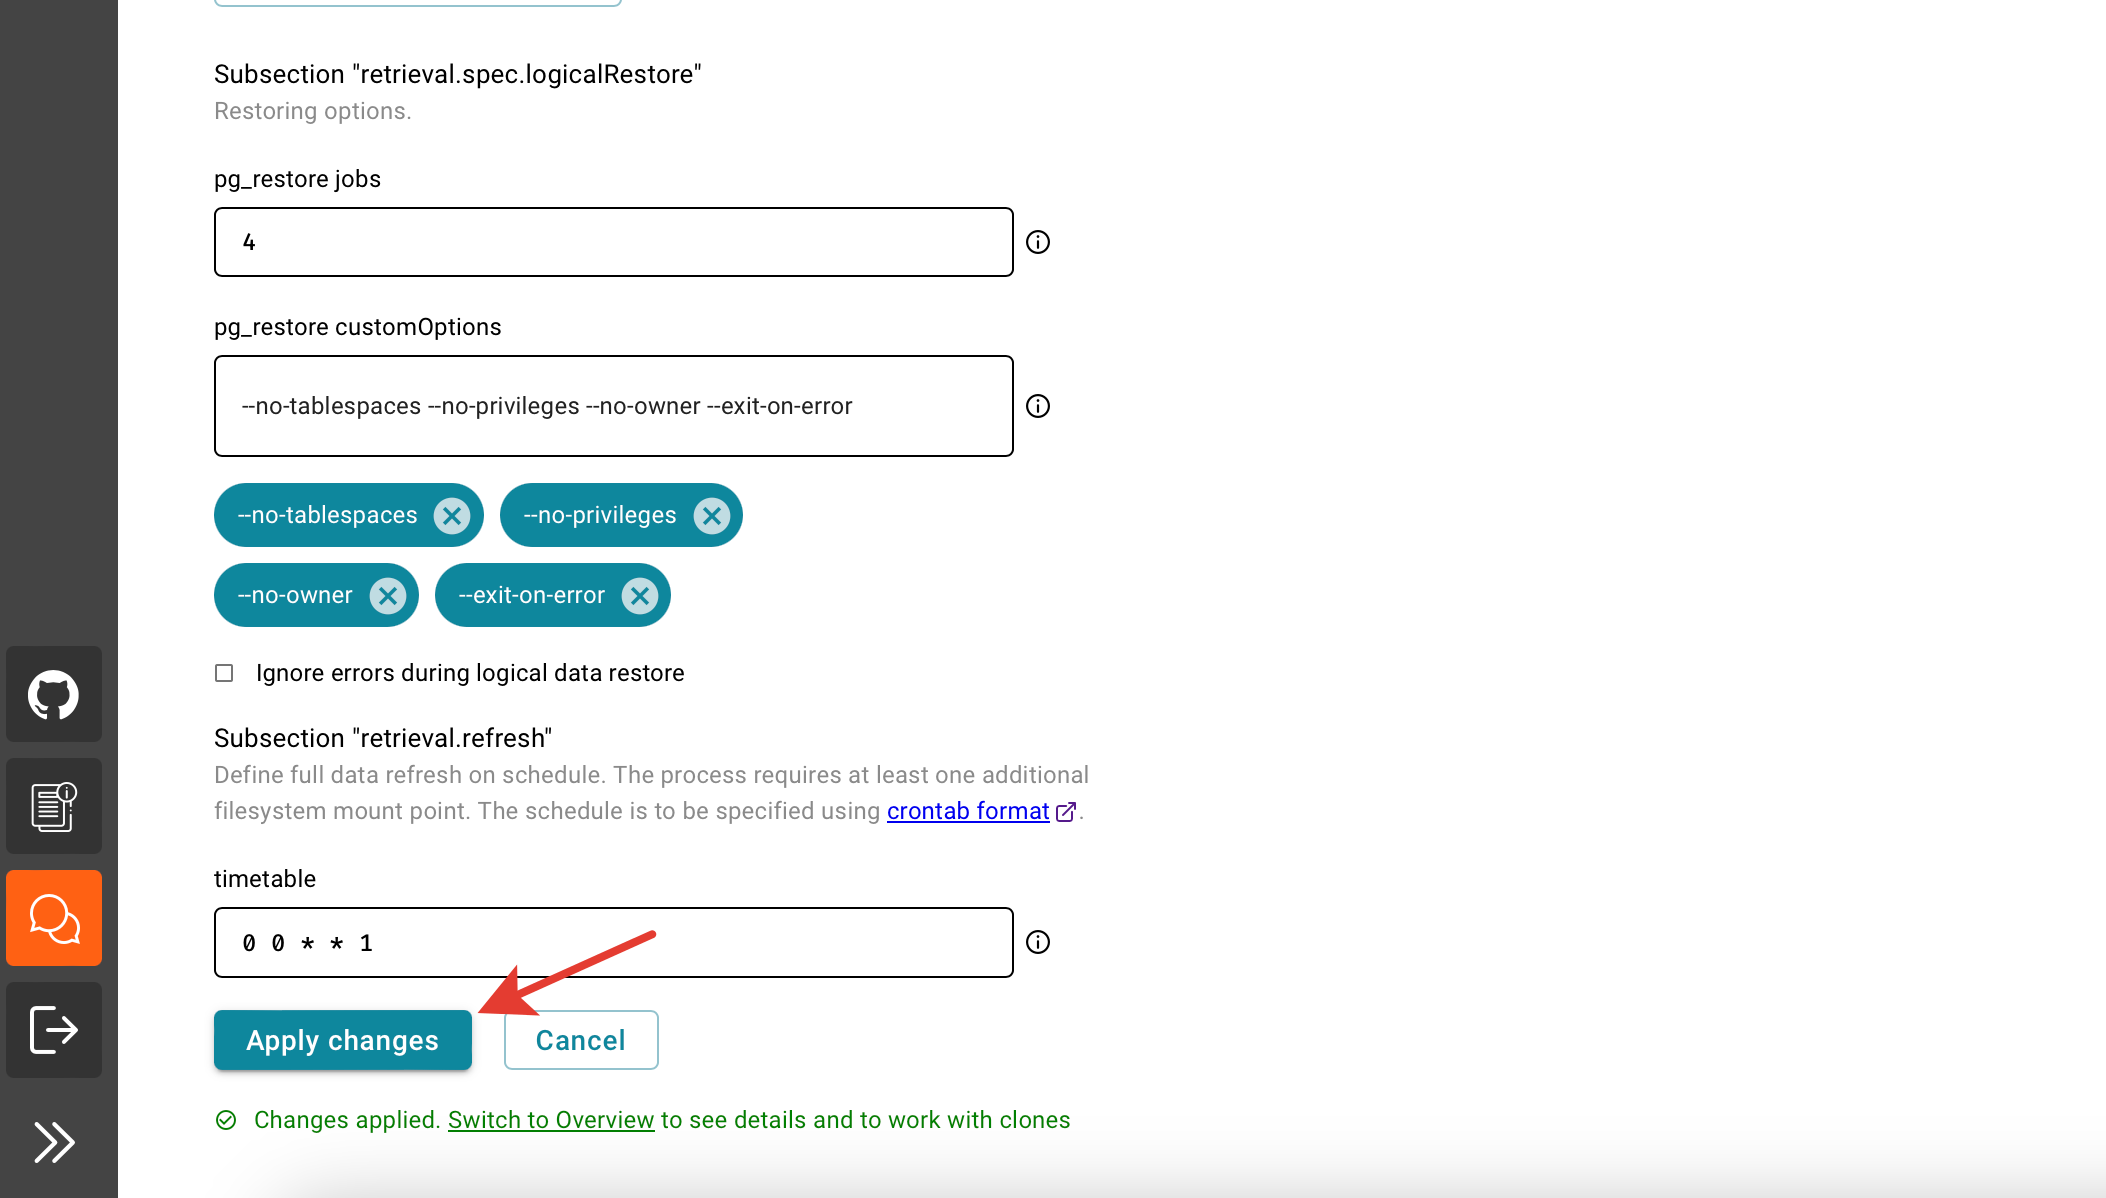
Apply changes and press "Switch to Overview" to track the process of data retrieval.
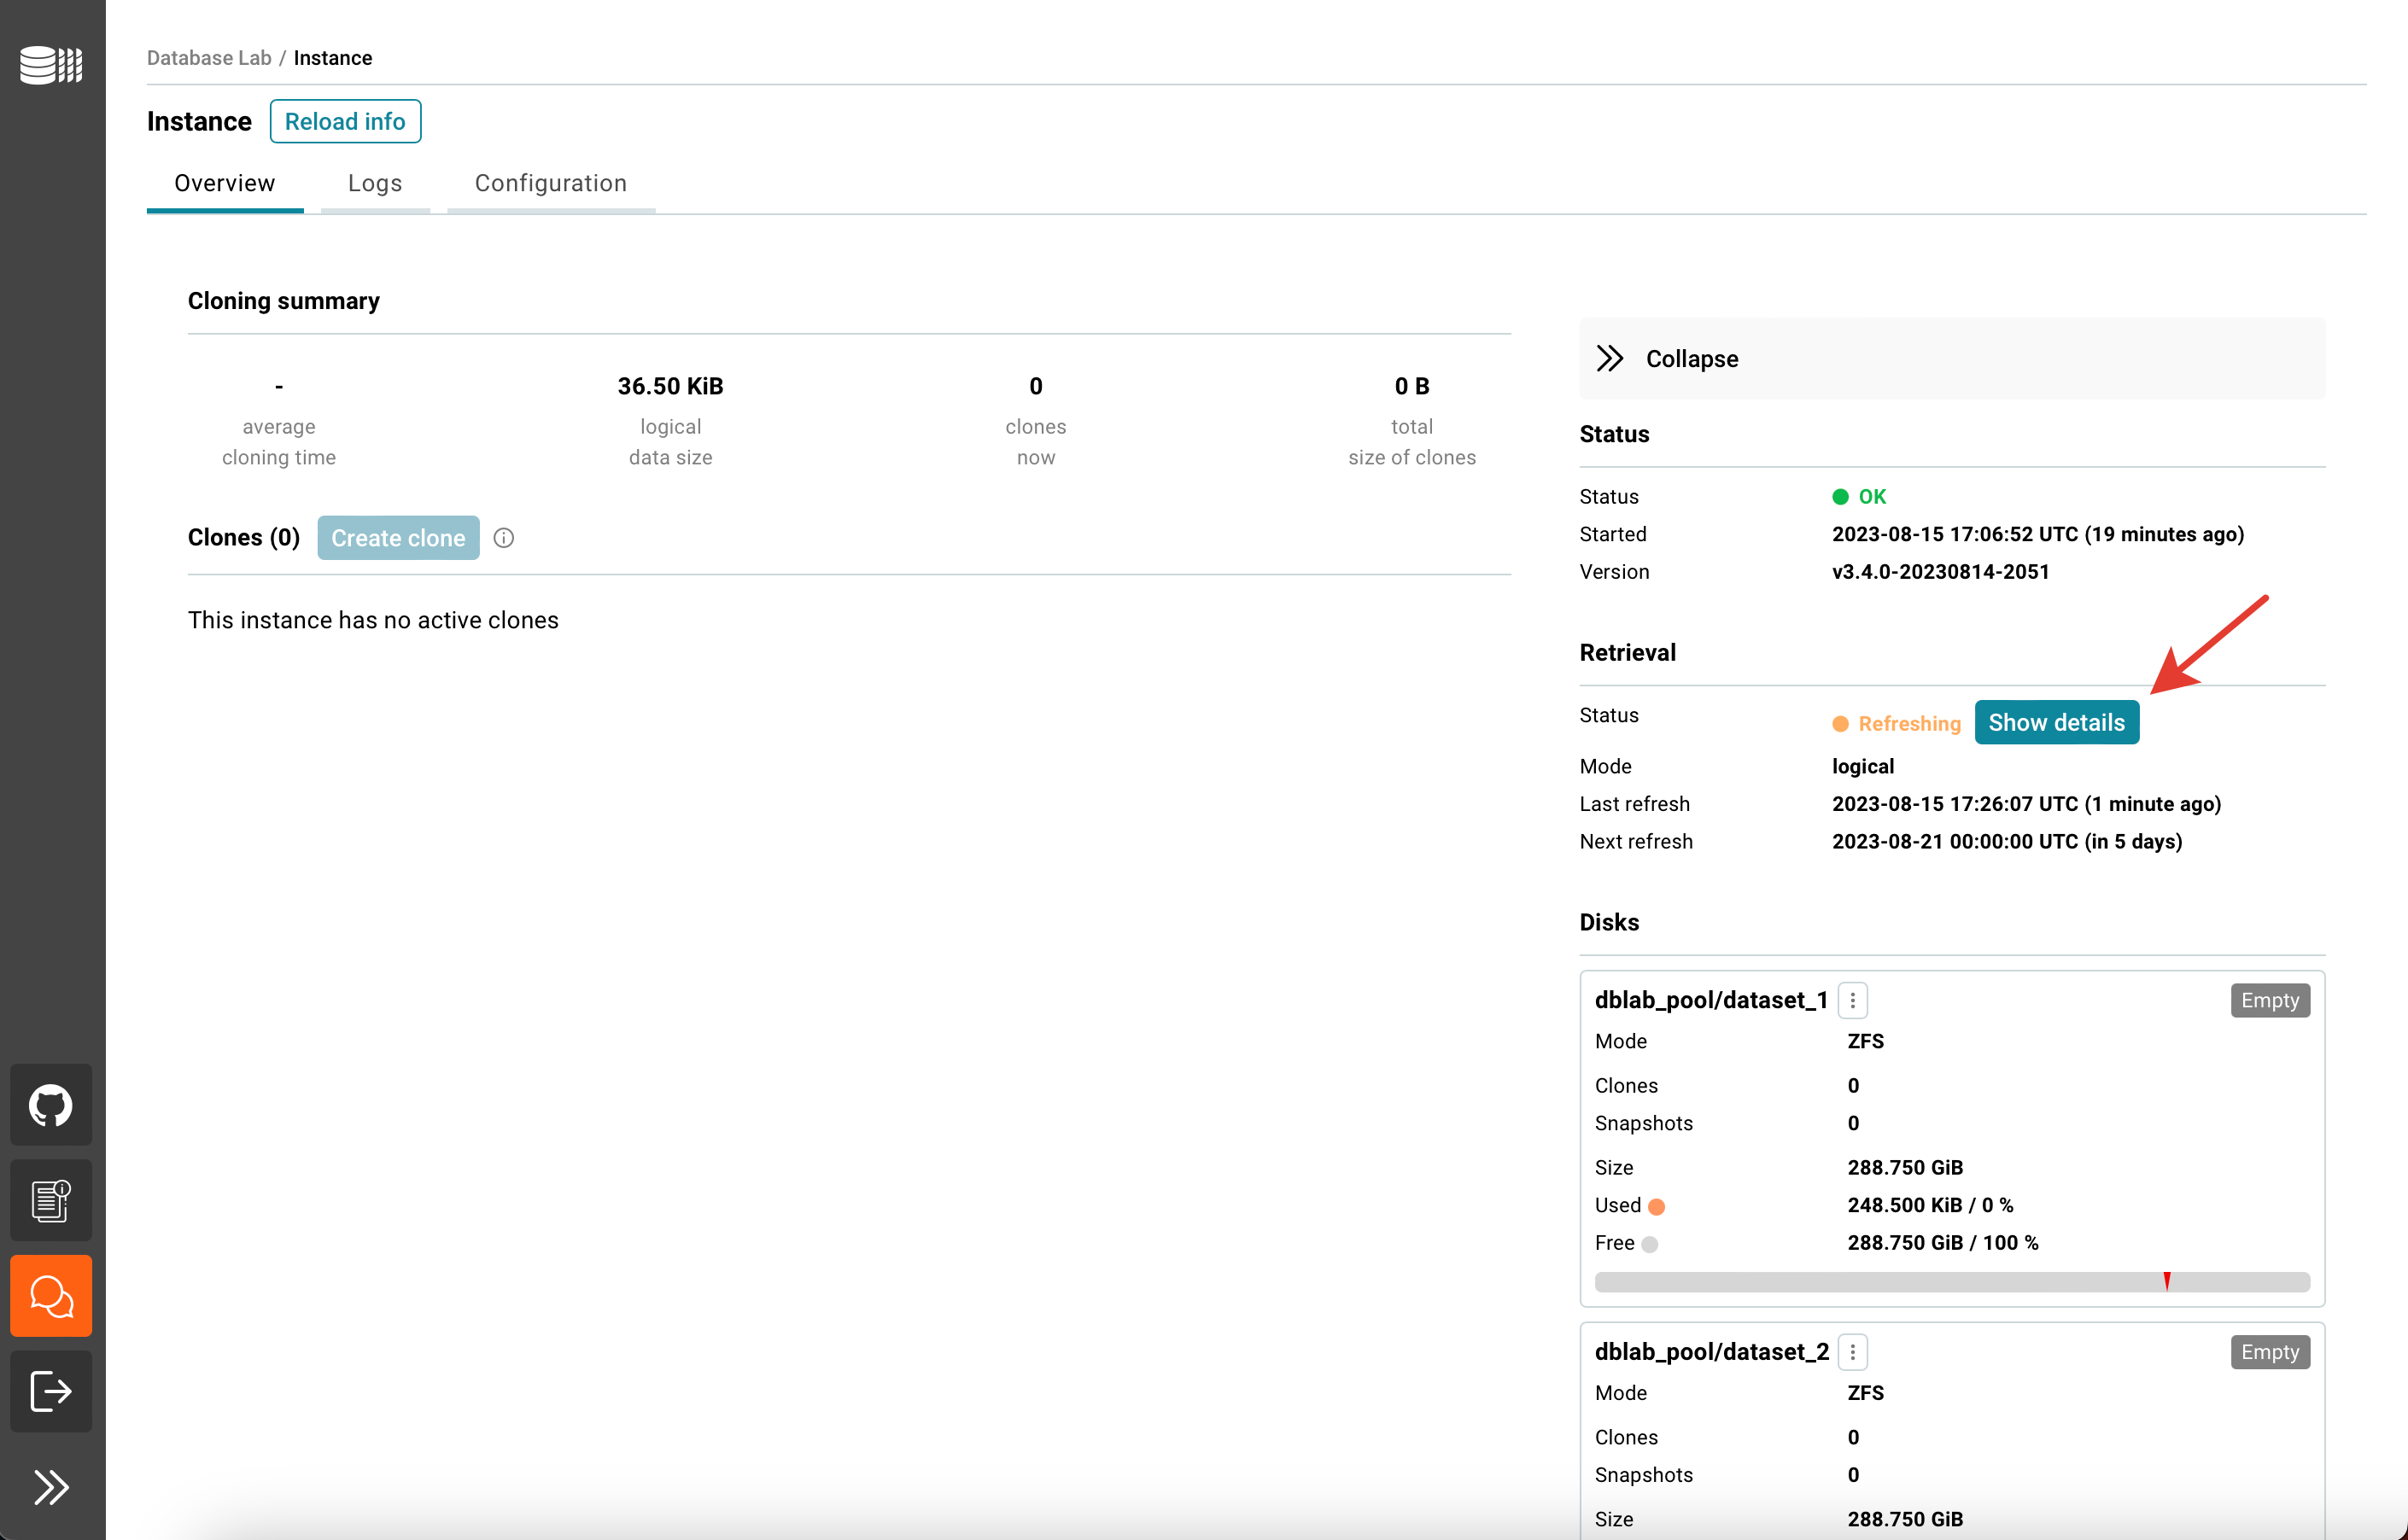
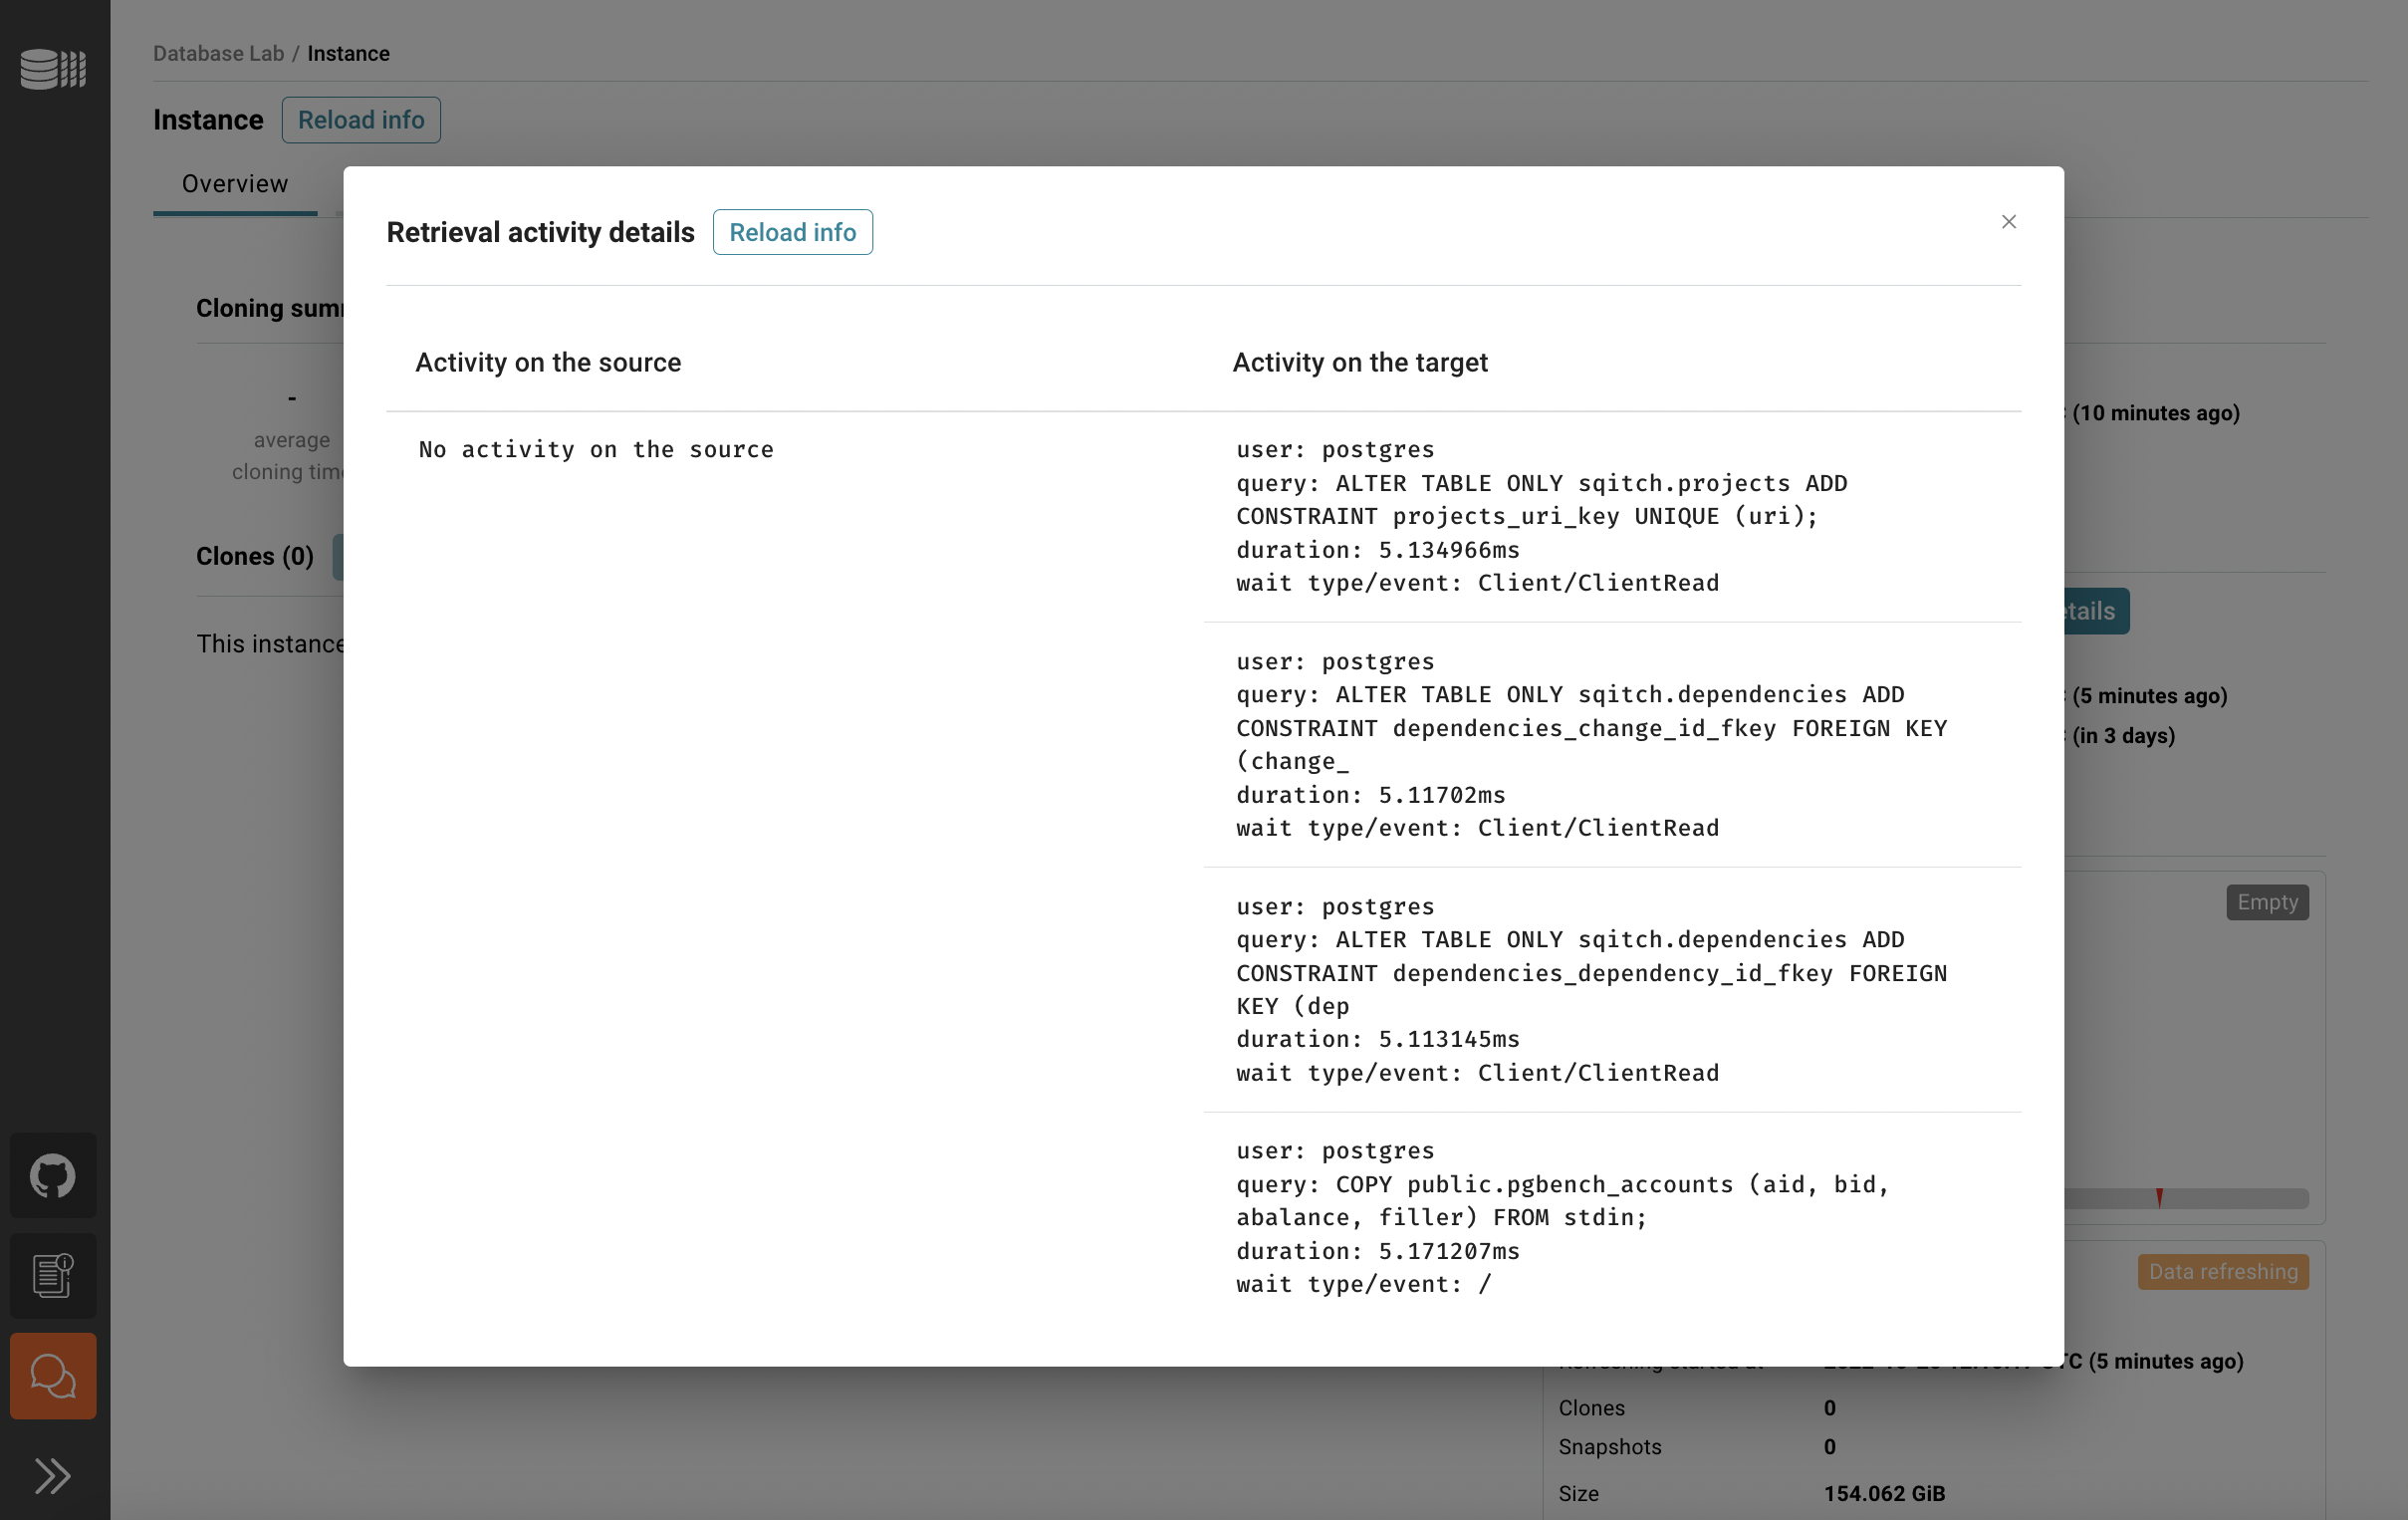
In the Overview tab, you can see the status of the data retrieval. Note that the initial data retrieval takes some time – it depends on the source database size. However, DBLab API, CLI, and UI are already available for use. To observe the current activity on both source and target sides use "Show details".
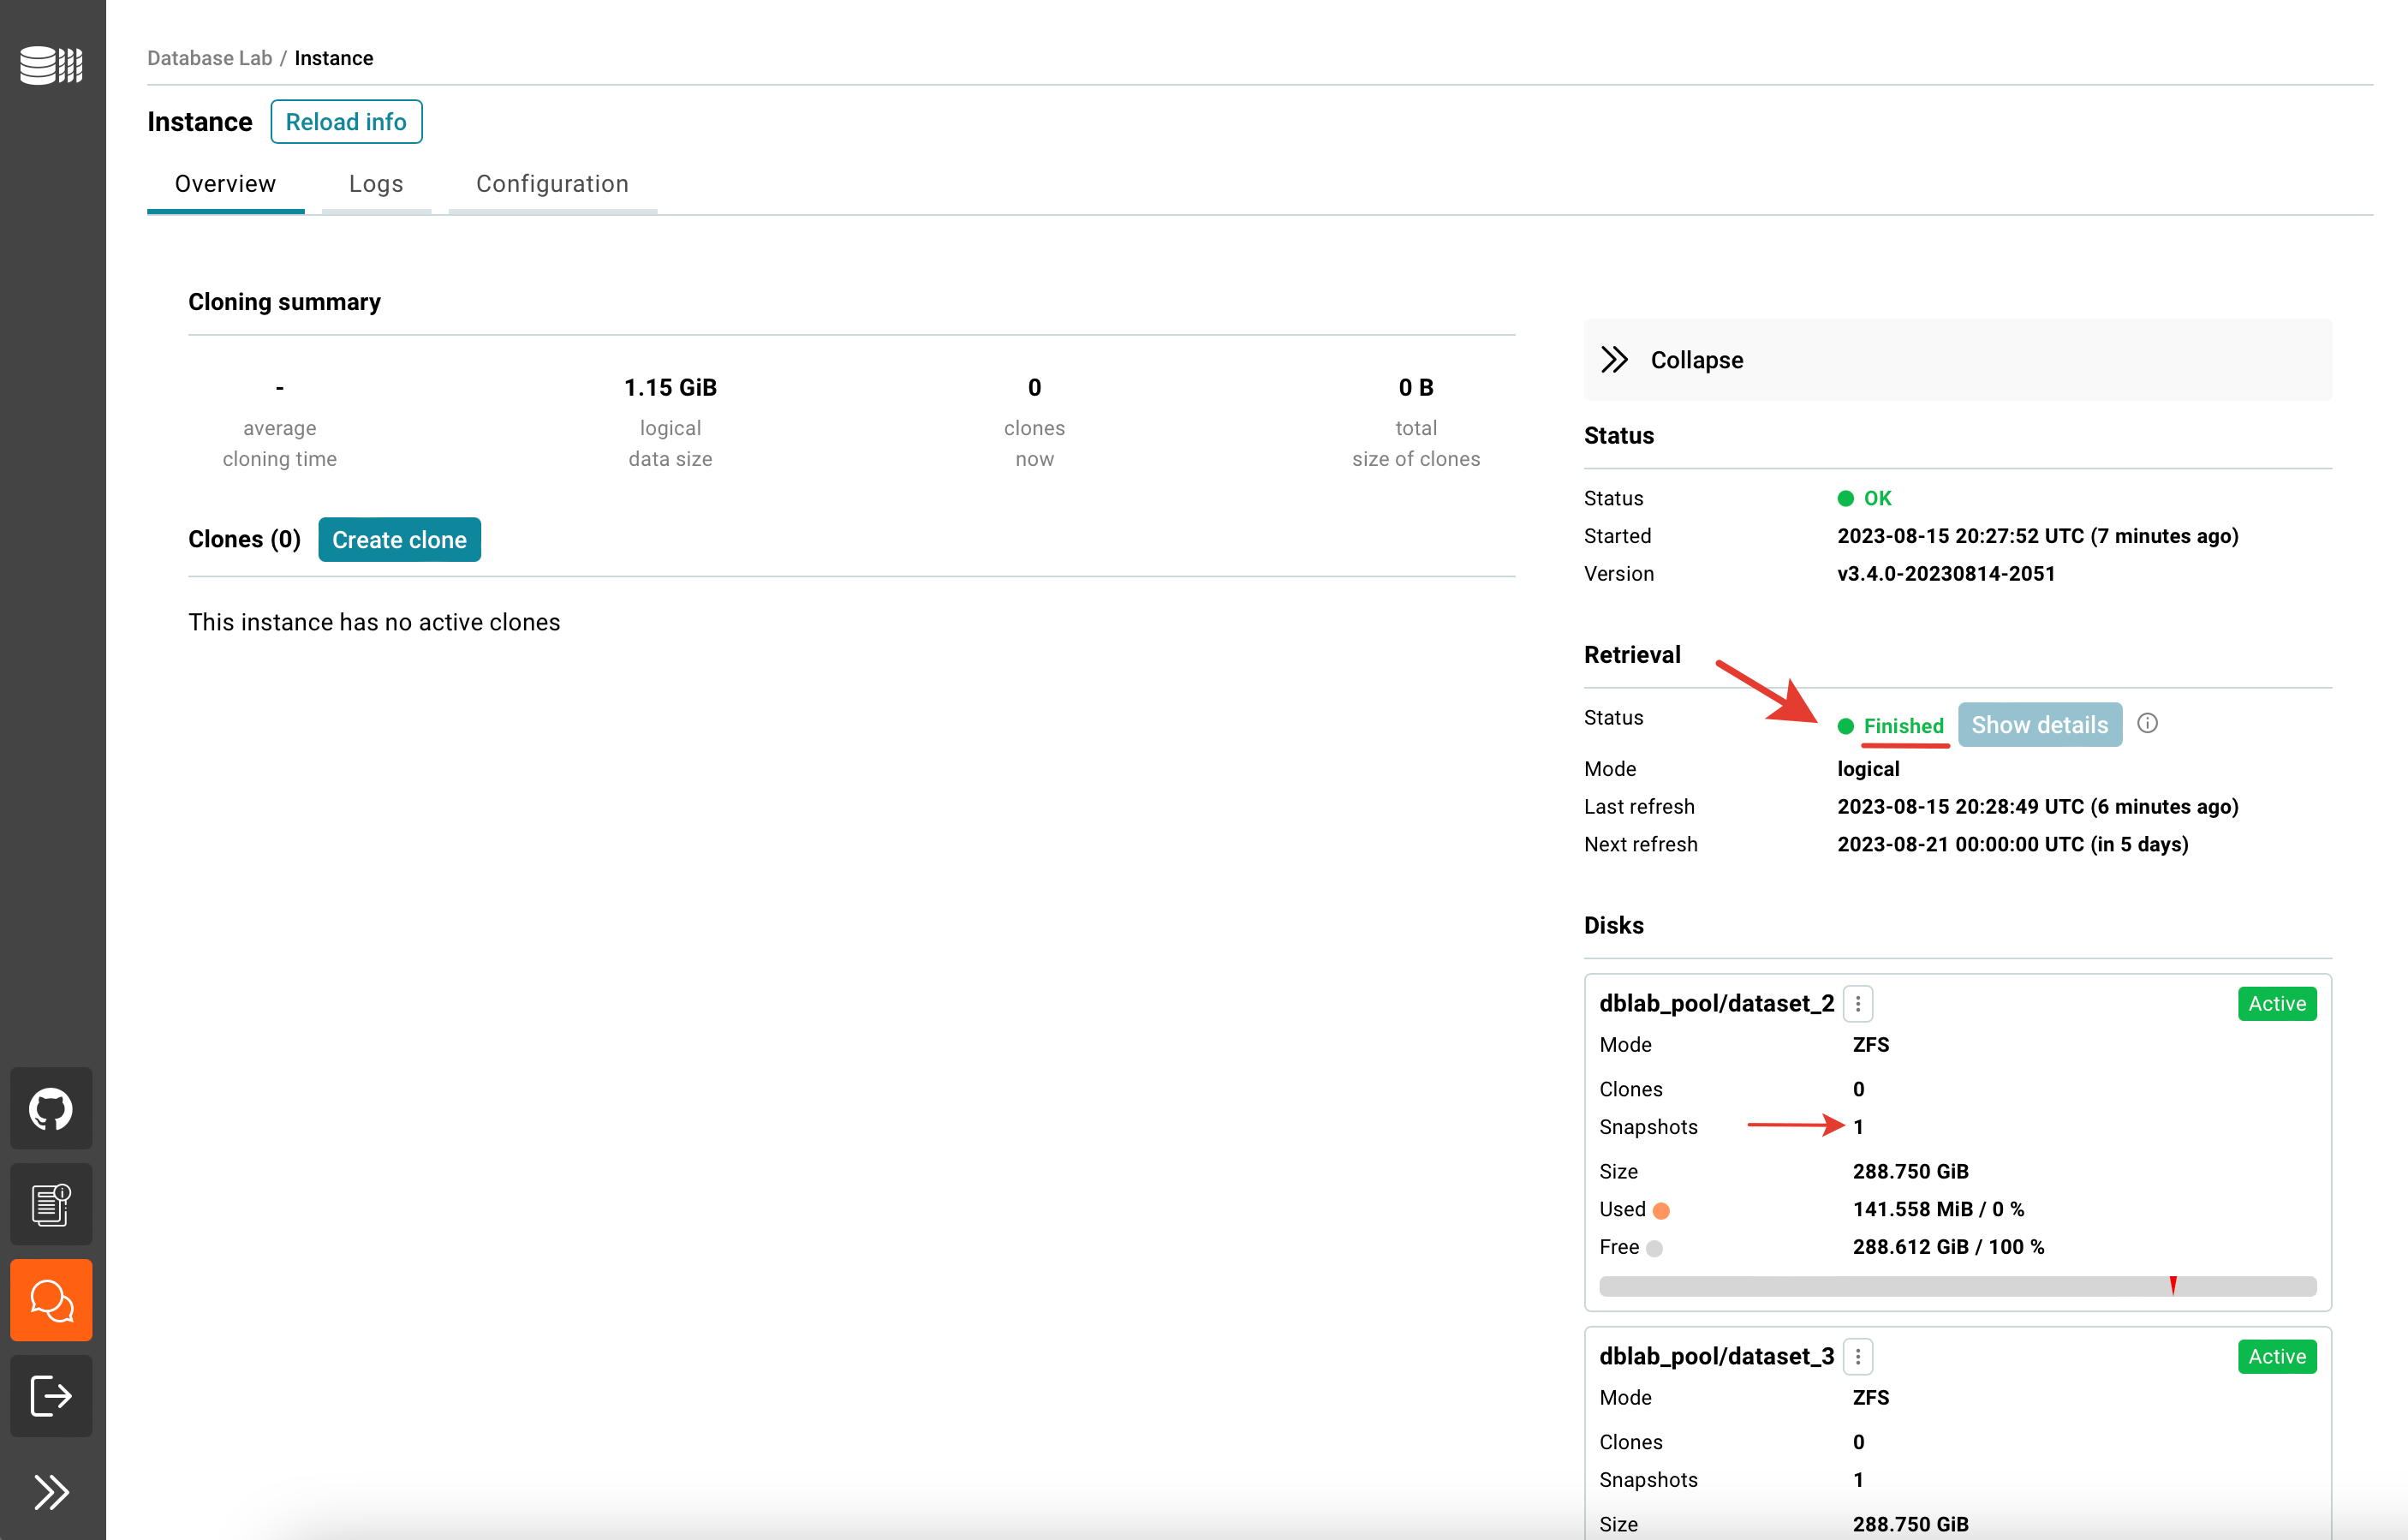
Once the retrieval is done, you can create your first clone. Happy cloning!
Step 3. Start experimenting!
With DBLab, you can create safe, instant copies of your database. It is perfect for testing, experimenting, troubleshooting incidents, query optimization, and development of new features. In this step, you’ll learn how to:
- Make a clone (your own private copy)
- Save a snapshot (bookmark your progress)
- Branch off to experiment without risk
Cloning
UI
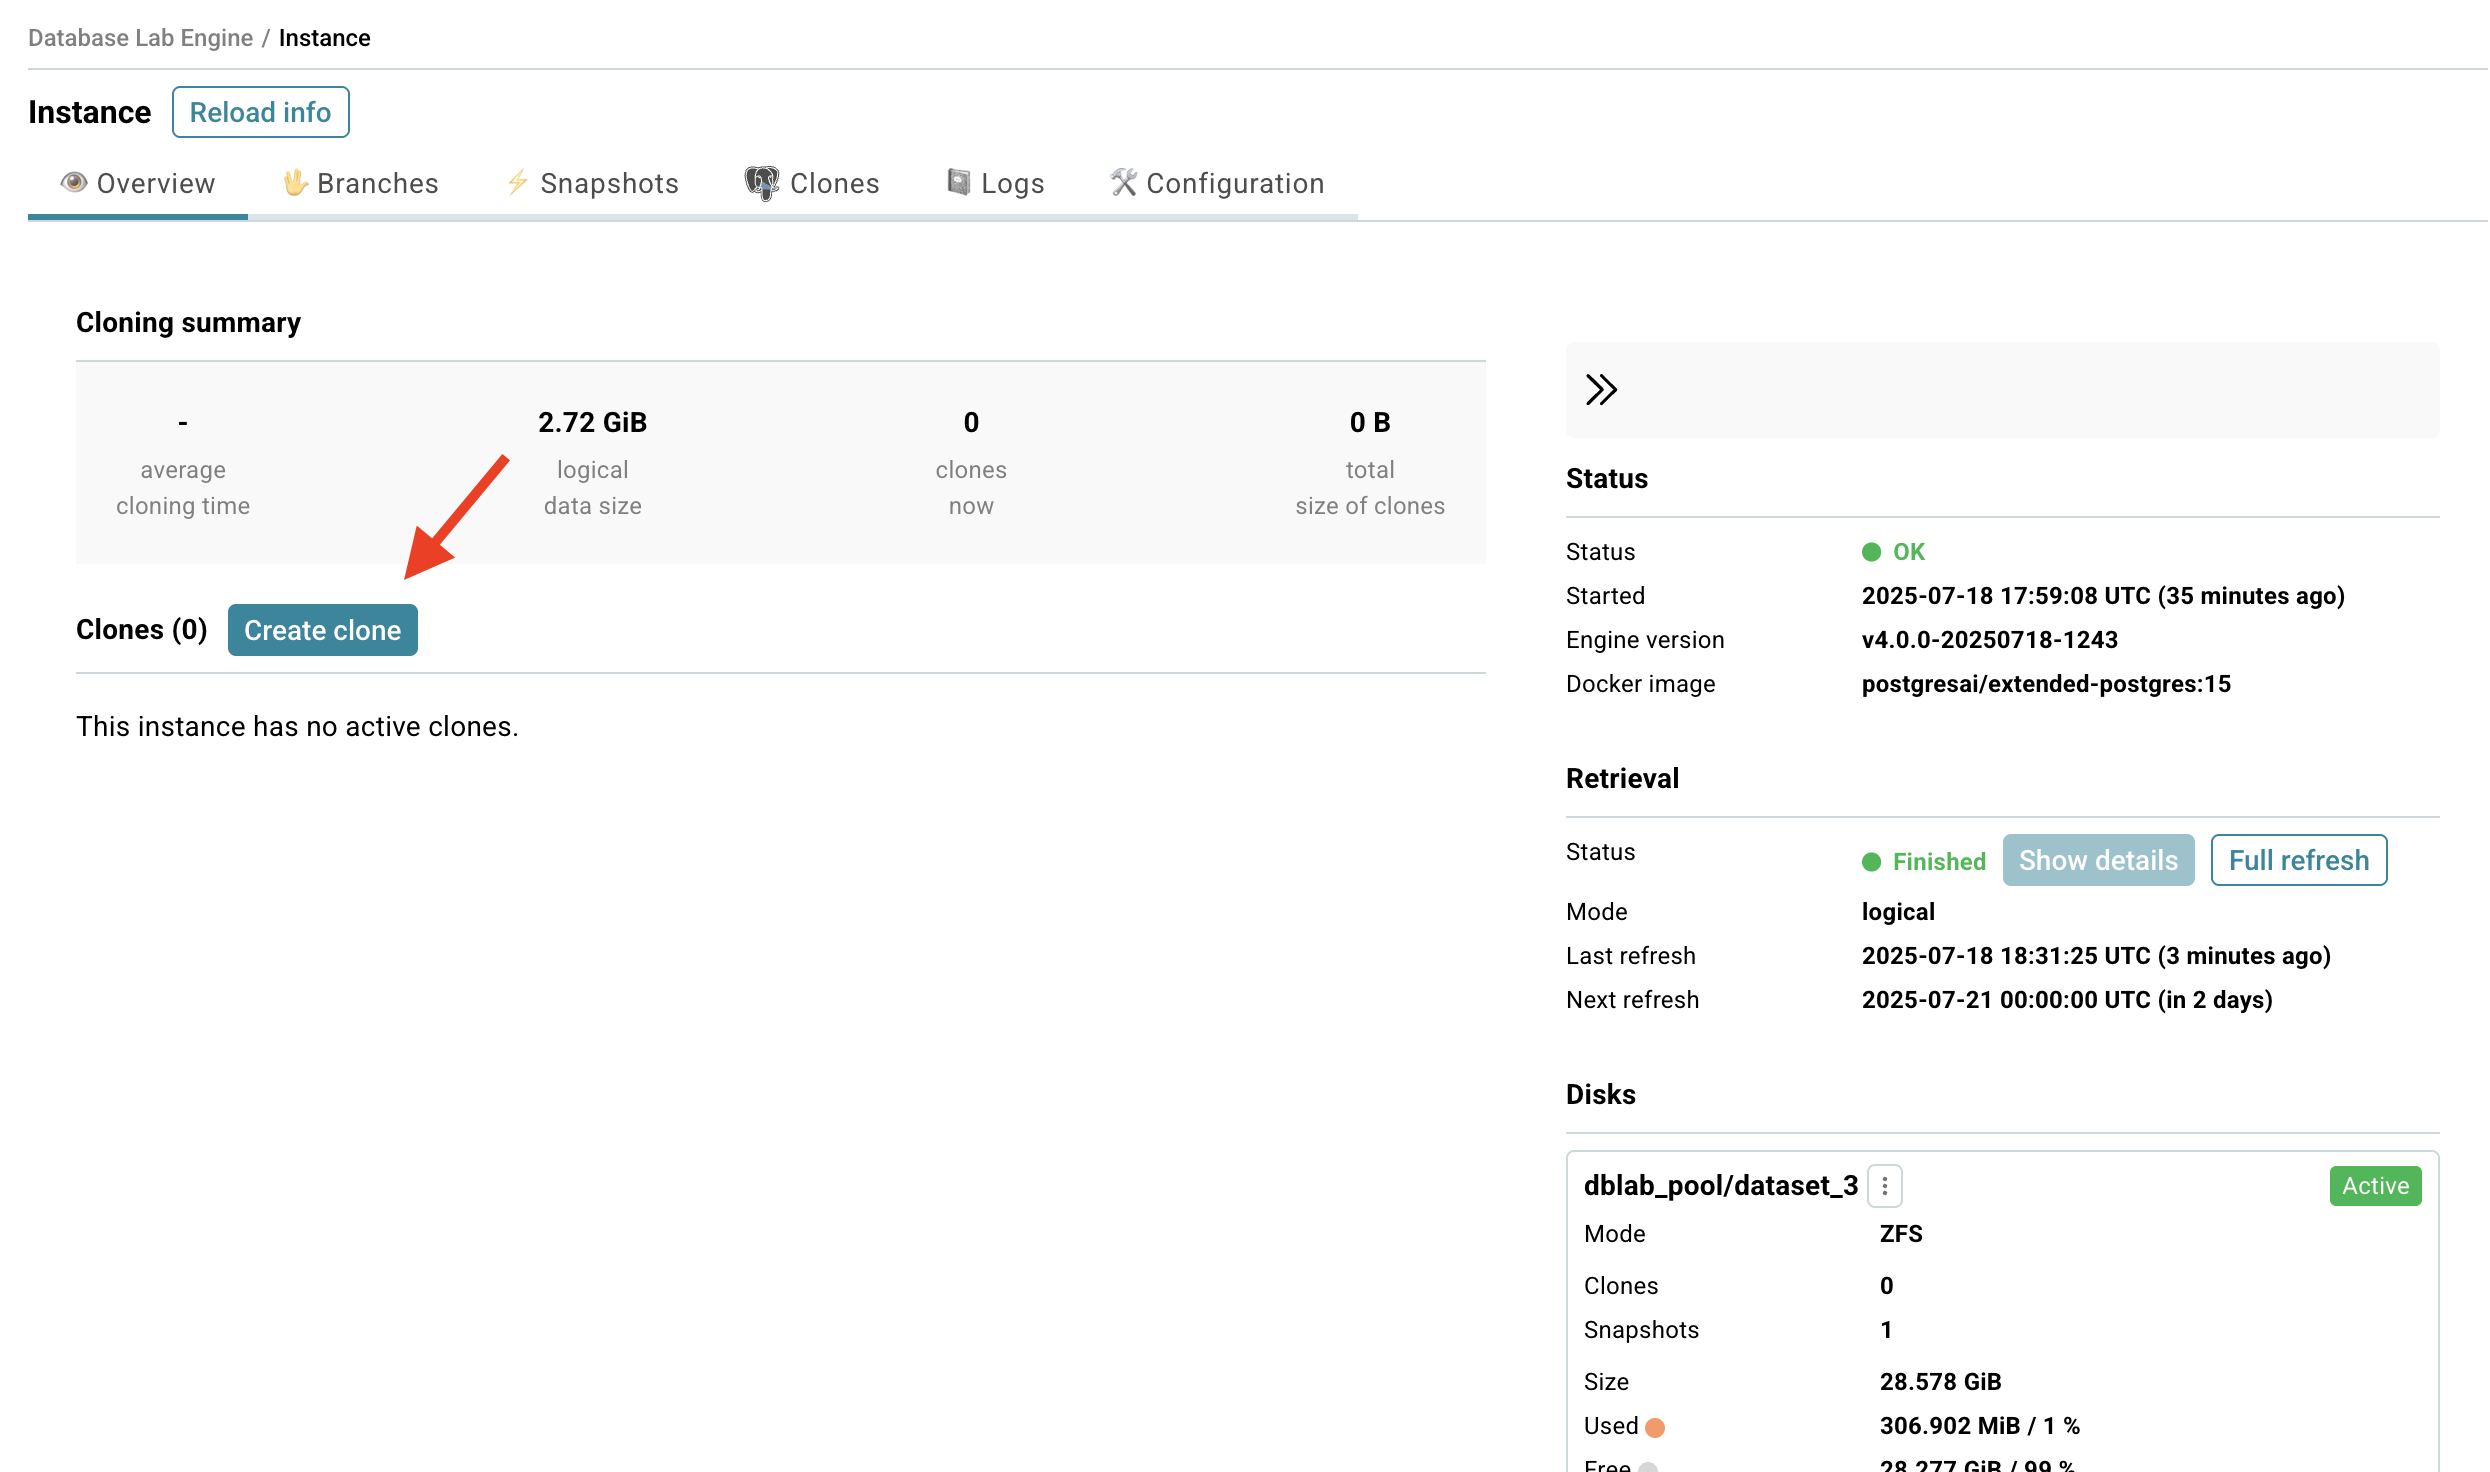
Create a clone
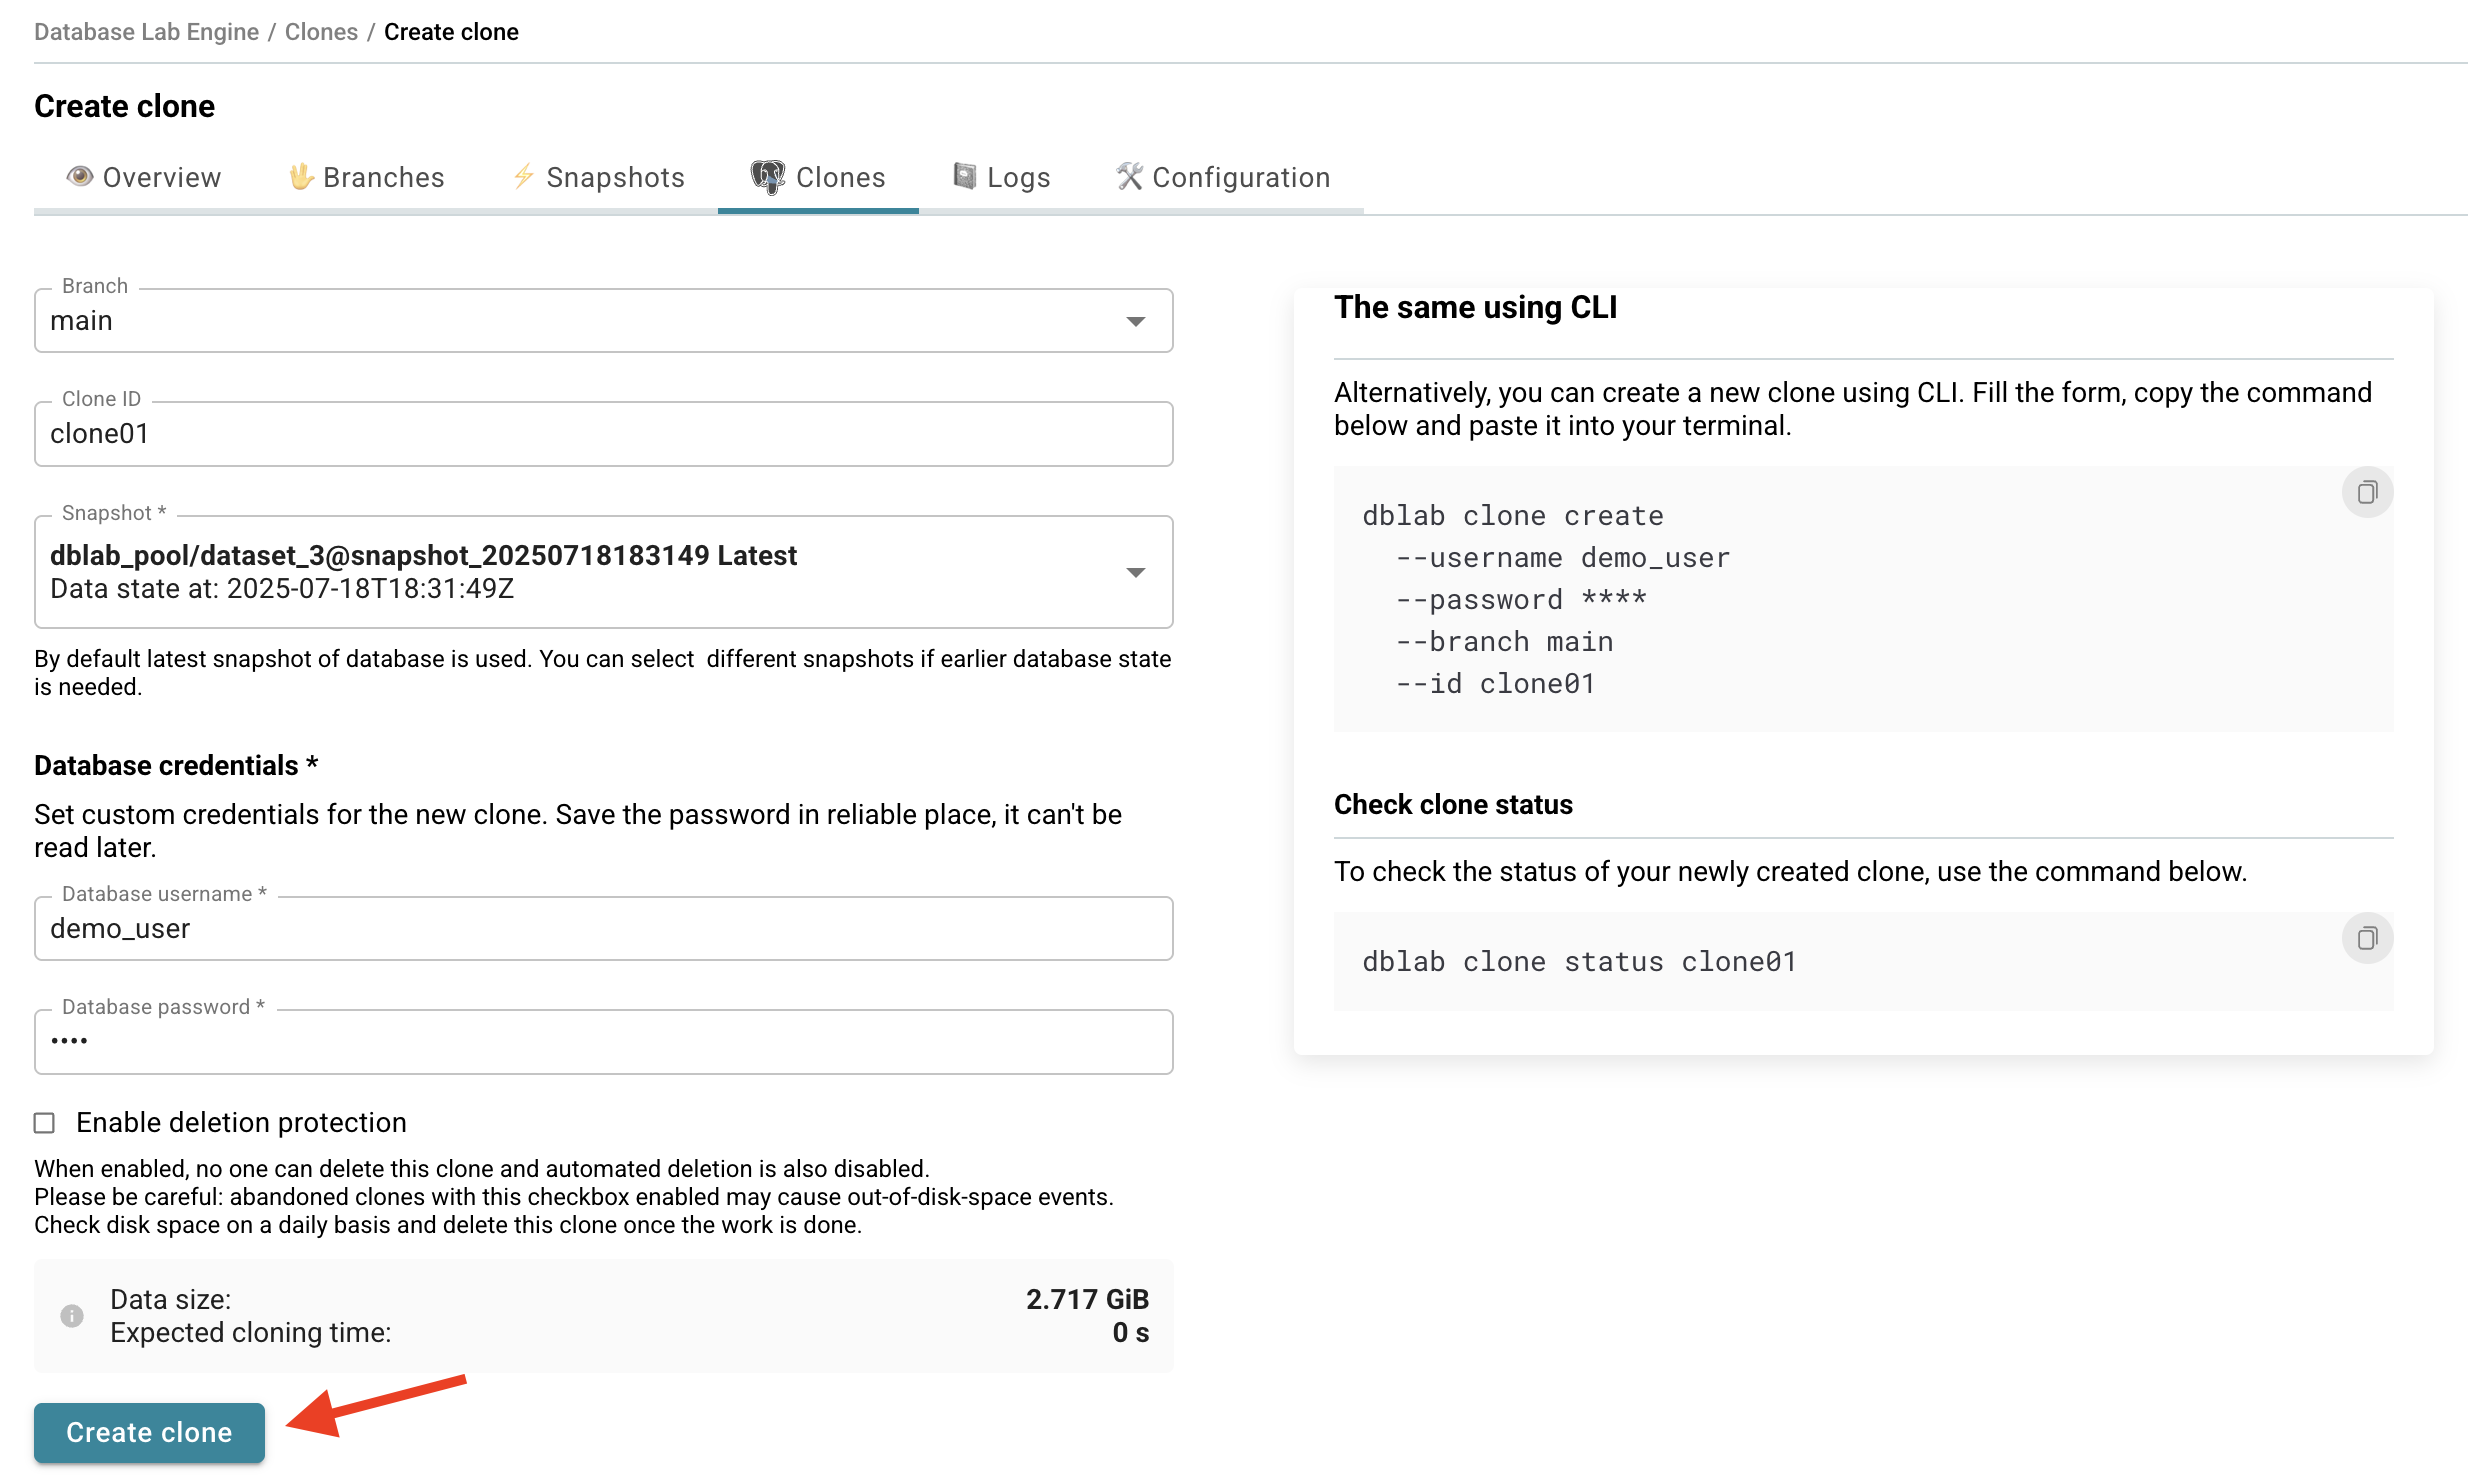
- Click the Create clone button.
- Fill the ID field with a meaningful name.
- (optional) By default, the latest data snapshot (closest to production state) will be used to provision a clone. You can choose another snapshot if any.
- Fill database credentials. Remember the password (it will not be available later, DBLab Platform does not store it!) – you will need to use it to connect to the clone.
- Click the Create clone button and wait for a clone to be provisioned. The process should take only a few seconds.
- You will be redirected to the DBLab clone page.

You also can click the "Enable deletion protection" box. When enabled no one can delete this clone and automated deletion is also disabled.
Connect to a clone
- From the DBLab clone page under section Connection info, copy the psql connection string field contents by clicking the Copy button.
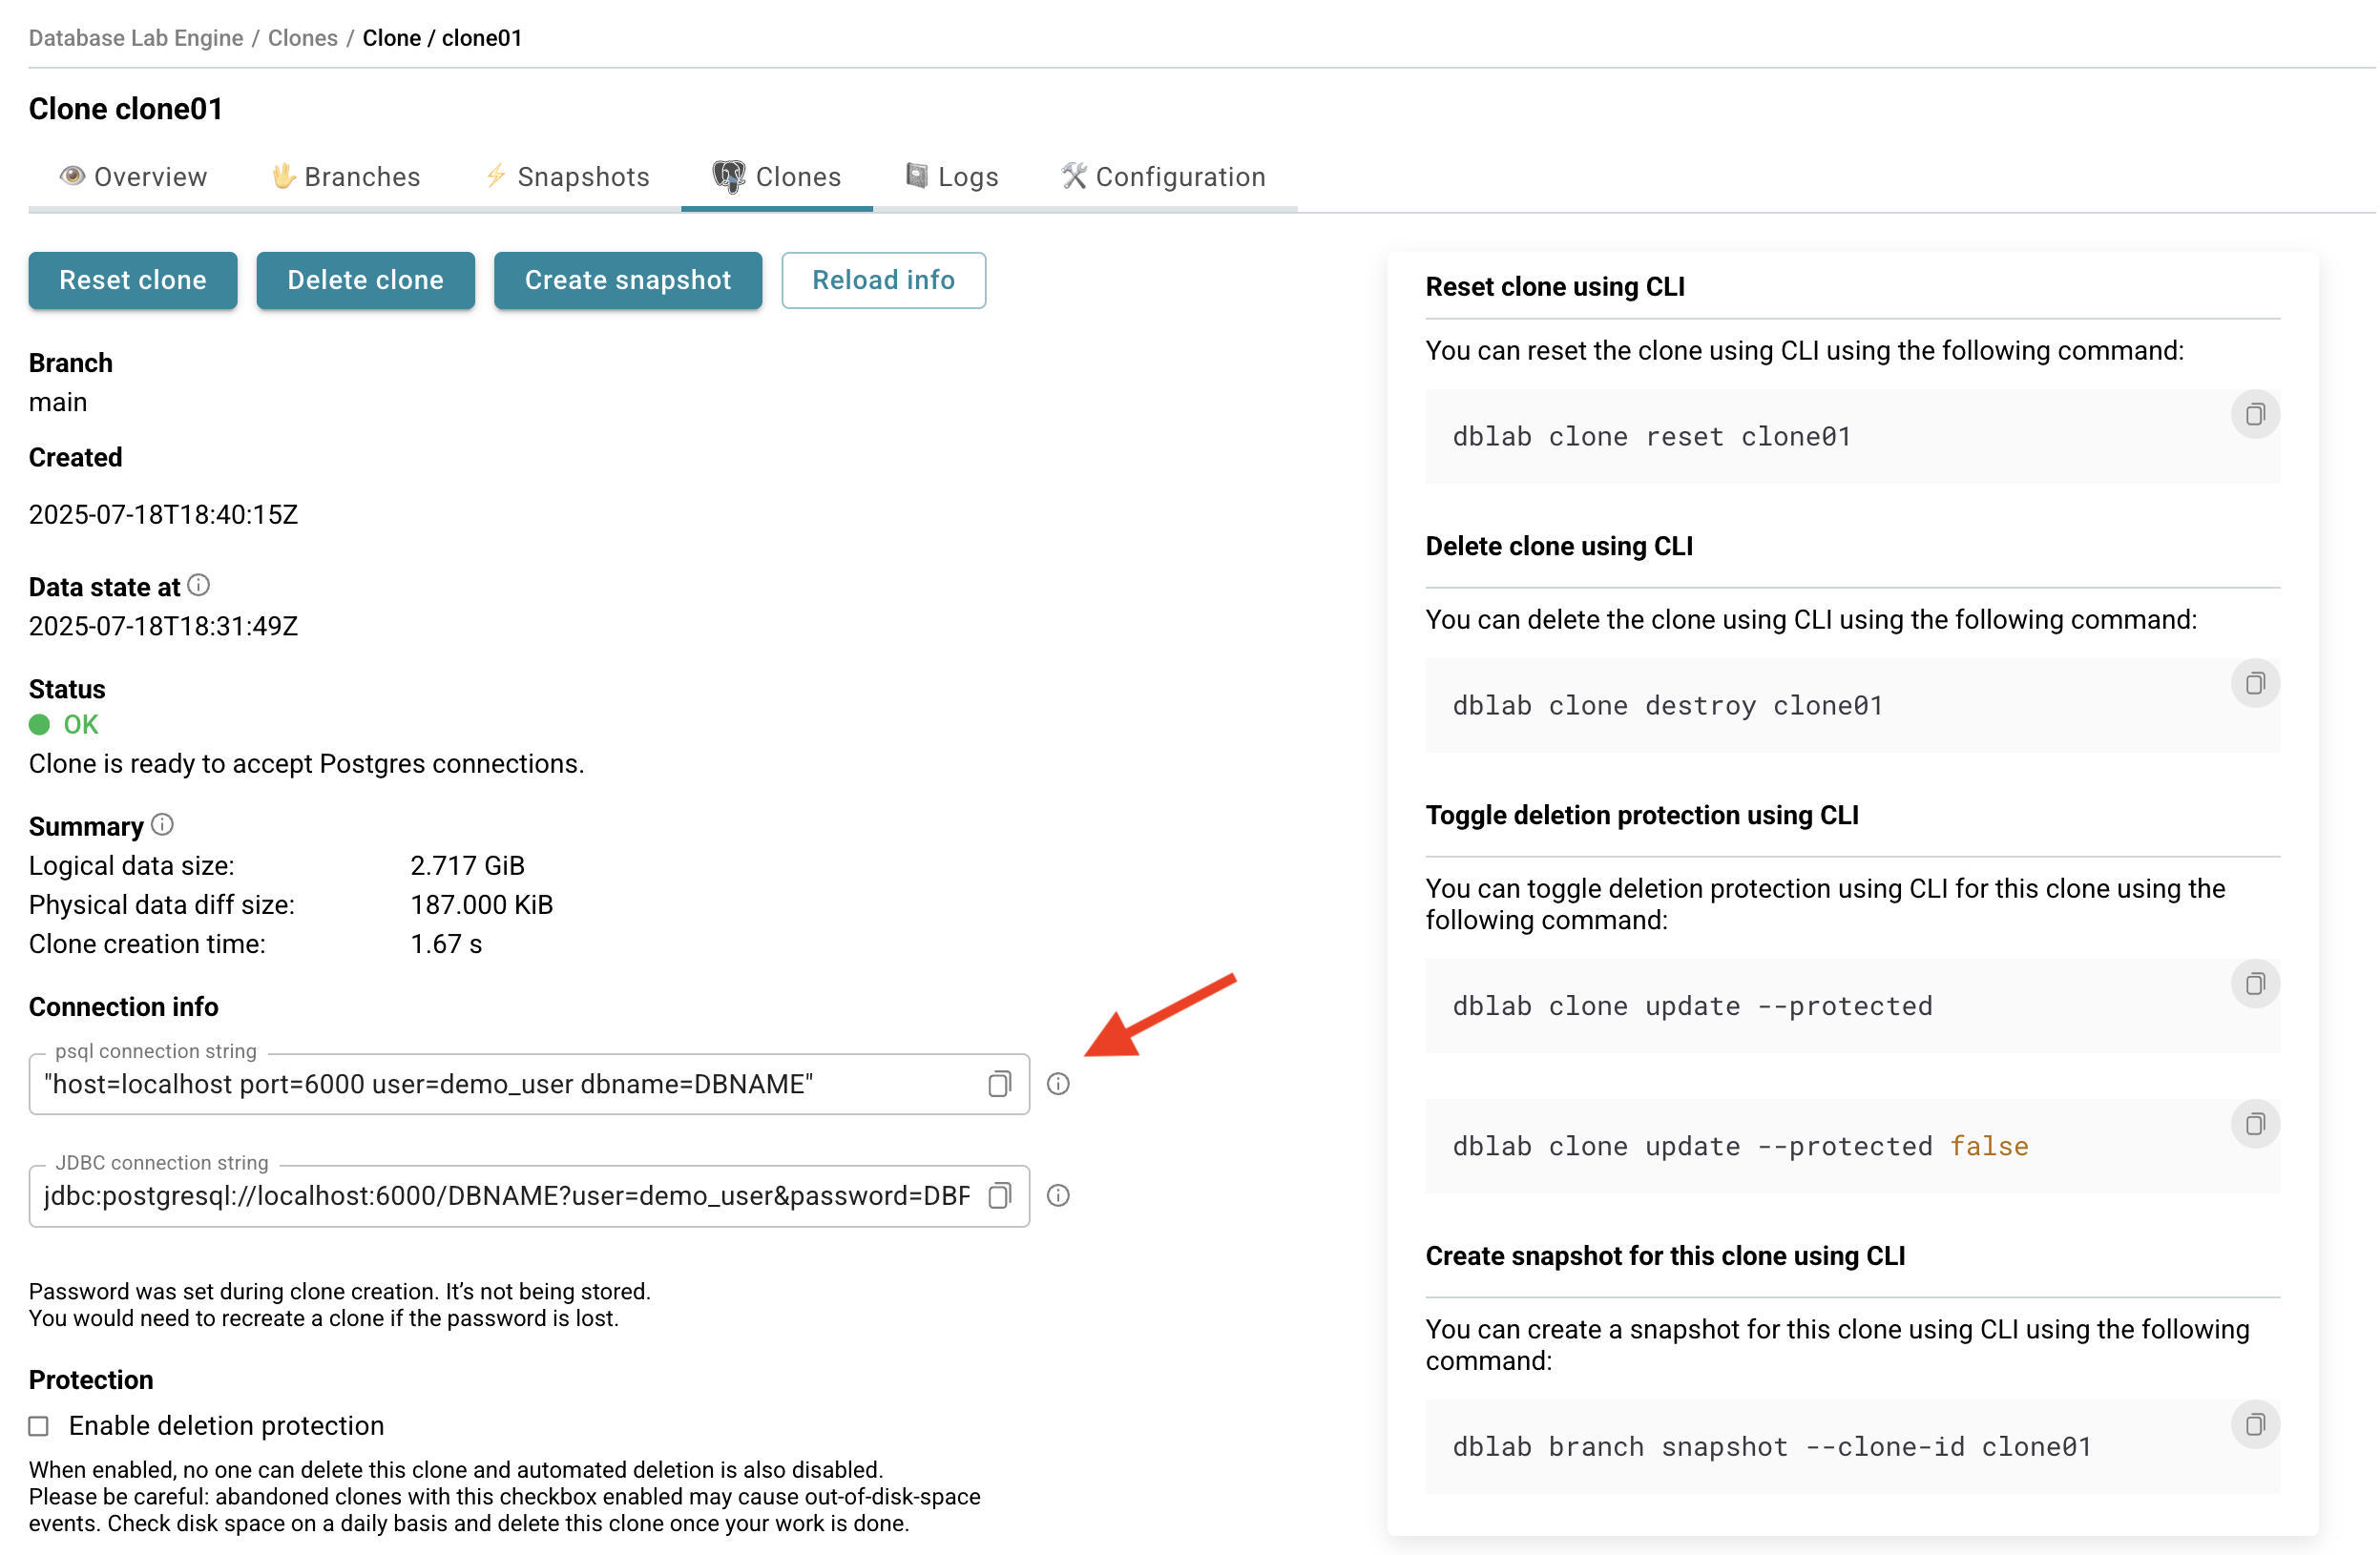
- To connect to clones, also use SSH port forwarding:
# Replace with your server IP and clone port
ssh -N -L 6000:127.0.0.1:6000 [email protected]
- Here we assume that you have
psqlinstalled on your working machine. In the terminal, typepsqland paste the psql connection string field contents. Change the database nameDBNAMEparameter — you can always usepostgresfor the initial connection. - Run the command and type the password you've set during the clone creation.
- Test established connection by listing tables in the database using
\dt.
vitabaks@MacBook-Pro-Vitaliy ~ % psql "host=localhost port=6000 user=demo_user dbname=test"
Password for user demo_user:
psql (14.6 (Homebrew), server 15.3 (Debian 15.3-1.pgdg110+1))
WARNING: psql major version 14, server major version 15.
         Some psql features might not work.
Type "help" for help.

test=# \dt
              List of relations
 Schema |       Name       | Type  |  Owner
--------+------------------+-------+----------
 public | pgbench_accounts | table | postgres
 public | pgbench_branches | table | postgres
 public | pgbench_history  | table | postgres
 public | pgbench_tellers  | table | postgres
(4 rows)

test=# \q
CLI
Install DBLab client CLI (dblab)
CLI can be used on any machine, you just need to be able to reach the DBLab UI/API (port 2346).
curl -sSL dblab.sh | bash
Set up SSH port forwarding for UI/API port 2346:
# Replace with your server IP
ssh -N -L 2346:127.0.0.1:2346 [email protected]
Initialize CLI configuration (assuming that 127.0.0.1:2346 forwards to DBLab machine's port 2346):
dblab init \
  --environment-id=dle-demo \
  --token=tEsuMyA3M108AZYEXWNXDqNJfFp8vefx \
  --url=http://127.0.0.1:2346/api \
  --insecure
Check the configuration by fetching the status of the instance:
dblab instance status
Create a clone
dblab clone create \
  --username dblab_user_1 \
  --password secret_password \
  --id my_first_clone
To connect to clones, also use SSH port forwarding:
# Replace with your server IP and clone port
ssh -N -L 6000:127.0.0.1:6000 [email protected]
After a second or two, if everything is configured correctly, you will see that the clone is ready to be used. It should look like this:
{
    "id": "my_first_clone",
    "protected": false,
    "deleteAt": null,
    "createdAt": "2023-08-15T21:24:42Z",
    "status": {
        "code": "OK",
        "message": "Clone is ready to accept Postgres connections."
    },
    "db": {
        "connStr": "host=localhost port=6001 user=dblab_user_1 dbname=postgres",
        "host": "localhost",
        "port": "6000",
        "username": "dblab_user_1",
        "password": "",
        "dbName": ""
    },
    "snapshot": {
        "id": "dblab_pool/dataset_2@snapshot_20230815202914",
        "createdAt": "2023-08-15T20:30:47Z",
        "dataStateAt": "2023-08-15T20:29:14Z",
        "pool": "dblab_pool/dataset_2",
        "numClones": 2,
        "physicalSize": "0 B",
        "logicalSize": "587 MiB"
    },
    "metadata": {
        "cloningTime": 1.077492737,
        "maxIdleMinutes": 120,
        "cloneDiffSize": "182 KiB",
        "logicalSize": "587 MiB"
    }
}
Connect to a clone
You can work with the clone you created earlier using any PostgreSQL client, for example, psql. To install psql:
- macOS (with Homebrew):
brew install libpq - Ubuntu:
sudo apt-get install postgresql-client
Use connection info (the db section of the response of the dblab clone create command):
PGPASSWORD=secret_password psql \
  "host=localhost port=6000 user=dblab_user_1 dbname=test"
Check the available tables:
\dt+
Now let's see how quickly we can reset the state of the clone. Delete some data or drop a table. Do any damage you want! And then use the clone reset command (replace my_first_clone with the ID of your clone if you changed it). You can do it not leaving psql – for that, use the \! command:
\! dblab clone reset my_first_clone
Check the status of the clone:
\! dblab clone status my_first_clone
Notice how fast the resetting was, just a few seconds! 💥
Reconnect to the clone:
\c
Now check the database objects you've dropped or partially deleted – the "damage" has gone.
Create a snapshot
UI
Let's capture a snapshot of your database state. Think of it as creating a checkpoint - you can always return to this exact moment later, or use it as a starting point for new experiments.
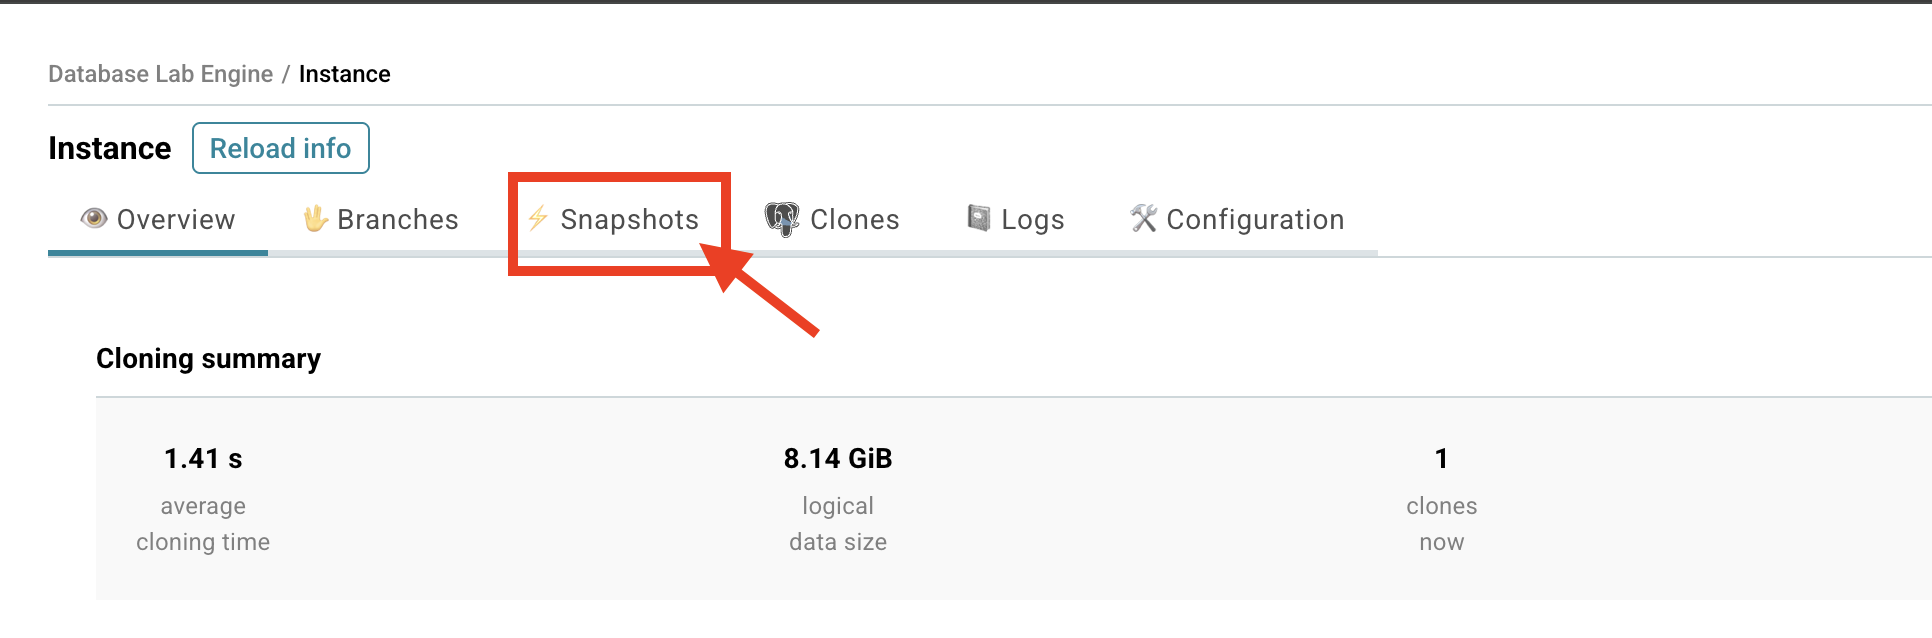
- Find the Snapshots section on your DBLab instance page.
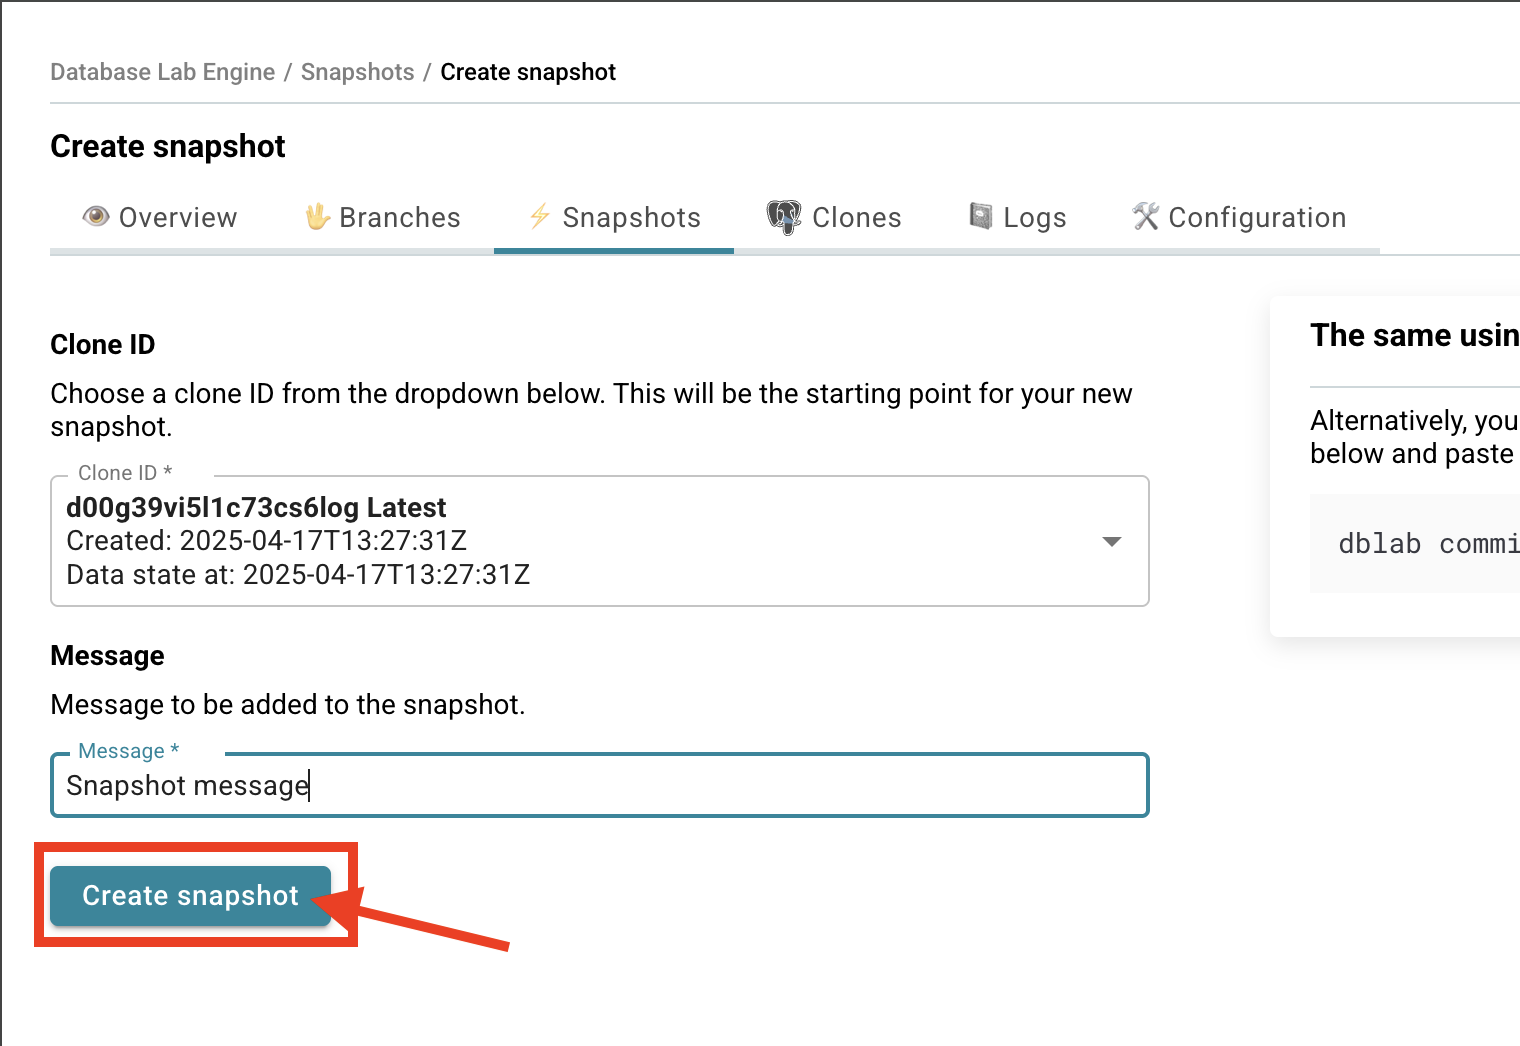
- Click Create snapshot - you'll see a form appear.
- Choose which clone you want to snapshot and give it a meaningful message.
- Click Create.
- You'll be taken to your DBLab Snapshot page - success! 🎉

You can now use the snapshot as a base for new clones or branches!
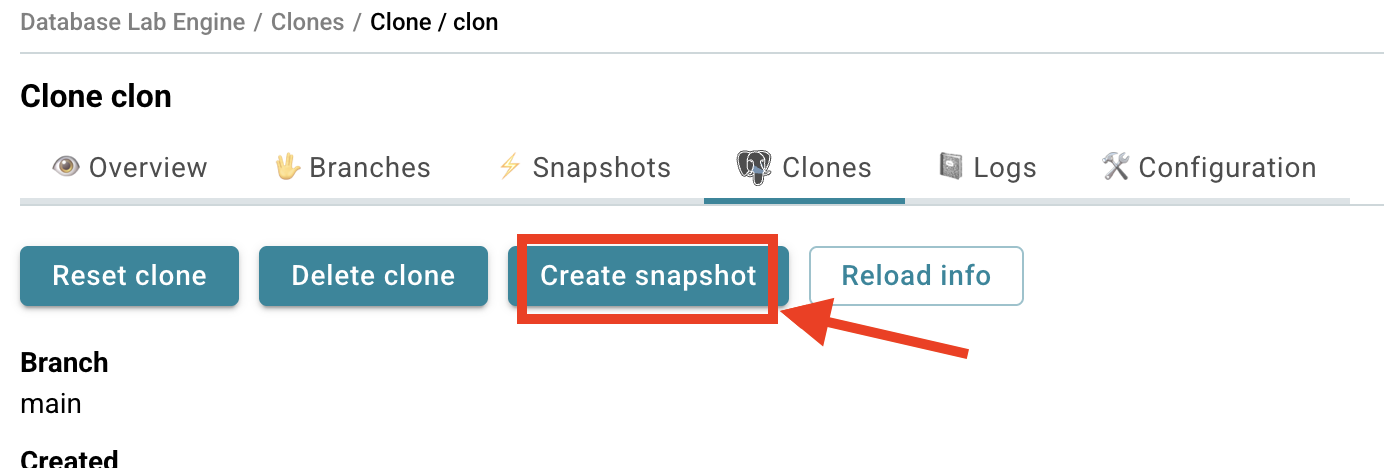
Pro tip: You can also create snapshots directly from any clone page - just look for the "Create snapshot" button there.
CLI
You can also create snapshots from the CLI:
dblab commit --clone-id my_first_clone --message "Snapshot message"
Replace my_first_clone with your actual clone ID (you can see it in the UI or use dblab clone list to list them).
Want to see all your snapshots? Just run:
dblab snapshot list
Instant database branching
UI
Now let's create your first branch! Branches let you experiment safely, try new features, or test fixes in your own isolated environment.
- Find the Branches section on your DBLab instance page.
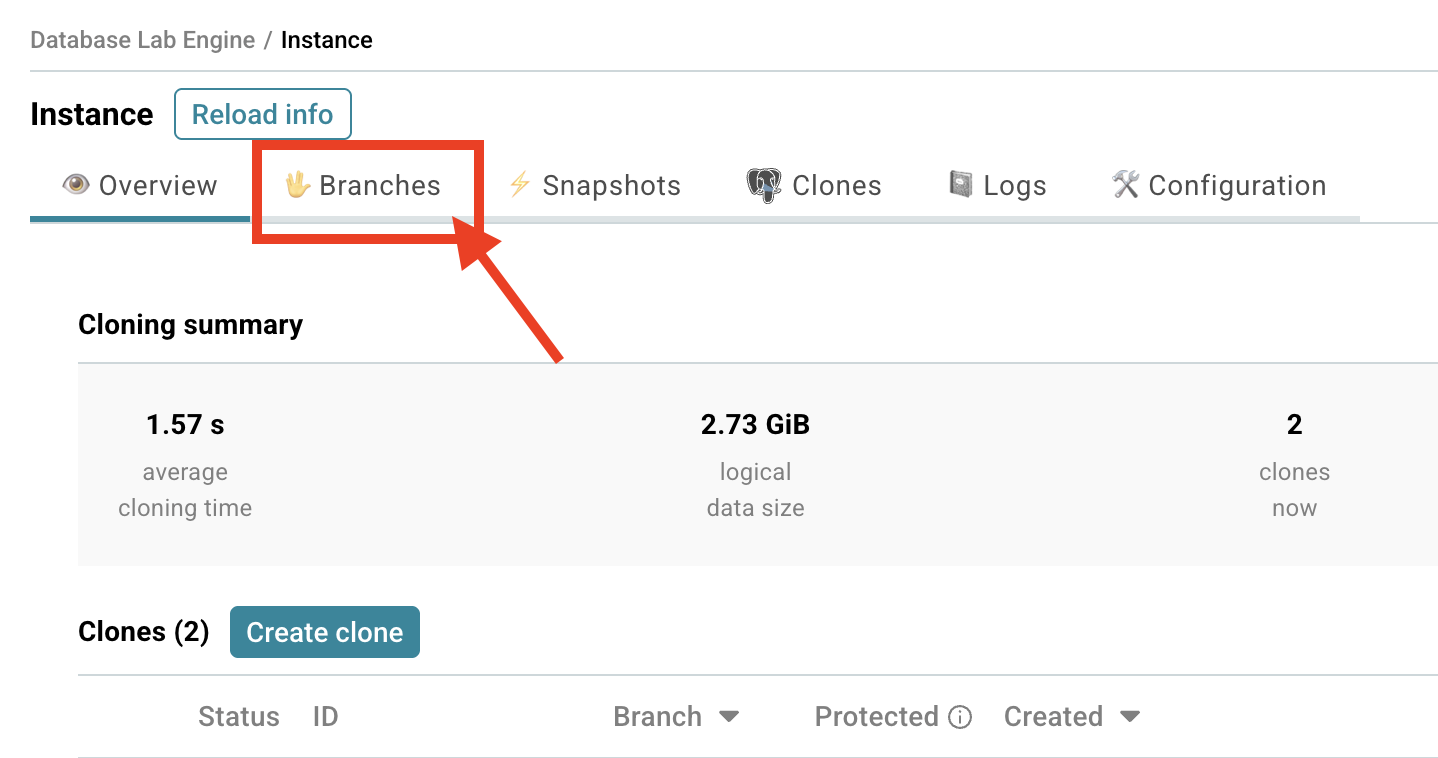
- Click Create branch.
- Give your branch a meaningful name.
- Choose the parent branch (
mainby default) and/or a snapshot that will be memorized as a forking point. - Click Create.
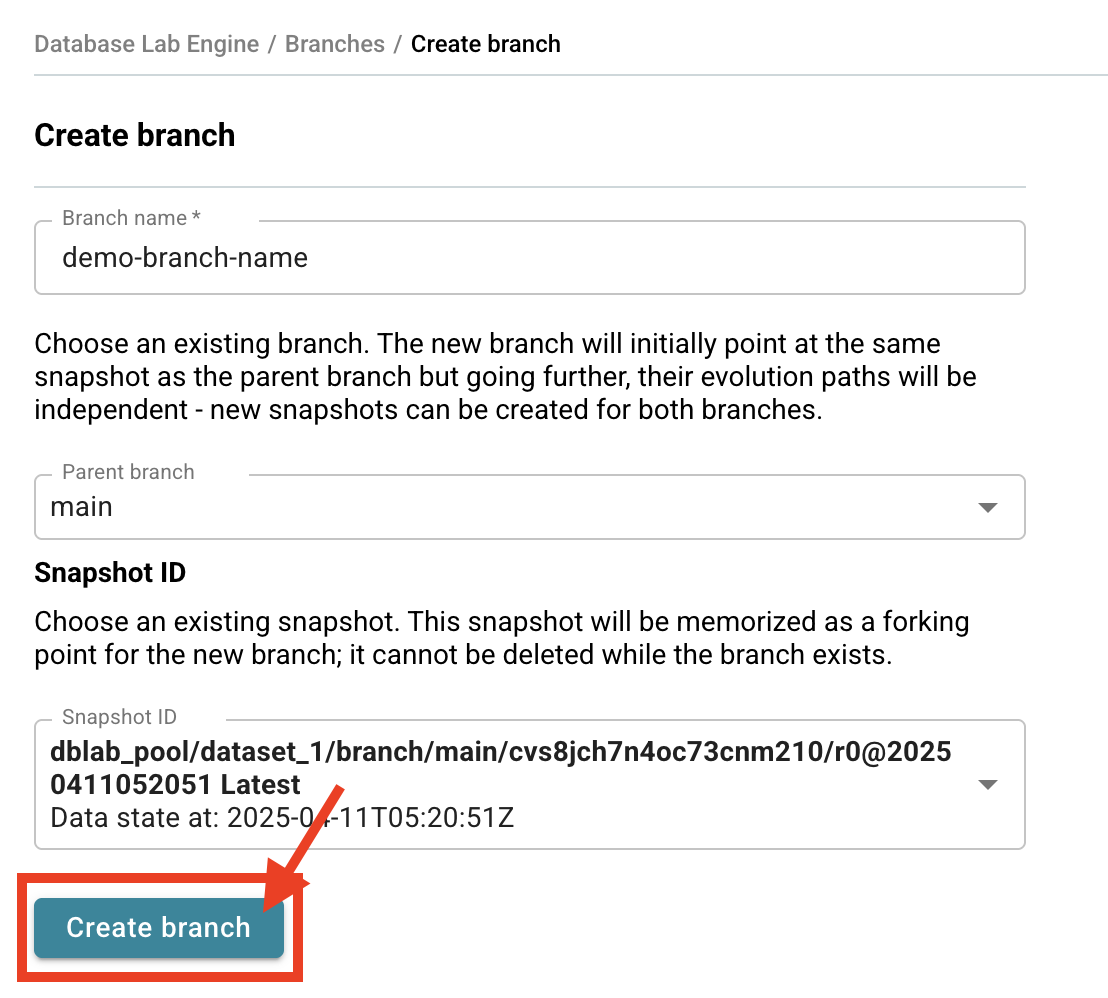
- You'll be taken to your DBLab Branch page - you're all set! 🚀
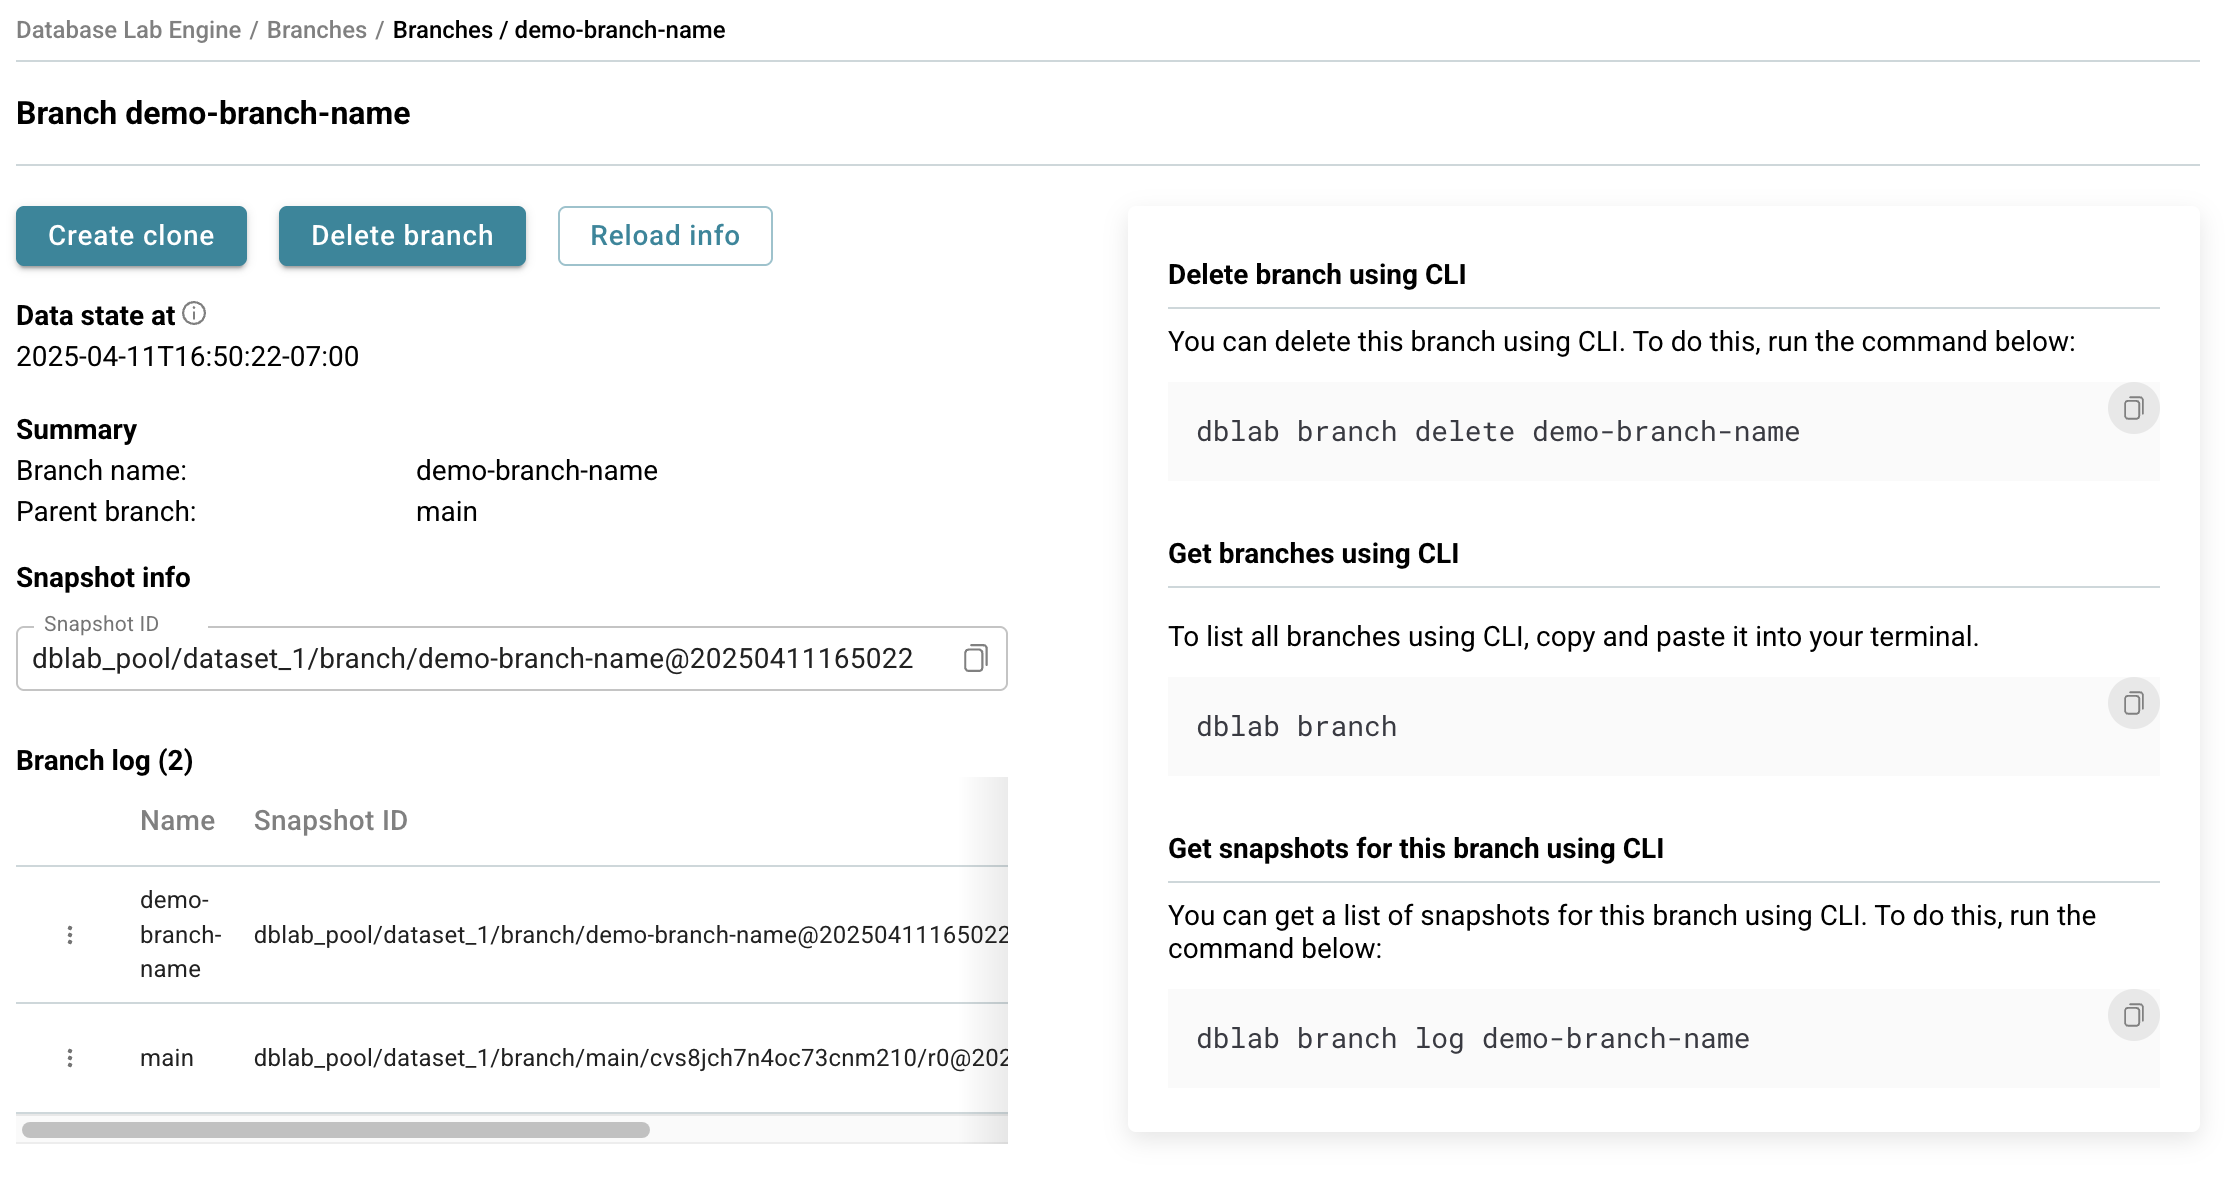
Your new branch is now ready for you to use!
CLI
To create a branch from the command line:
dblab branch my_first_branch
By default, the current branch will be the parent of the new one. You can see your current branch, along with other existing branches, using this command:
dblab branch
Additionally, you can specify the parent branch or the snapshot when creating a branch:
dblab branch --parent-branch my_first_branch my_second_branch

dblab branch --snapshot-id SNAPSHOT_ID my_first_branch
You'll see a list of all your branches with their current status.
Try it out: Create a branch, make some changes to your data, then create another branch from that point. You're now branching like a pro! 🌿
For more, see the full client CLI reference.
Troubleshooting
To troubleshoot:
- Use SSH to connect to the DBLab server
- Check the containers that are running:
sudo docker ps - Check the DBLab container's logs:
sudo docker logs dblab_server - If needed, check Postgres logs for the main branch. They are located in
/var/lib/dblab/dblab_pool/dataset_1/data/logfor the first snapshot of the database, in/var/lib/dblab/dblab_pool/dataset_2/data/logfor the second one (if it's already fetched); if you've configured DBLab to have more than 2 snapshots, check out the other directories too (/var/lib/dblab/dblab_pool/dataset_$N/data/log, where$Nis the snapshot number, starting with1)
Getting support
With DBLab installed from DBLab Platform, guaranteed vendor support is included – please use one of the available ways to contact.