Quick start guide for Amazon RDS over AWS PrivateLink
Set up PostgresAI monitoring for a private Amazon RDS database — one that has no public endpoint — using the guided setup in PostgresAI Console. PostgresAI reaches your database over AWS PrivateLink, so your database is never exposed to the internet: the connection is outbound-only, from your VPC to PostgresAI.
Private-RDS monitoring over AWS PrivateLink is available on the Scale plan and on Enterprise. Consulting clients get it packaged as part of their engagement. If you prefer not to use PrivateLink, you can instead monitor RDS by exposing a publicly reachable database port to PostgresAI (see Cloud installation). See Pricing for the full feature comparison.
Overview
This flow connects a database that lives entirely inside your VPC:
- You create a least-privilege, read-only monitoring role on your RDS instance.
- You launch a one-click CloudFormation stack in your own AWS account. It publishes your RDS over AWS PrivateLink (an internal Network Load Balancer plus a VPC endpoint service) and allowlists only the PostgresAI principal.
- You paste the resulting endpoint-service name back into PostgresAI Console.
- PostgresAI provisions a dedicated monitoring VM, creates an interface endpoint to your service, and starts collecting metrics.
The collector is read-only and metadata-only — it reads statistics, normalized query text, and wait events. It never reads your data or raw query parameters. See data privacy details.
- Single-instance Amazon RDS only. A Multi-AZ instance (primary plus standby) counts as a single instance and is supported. Aurora clusters are not supported by this flow yet.
- PostgreSQL 14 or newer (currently tested up to 18).
- Standard (commercial) AWS Regions only. AWS GovCloud and the China Regions are separate AWS partitions, and PrivateLink cannot connect across partitions. If your database runs there, contact us.
- This flow is for instances that are not publicly accessible. If yours has a public endpoint, that's fine too — the wizard asks about this up front and guides you to the simpler direct-connection setup (Cloud installation) instead, with no CloudFormation stack (see the FAQ).
- One database instance per setup. To also monitor a read replica, run this flow again for the replica — it gets its own stack and its own monitoring instance.
Prerequisites
- A private Amazon RDS for PostgreSQL instance (PostgreSQL 14 or newer) — Publicly accessible is No in the RDS console under Connectivity & security. (A publicly accessible instance is monitored via Cloud installation instead — the wizard will guide you there.)
- A PostgresAI Console account on the Scale plan (or Enterprise). Sign up with Google, LinkedIn, GitHub, or GitLab.
- An organization in PostgresAI Console. Create one if you don't have one yet. You must be an organization admin to provision RDS monitoring.
- A payment method on file. In your organization, open Billing, click Edit payment methods, and add a card in the Stripe portal.
- AWS permissions to launch a CloudFormation stack in the account and Region where your RDS runs (it creates an internal NLB and a VPC endpoint service), and the master database user to run the one-time preparation SQL.
pg_stat_statementslisted inshared_preload_librariesin the instance's parameter group. RDS includes it by default, but custom parameter groups may not — verify withSHOW shared_preload_libraries;. We also recommendtrack_activity_query_size = 16384, so long queries aren't cut off in monitoring. Both settings take effect only after an instance reboot. Check them now: if a change is needed, you can schedule that reboot in advance instead of discovering it mid-setup.
Step 1. Start the guided setup
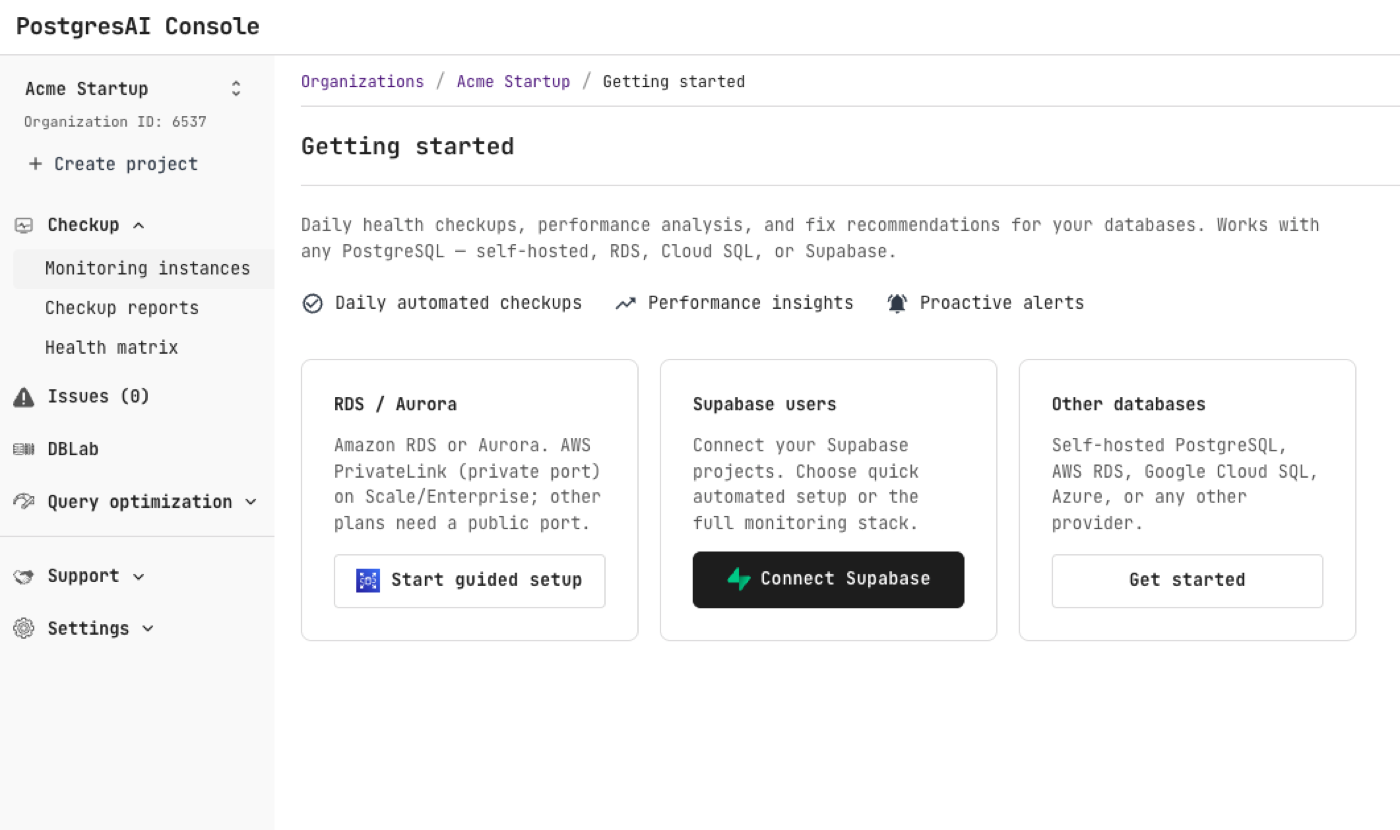
In PostgresAI Console, navigate to DB health — Getting started. On the RDS / Aurora card, click Start guided setup.
Step 2. Choose the Scale (or Enterprise) plan
AWS PrivateLink monitoring runs on the full monitoring stack, which is available on Scale and Enterprise. On the plan page, click Choose Scale (or Contact sales for Enterprise). Consulting clients already have it enabled and can skip this step.
See Pricing for the full list of options with feature comparison.
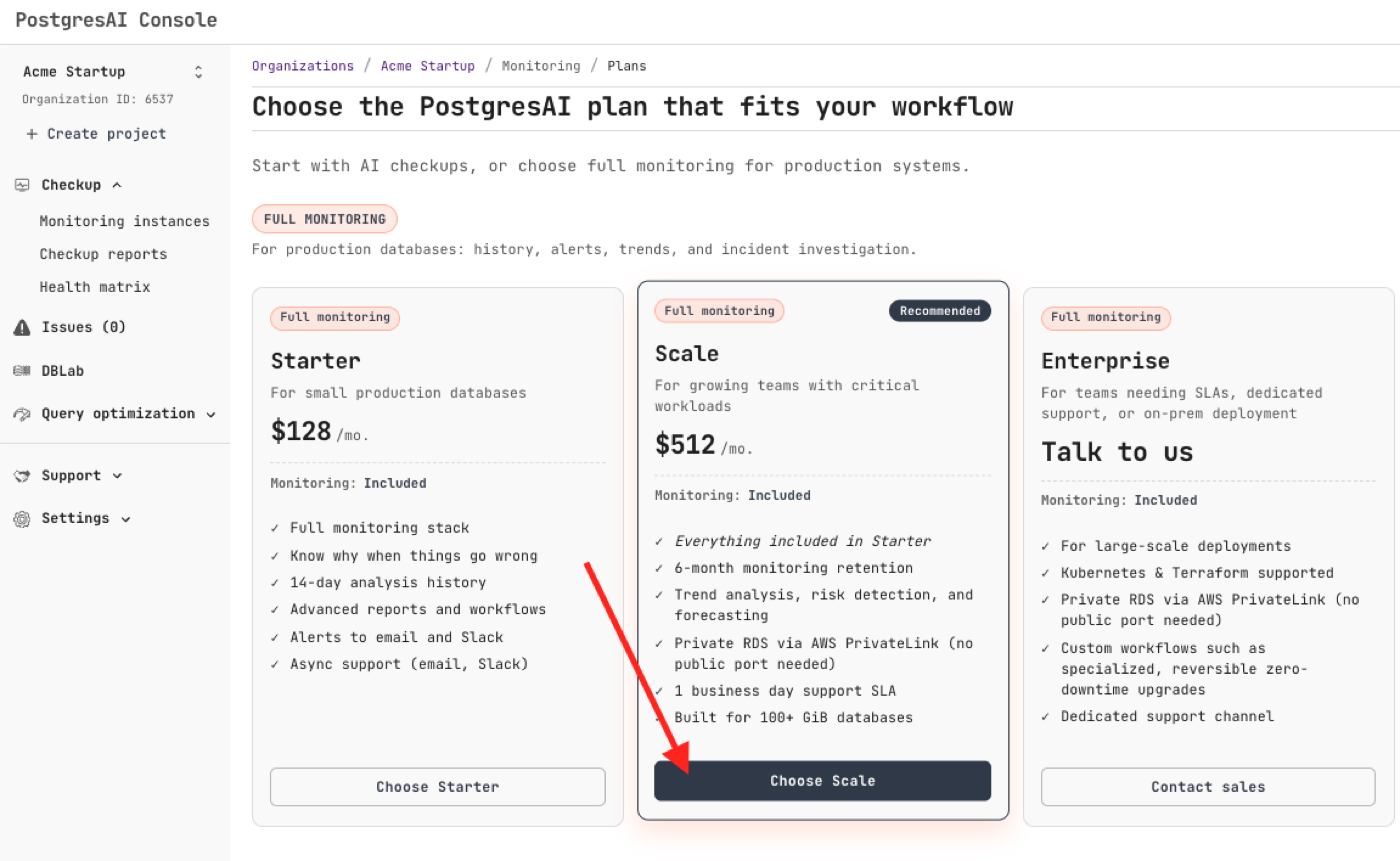
The console screenshot above still shows the retired Starter plan (the Scale card's "Everything included in Starter" bullet refers to it). The Scale card also still shows the previous 6-month monitoring retention; Scale now includes 13-month retention. Starter is no longer offered — click Choose Scale, or contact us about Enterprise.
Step 3. Create the read-only monitoring role
The Set up RDS monitoring over AWS PrivateLink wizard opens. It first asks
Is your RDS instance publicly accessible? — answer No to continue with this guide
(answering Yes routes you to the direct-connection setup instead). Then, in wizard Step 1,
click Generate database-preparation SQL. PostgresAI shows a one-time script that creates the least-privilege,
read-only, metadata-only postgres_ai_mon role, grants pg_monitor, and creates the
postgres_ai schema with a few read-only helper views.
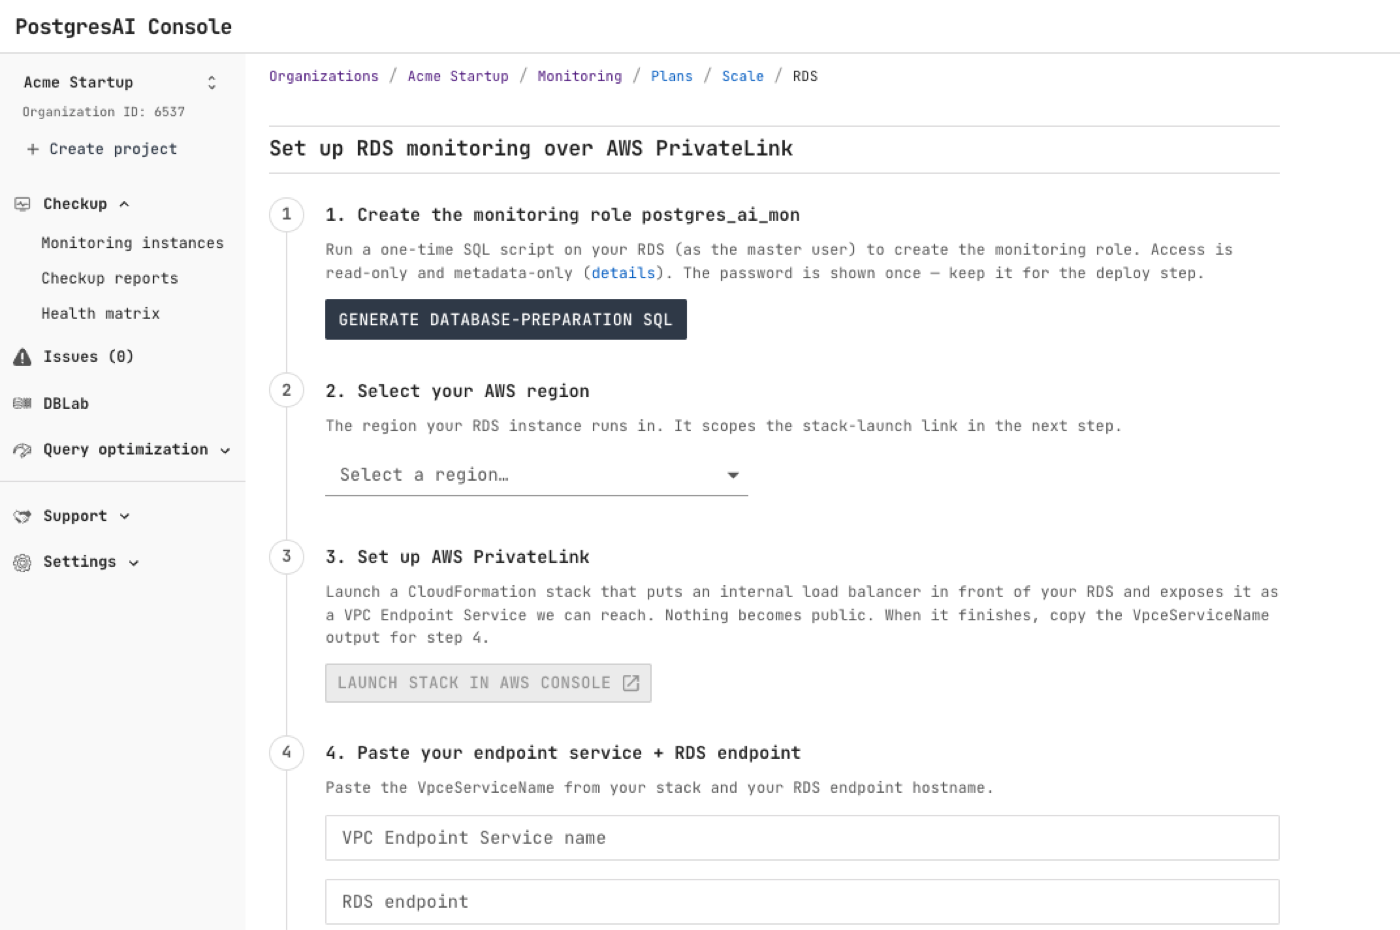
The screenshot above shows an older, four-step version of the wizard. The current wizard opens with the public-accessibility question and has five steps, and you no longer need to save the monitoring-role password — it is embedded in the generated SQL and the console keeps it for the deploy step automatically. Where the screenshot and the text differ, follow the text.
Run it once as the master user, for example:
psql "host=<your-rds-endpoint> port=5432 dbname=<your-database> sslmode=require"
Then paste the SQL shown in the console.
Read through the generated SQL before you run it — it is short, and only creates a read-only role,
the postgres_ai schema, and helper views; it grants no write access and touches no table data.
Make sure you connect to the correct logical database — the one you actually want monitored
(typically your application database, not the default postgres) — because the role and helper
objects are created in whichever database you run the script against.
To review the exact statements at any time, run:
npx postgresai@latest prepare-db --print-sql
This confirms the minimal, read-only nature of the permissions.
Step 4. Launch and fill the CloudFormation stack
Back in the wizard, in Step 2 select your AWS Region (it scopes the stack-launch link, and it must match the Region your RDS runs in). In Step 3, click Launch stack in AWS Console. This opens the AWS Quick create stack page in your own account, pre-filled with the PostgresAI principal to allowlist. The launch link carries only non-secret parameters. (Wizard Step 3 also offers a Terraform option that produces the same result — this guide follows the CloudFormation path.)
Review the template (it is intentionally published and line-by-line auditable), then fill in the typed parameters:
- Stack name — pre-filled as
postgresai-rds-privatelink; keep it unless you have your own naming convention. - RDS DB instance identifier — your RDS instance's identifier, taken from the RDS console (a single-instance Amazon RDS, not an Aurora cluster).
- RDS port — default
5432. - VPC of the RDS — the VPC your RDS instance runs in (a typed
AWS::EC2::VPC::Iddropdown). - Subnets (the RDS's AZs) — pick one subnet per Availability Zone your RDS can run in. For a Multi-AZ instance, select the subnets for all of its AZs so the internal load balancer can follow the database if it fails over. They must be in the VPC above and able to reach the RDS (no NAT gateway or special egress is required — it stays inside the VPC).
- RDS security group (NLB→RDS access) — the security group attached to your RDS instance. The stack adds exactly one inbound rule to it: TCP on the port above, from the load balancer's own security group. Without that rule the stack still creates fine, but the load balancer can never reach the database — the monitoring deployment later fails as unreachable. The rule is removed automatically when you delete the stack. Find the group in the RDS console under Connectivity & security → VPC security groups. If your RDS has more than one security group, pick the one that lets your application connect — a wrong pick leaves the setup "deployed but unreachable".
- PostgresAI principal ARN (allowlist) — pre-filled; leave it as-is unless instructed otherwise.
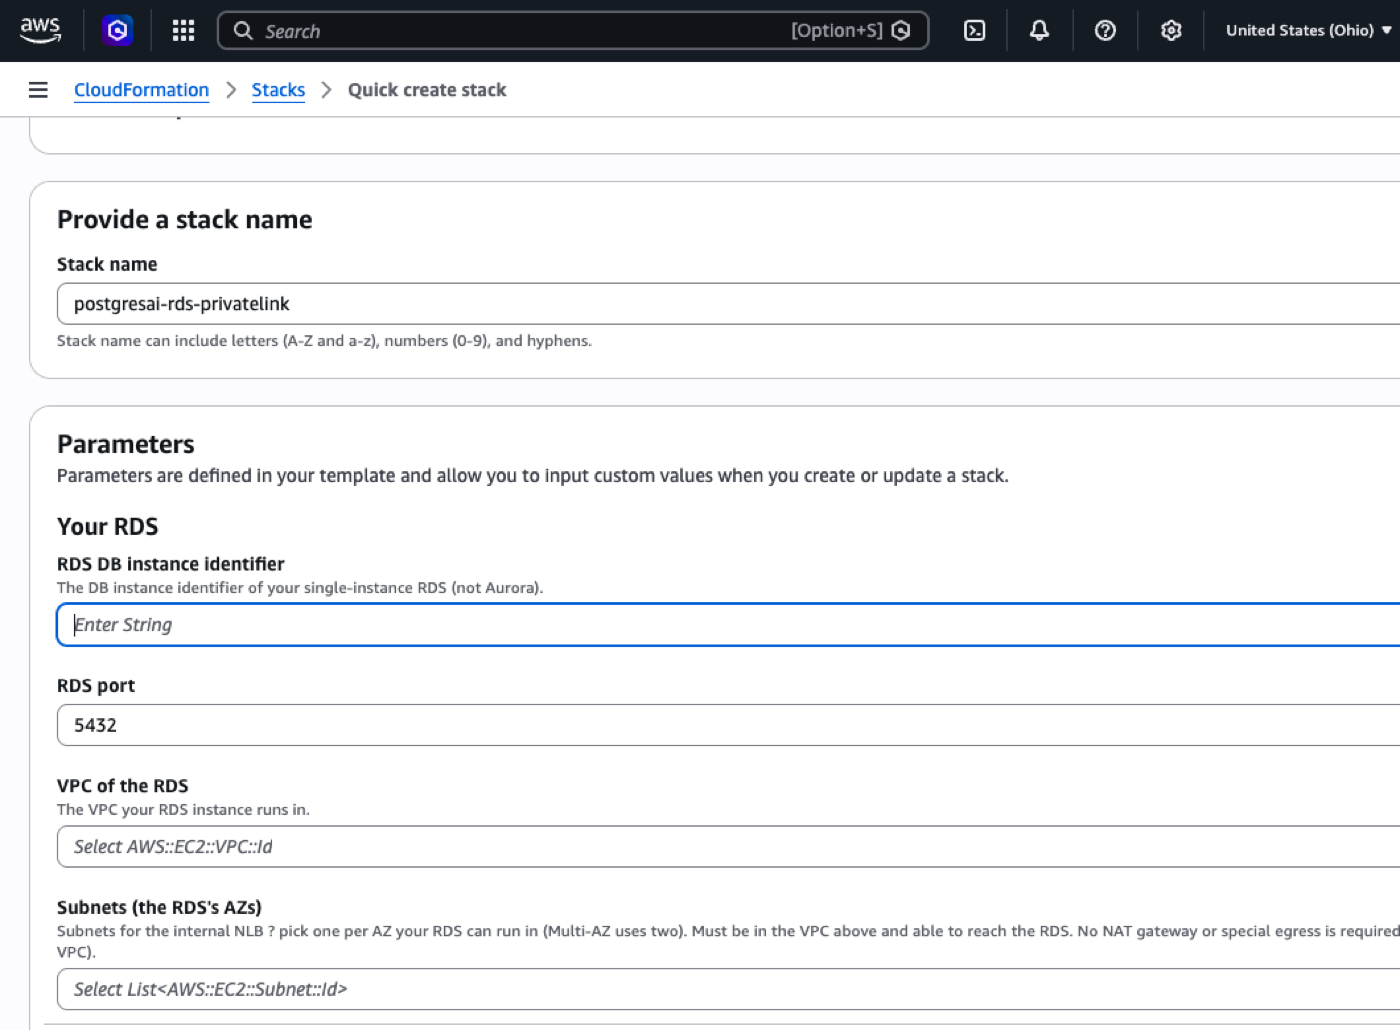
A filled-in example — note that all of the RDS's subnets are selected for failover coverage:
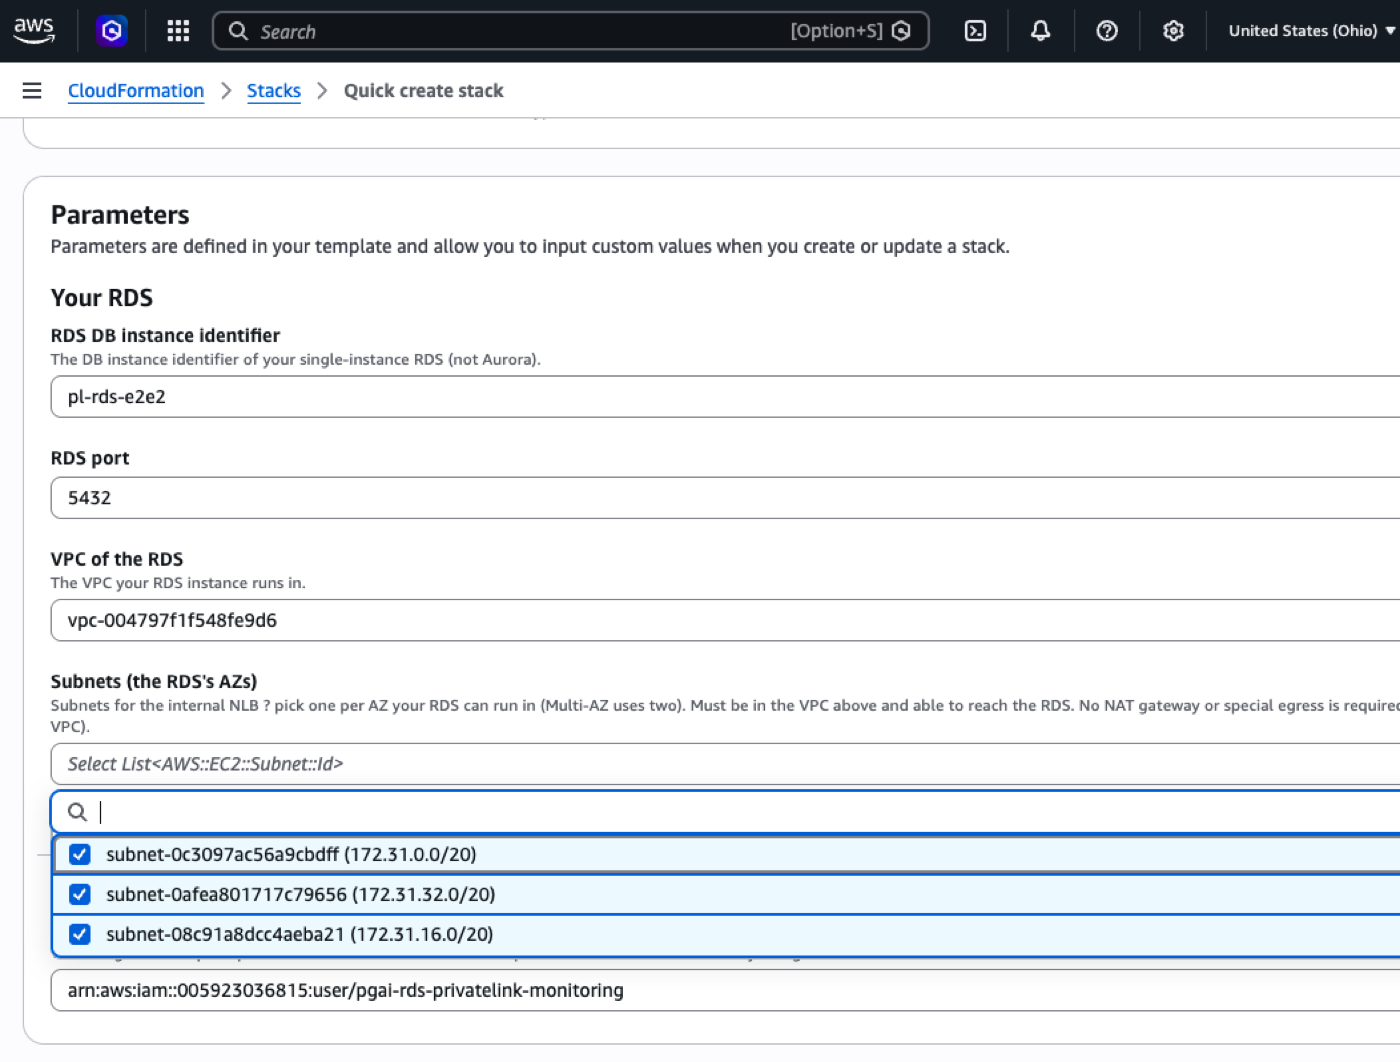
The two screenshots above predate the RDS security group parameter — the current form has one more field than shown.
The stack creates an internal Network Load Balancer in front of your RDS primary (its target IP is kept current by a small failover Lambda) and a VPC endpoint service — the AWS PrivateLink provider — that allows only the PostgresAI principal. Nothing is exposed to the internet and no public database port is created; the only new inbound rule is the internal one described above (load balancer → database, inside your VPC), and the path to PostgresAI is outbound-only.
Your RDS instance, the Network Load Balancer, and the VPC endpoint service must all be in the same AWS Region — this setup does not support cross-Region connections. Make sure the Region you selected in PostgresAI Console matches the Region of your RDS.
The stack validates your RDS instance first — a failed check means nothing in your account was changed. If the check fails — for example, the instance is publicly accessible, or the identifier is mistyped — CloudFormation rolls the stack back, and a rolled-back stack cannot be retried in place. Fix the cause first, then delete the failed stack, then click the launch link again to create it fresh.
If the check failed because your instance is publicly accessible, you have two options: keep the instance as it is and use the direct-connection setup (delete the failed stack, go back to the wizard, and answer Yes to the public-accessibility question), or — if the instance was public by mistake — make it private, delete the failed stack, and launch it again.
Step 5. Copy the endpoint-service name
When the stack reaches CREATE_COMPLETE, open its Outputs tab and copy the
VpceServiceName value — it looks like com.amazonaws.vpce.<region>.vpce-svc-0abc….
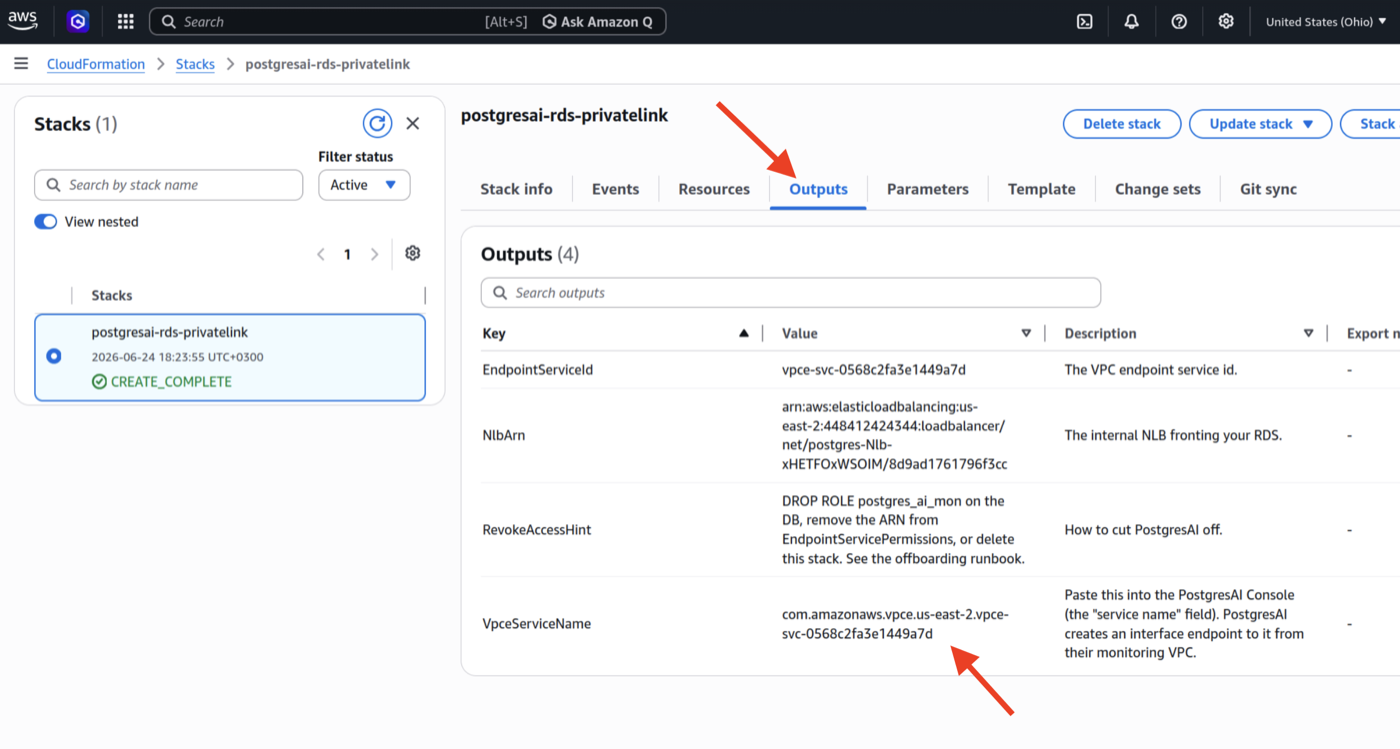
The RevokeAccessHint output tells you exactly how to cut PostgresAI off later (drop the role,
remove the principal from the endpoint-service permissions, or delete the stack).
Step 6. Paste it back and deploy
Back in PostgresAI Console (wizard Step 4), fill in the four fields:
- VPC Endpoint Service name — paste the
VpceServiceNamevalue. - RDS endpoint — your RDS endpoint hostname (see the caution below).
- Port — usually
5432. - Database — the logical database you ran the preparation SQL against.
Then, in wizard Step 5, click Deploy monitoring.
Copy the endpoint exactly as the RDS console shows it (Connectivity & security → Endpoint),
for example mydb.abc123xyz.us-east-1.rds.amazonaws.com:
- No port in the endpoint field. The port has its own field; entering
mydb....rds.amazonaws.com:5432as the endpoint fails the deployment. - No scheme. Don't add
postgres://orhttps://. - The real RDS endpoint, not an alias. The deployment verifies the database's TLS certificate, and the certificate only matches the real endpoint name — a CNAME or internal DNS alias fails that check.
Step 7. Wait for deployment
PostgresAI provisions a dedicated monitoring VM, creates an interface endpoint to your endpoint service over AWS PrivateLink, and connects to your database as the read-only role.
The connection is verified automatically before monitoring is reported as active: PostgresAI confirms it can reach the database, that the monitoring role works, and that the database belongs to your organization. Once all checks pass, the console shows Monitoring active — this database is now being monitored.
While waiting, you can set up the CLI tools:
# Install CLI
npm i -g postgresai

# Authenticate
postgresai auth

# Set up MCP for your AI coding tool (Cursor, Claude Code, etc.)
postgresai mcp install
The installation-progress, Grafana sign-in, and first-Issues screens are identical for every PostgresAI monitoring setup. See the Supabase quick start (steps 5–8) for screenshots of those steps.
Step 8. Open Grafana dashboards
Once monitoring is active, open the Grafana URL from the console. You can sign in with the Grafana credentials shown after deployment, or click Sign in with PostgresAI for passwordless access.
Start with 01. Single node performance overview (high-level) for a high-level health check of your RDS database. Key panels to check first:
- Active session history (ASH) — wait events over time (similar to RDS Performance Insights)
- Sessions — active, idle, and idle in transaction connections
- TPS — transactions per second
- QPS — queries per second
Step 9. Review first issues
After about 30 minutes, PostgresAI generates the first automated issue reports. Navigate to Issues in PostgresAI Console to see detected problems and recommended actions.
Common issues detected automatically include:
- Redundant indexes — duplicate indexes wasting storage
- Unused indexes — indexes that are never scanned
- Invalid indexes — indexes that failed to build
- Autovacuum tuning — recommended configuration changes
- Minor version updates — available PostgreSQL updates
See How to work with issues for details on managing issues, assigning team members, and integrating with AI coding tools.
Next steps
- Dashboard guide — complete dashboard reference
- PostgresAI CLI — CLI setup and commands
- MCP integration — set up MCP for Cursor, Claude Code, or other AI coding tools
FAQ
Does PostgresAI open any inbound ports on my account?
Not to the internet, and not to PostgresAI. The connection uses AWS PrivateLink and is
outbound-only: your VPC endpoint service exposes the database to the PostgresAI principal you
allowlist, with no public database port. The one inbound security-group rule the stack adds is
internal to your VPC — it lets the stack's own load balancer reach the database — and it is
removed when you delete the stack. To cut PostgresAI off, drop the monitoring role, remove the
PostgresAI principal from the endpoint-service permissions, or delete the CloudFormation stack
(see the RevokeAccessHint stack output).
What database role is created and what permissions does it have?
The postgres_ai_mon role is created with read-only, metadata-only access (pg_monitor plus the
postgres_ai helper schema). On RDS, optional superuser-only grants are skipped
(include_optional = false). To review the exact SQL statements at any time:
npx postgresai@latest prepare-db --print-sql
What data is collected from my database?
Only database metadata — no actual data or raw query parameters. Query text is collected
normalized (parameters stripped) from pg_stat_statements. To review exactly what metrics are
collected, examine the metric definitions:
- Prometheus sink metrics: metrics.yml (pgwatch-prometheus)
- PostgreSQL sink metrics (including normalized queries): metrics.yml (pgwatch-postgres)
See also: data privacy details.
What if my RDS instance is publicly accessible?
Then you usually don't need PrivateLink at all. The wizard asks about this up front — answer Yes and it guides you to the simpler Cloud installation setup, which connects directly and needs no CloudFormation stack.
If you launched the stack anyway, it fails on purpose, with a clear message in the stack's Events tab: this flow supports only instances without a public endpoint. Delete the failed stack (the rollback removes everything it created), then either continue with the direct-connection setup, or — if the instance was public by mistake — make it private and launch the stack again. Changing Publicly accessible affects how existing clients reach the database, so plan that change carefully.
What happens when my Multi-AZ instance fails over?
The stack includes a small Lambda function that notices the failover and re-points the internal load balancer at the database's new address. Monitoring continues automatically. This is also why the stack asks for a subnet in every Availability Zone your instance can run in: a failover into a zone the load balancer doesn't cover can leave monitoring with no working path.
Can I monitor a read replica too?
A replica is monitored as its own setup: a second CloudFormation stack pointing at the replica's instance identifier, added in the console as its own instance. The monitoring role doesn't need to be created again — roles created on the primary replicate to the replica. Each monitored endpoint counts as a separate monitoring instance. You can do all of this yourself; if you'd like help, contact us.
What does this cost on my AWS side?
The stack creates an internal Network Load Balancer (the main cost — see AWS pricing for your Region), two small Lambda functions (one runs only on stack events — create, update, delete; the other runs briefly every minute to keep the load balancer pointed at the database — its cost is negligible), and a VPC endpoint service (free — in PrivateLink terms you are the "provider"; the interface endpoint on the other side is PostgresAI's cost). Monitoring traffic itself is small and stays inside AWS.
Our security team wants to review this. What should they look at?
The CloudFormation template is intentionally short and published in full — the launch link shows it in your own account before anything is created. Common review questions, answered:
- What does it change in our account? It creates new resources: an internal load balancer with its own security group, a VPC endpoint service, two Lambda functions sharing one IAM role (allowed actions: describing RDS instances, registering/deregistering load-balancer targets and checking their health, and writing logs — no other actions, though the template grants them account-wide rather than scoped to single resources), and the failover triggers: an every-minute event rule, an SNS topic, and an RDS event subscription. It makes exactly one change to an existing resource: one inbound rule on the RDS security group you name, allowing TCP from the load balancer only. Deleting the stack removes that rule.
- Who can connect to the endpoint service? Only the single PostgresAI principal you allowlist — an IAM user in PostgresAI's dedicated collector account. Nobody else can create an interface endpoint to your service, even knowing the service name.
- Why are connections accepted automatically? Because the allowlist already limits who can connect to that single PostgresAI principal. Manual acceptance would add a step without adding control.
- What can the database role read? Metadata only — see the role and data questions above.
What about Aurora, GovCloud, Azure, or self-managed Postgres?
Not through this flow yet. The one-click stack supports single-instance RDS in standard (commercial) AWS Regions only: Aurora isn't supported, and AWS GovCloud is a separate AWS partition that PrivateLink cannot reach across. For Azure, self-managed, and on-premises databases, see the other installation options or contact us.
Why is private-RDS monitoring available only on Scale and Enterprise?
The AWS PrivateLink path provisions dedicated infrastructure (a monitoring VM and an interface endpoint) and is part of the full monitoring stack, available on the Scale plan and Enterprise. Consulting clients get it packaged with their engagement. If you prefer not to use PrivateLink, you can instead monitor RDS by exposing a publicly reachable database port — see Cloud installation.